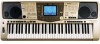
Yamaha PSR-A1000 Owner's Manual - Page 79
Editing Voices — Sound Creator, Operation
 |
View all Yamaha PSR-A1000 manuals
Add to My Manuals
Save this manual to your list of manuals |
Page 79 highlights
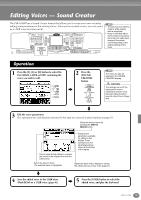
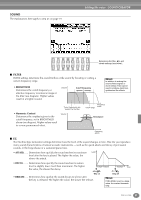
Editing Voices - Sound Creator The PSR-A1000 has a Sound Creator feature that allows you to create your own voices by editing some parameters of the existing voices. Once you've created a voice, you can save it as a USER voice for future recall. DIGITAL STUDIO SOUND CREATOR • The Voice can be edited in realtime while playing back a song/style. • Keep in mind that adjustments made to the parameters may not make much change in the actual sound depending on the original settings of the voice. Operation 1 Press the [F], [G] or [H] button to select the Part (MAIN, LAYER or LEFT) containing the voice you wish to edit. F G H I J 2 Press the [SOUND CREATOR] button. DIGITAL STUDIO SOUND CREATOR DIGITAL RECORDING MIXING CONSOLE PART The voice can also be selected in the SOUND CREATOR display. CAUTION The settings are lost if the edited part's voice is switched to another voice. Important data should be saved to User Drive or floppy disk. 3 Edit the voice parameters. The operations for each function selected in this step are covered in detail starting on page 81. Select the desired menu by pressing the [NEXT]/ [BACK] button. Indicates the parameters available for editing in this display. These correspond to the parameters/values shown at the bottom of the display. Can be used during editing to compare the sound of the original voice with the edited voice. Select the desired menu. The selected menu is highlighted. Opens the Save (Voice) display for saving the edited voice as a User voice (page 41). 4 Save the edited voice to the USER drive (Flash ROM) as a USER voice (page 41). 5 Press the [USER] button to select the edited voice, and play the keyboard. PSR-A1000 79
-
 1
1 -
2
-
3
-
4
-
5
-
6
-
7
-
8
-
9
-
10
-
11
-
12
-
13
-
14
-
15
-
16
-
17
-
18
-
19
-
20
-
21
-
22
-
23
-
24
-
25
-
26
-
27
-
28
-
29
-
30
-
31
-
32
-
33
-
34
-
35
-
36
-
37
-
38
-
39
-
40
-
41
-
42
-
43
-
44
-
45
-
46
-
47
-
48
-
49
-
50
-
51
-
52
-
53
-
54
-
55
-
56
-
57
-
58
-
59
-
60
-
61
-
62
-
63
-
64
-
65
-
66
-
67
-
68
-
69
-
70
-
71
-
72
-
73
-
 74
74 -
 75
75 -
 76
76 -
 77
77 -
 78
78 -
 79
79 -
 80
80 -
 81
81 -
 82
82 -
 83
83 -
 84
84 -
85
-
86
-
87
-
88
-
89
-
90
-
91
-
92
-
93
-
94
-
95
-
96
-
97
-
98
-
99
-
100
-
101
-
102
-
103
-
104
-
105
-
106
-
107
-
108
-
109
-
110
-
111
-
112
-
113
-
114
-
115
-
116
-
117
-
118
-
119
-
120
-
121
-
122
-
123
-
124
-
125
-
126
-
127
-
128
-
129
-
130
-
131
-
132
-
133
-
134
-
135
-
136
-
137
-
138
-
139
-
140
-
141
-
142
-
143
-
144
-
145
-
146
-
147
-
148
-
149
-
150
-
151
-
152
-
153
-
154
-
155
-
156
 |
 |
