Yamaha PSR-S550B Owner's Manual - Page 17
Basic Operation, Calling up the Operation Displays
 |
View all Yamaha PSR-S550B manuals
Add to My Manuals
Save this manual to your list of manuals |
Page 17 highlights
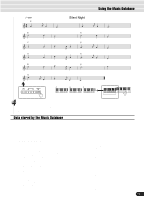
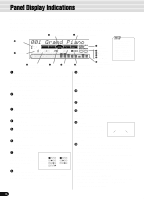
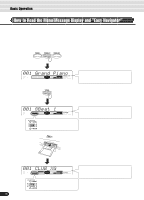
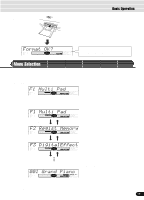
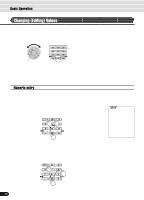
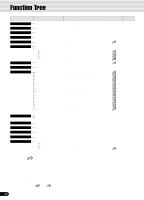
Basic Operation This section introduces you to the basic operations common to the various functions of the PSR-550. In particular, you'll learn how to use the menu/message display at the center of the front panel. • Calling up the Operation Displays page 17 • How to read the Menu/message display and the "Easy Navigator page 18 • Menu Selection page 19 • Changing (Editing) Values page 20 • Naming ...page 21 • Direct Access ...page 21 Calling up the Operation Displays Press the buttons listed below in order to call up the appropriate displays for the various functions of the PSR-550. • DEMO button page 13 • RECORD button pages 25, 78, 92, 96 • SONG button page 25 • STYLE button pages 25, 32 • MUSIC DATABASE button page 14 • VOICE L button page 28 • VOICE R1 button page 26 • VOICE R2 button page 27 • VOICE CHANGE button page 75 • MIXER button page 76 • ACMP/SONG VOL button pages 37, 70 • TEMPO/TAP button page 36 • TRANSPOSE button page 30 • FUNCTION button page 118 • DISK LOAD button page 62 • DISK SAVE button page 60 • DISK UTILITY button pages 64, 67 Pressing one of these buttons instantly calls up the relevant display for the selected function. See the function tree chart for details (page 22). If you've selected several different functions' displays in succession, you can "retrace your steps" and revisit each display by using the [BACK] and [NEXT] buttons at the left side of the display. Of course you can also directly select the desired displays by pressing the appropriate buttons (as listed above). How to leave the current display As shown in the function tree chart (page 22), there is a wide varierty of functions on the PSR-550, each with its own corresponding display. In order to leave the display of each function press the [EXIT] button. Since the PSR-550 has so many different displays, you may occasionally find yourself confused as to which operation's display is currently shown. If this happens, you can return to "home base" by pressing the [EXIT] button several times. This returns the PSR-550 to the default display - the same display that appears when the power is turned on. 17 15
-
 1
1 -
2
-
3
-
4
-
5
-
6
-
7
-
8
-
9
-
10
-
11
-
 12
12 -
 13
13 -
 14
14 -
 15
15 -
 16
16 -
 17
17 -
 18
18 -
 19
19 -
 20
20 -
 21
21 -
 22
22 -
23
-
24
-
25
-
26
-
27
-
28
-
29
-
30
-
31
-
32
-
33
-
34
-
35
-
36
-
37
-
38
-
39
-
40
-
41
-
42
-
43
-
44
-
45
-
46
-
47
-
48
-
49
-
50
-
51
-
52
-
53
-
54
-
55
-
56
-
57
-
58
-
59
-
60
-
61
-
62
-
63
-
64
-
65
-
66
-
67
-
68
-
69
-
70
-
71
-
72
-
73
-
74
-
75
-
76
-
77
-
78
-
79
-
80
-
81
-
82
-
83
-
84
-
85
-
86
-
87
-
88
-
89
-
90
-
91
-
92
-
93
-
94
-
95
-
96
-
97
-
98
-
99
-
100
-
101
-
102
-
103
-
104
-
105
-
106
-
107
-
108
-
109
-
110
-
111
-
112
-
113
-
114
-
115
-
116
-
117
-
118
-
119
-
120
-
121
-
122
-
123
-
124
-
125
-
126
-
127
-
128
-
129
-
130
-
131
-
132
-
133
-
134
-
135
-
136
-
137
-
138
-
139
-
140
-
141
-
142
-
143
-
144
-
145
-
146
-
147
-
148
-
149
-
150
-
151
-
152
-
153
-
154
-
155
-
156
-
157
-
158
-
159
-
160
 |
 |
