Yamaha PSR-S550B Owner's Manual - Page 93
M.Pad Recording, Rehearsal, Rec Pad, M.Pad Rec:Record, M.Pad Rec Ready
 |
View all Yamaha PSR-S550B manuals
Add to My Manuals
Save this manual to your list of manuals |
Page 93 highlights
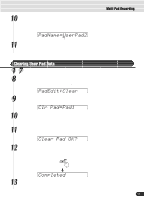
Multi Pad Recording 5 Press the [NEXT] button to display the RecMode screen. 6 Select "Record". Use the data dial, the [+/YES] button or the [-/NO] button. M.Pad Rec:Record 7 Press the [NEXT] button to display the pad number selection screen. 8 Select a Pad number to record. Use the data dial, the [+/YES] button, the [-/NO] button, or the MULTI PAD buttons [1]-[4]. Rec Pad =Pad1 9 Press the [NEXT] button to display the Rehearsal screen. Voices can be set from this display. After completing the desired settings, press the [EXIT] button to return to this display. Rehearsal 10 Press the [NEXT] button to display the Record ready screen. The beat indicator dots will flash at the currently set tempo, indicating that the record ready (Synchro Start) mode is engaged. BEAT M.Pad Rec Ready 11 Start recording. • Recording starts as soon as you play a key on the keyboard. • Recording can also be started by pressing the [START/STOP] button. M.Pad Recording If you are recording a Chord match phrase, use only the CM7 scale tones (i.e. C, D, E, G, A and B). CSC CSC C = chord tone C, S = scale tones 12 Press the [START/STOP] button to stop recording. 13 Press the [RECORD] button to exit from the Record mode. 93 91
-
 1
1 -
2
-
3
-
4
-
5
-
6
-
7
-
8
-
9
-
10
-
11
-
12
-
13
-
14
-
15
-
16
-
17
-
18
-
19
-
20
-
21
-
22
-
23
-
24
-
25
-
26
-
27
-
28
-
29
-
30
-
31
-
32
-
33
-
34
-
35
-
36
-
37
-
38
-
39
-
40
-
41
-
42
-
43
-
44
-
45
-
46
-
47
-
48
-
49
-
50
-
51
-
52
-
53
-
54
-
55
-
56
-
57
-
58
-
59
-
60
-
61
-
62
-
63
-
64
-
65
-
66
-
67
-
68
-
69
-
70
-
71
-
72
-
73
-
74
-
75
-
76
-
77
-
78
-
79
-
80
-
81
-
82
-
83
-
84
-
85
-
86
-
87
-
 88
88 -
 89
89 -
 90
90 -
 91
91 -
 92
92 -
 93
93 -
 94
94 -
 95
95 -
 96
96 -
 97
97 -
 98
98 -
99
-
100
-
101
-
102
-
103
-
104
-
105
-
106
-
107
-
108
-
109
-
110
-
111
-
112
-
113
-
114
-
115
-
116
-
117
-
118
-
119
-
120
-
121
-
122
-
123
-
124
-
125
-
126
-
127
-
128
-
129
-
130
-
131
-
132
-
133
-
134
-
135
-
136
-
137
-
138
-
139
-
140
-
141
-
142
-
143
-
144
-
145
-
146
-
147
-
148
-
149
-
150
-
151
-
152
-
153
-
154
-
155
-
156
-
157
-
158
-
159
-
160
 |
 |
