Yamaha PSR-S550B Owner's Manual - Page 38
Chord Fingerings, Fingering =Singl, Fingering =F1
 |
View all Yamaha PSR-S550B manuals
Add to My Manuals
Save this manual to your list of manuals |
Page 38 highlights
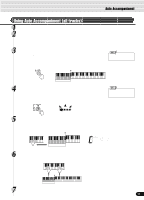
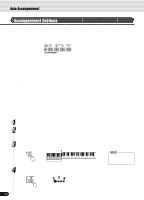
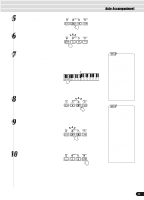
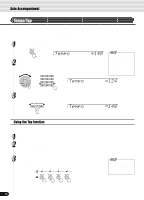
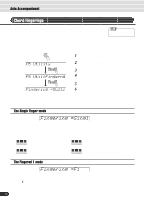
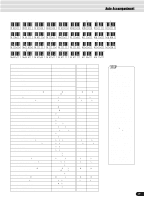
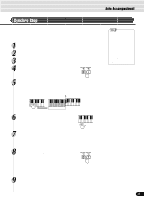
Auto Accompaniment Chord Fingerings The way in which chords are played or indicated with your left hand (in the auto accompaniment section of the keyboard) is referred to as "fingering". There are 5 types of fingerings as described below. • Multi Finger page 40 • Single Finger page 38 • Fingered 1 page 38 • Fingered 2 page 40 • Full Keyboard page 40 • The default fingering mode is "Multi Finger". 1 Press the [FUNCTION] button. F5 Utility F5 Util:Fingerng Fingering =Multi 2 Select ''Utility'' by using the data dial, the [+/YES] button or the [-/NO] button. 3 Press the [NEXT] button. 4 Select ''Fingerng'' by using the data dial, the [+/ YES] button or the [-/NO] button. 5 Press the [NEXT] button. 6 Select the way in which chords are played or indicated (Fingering) by using the data dial, the [+/ YES] button or the [-/NO] button. The operations for each function corresponding to step #6 are covered in the following explanations. The Single Finger mode Fingering =Singl Single-finger accompaniment makes it simple to produce beautifully orchestrated accompaniment using major, seventh, minor and minor-seventh chords by pressing a minimum number of keys on the Auto accompaniment section of the keyboard. The following abbreviated chord fingerings are used: C C7 • For a major chord, press the root key only. • For a seventh chord, simultaneously press the root key and a white key to its left. Cm Cm7 • For a minor chord, simultaneously press the root key and a black key to its left. • For a minor-seventh chord, simultaneously press the root key and both a white and black key to its left. The Fingered 1 mode Fingering =F1 The Fingered 1 mode lets you finger your own chords on the Auto accompaniment section of the keyboard (i.e. all keys to the left of and including the split-point key - normally F#2) while the PSR-550 supplies appropriately orchestrated rhythm, bass and chord accompaniment in the selected style. The Fingered 1 mode recognizes the following chords: 38 36
-
 1
1 -
2
-
3
-
4
-
5
-
6
-
7
-
8
-
9
-
10
-
11
-
12
-
13
-
14
-
15
-
16
-
17
-
18
-
19
-
20
-
21
-
22
-
23
-
24
-
25
-
26
-
27
-
28
-
29
-
30
-
31
-
32
-
 33
33 -
 34
34 -
 35
35 -
 36
36 -
 37
37 -
 38
38 -
 39
39 -
 40
40 -
 41
41 -
 42
42 -
 43
43 -
44
-
45
-
46
-
47
-
48
-
49
-
50
-
51
-
52
-
53
-
54
-
55
-
56
-
57
-
58
-
59
-
60
-
61
-
62
-
63
-
64
-
65
-
66
-
67
-
68
-
69
-
70
-
71
-
72
-
73
-
74
-
75
-
76
-
77
-
78
-
79
-
80
-
81
-
82
-
83
-
84
-
85
-
86
-
87
-
88
-
89
-
90
-
91
-
92
-
93
-
94
-
95
-
96
-
97
-
98
-
99
-
100
-
101
-
102
-
103
-
104
-
105
-
106
-
107
-
108
-
109
-
110
-
111
-
112
-
113
-
114
-
115
-
116
-
117
-
118
-
119
-
120
-
121
-
122
-
123
-
124
-
125
-
126
-
127
-
128
-
129
-
130
-
131
-
132
-
133
-
134
-
135
-
136
-
137
-
138
-
139
-
140
-
141
-
142
-
143
-
144
-
145
-
146
-
147
-
148
-
149
-
150
-
151
-
152
-
153
-
154
-
155
-
156
-
157
-
158
-
159
-
160
 |
 |
