Yamaha PSR-S550B Owner's Manual - Page 40
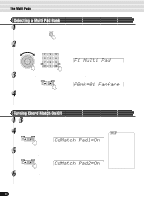
Accompaniment Split Point, Fingering =F2
 |
View all Yamaha PSR-S550B manuals
Add to My Manuals
Save this manual to your list of manuals |
Page 40 highlights
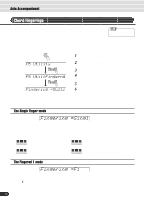
Auto Accompaniment The Fingered 2 mode Fingering =F2 This is essentially the same as the Fingered 1 mode, described above, except that the Fingered 2 mode additionally allows you to specify the lowest note of each chord - simply, the lowest note played in the Auto accompaniment section of the keyboard is used as the accompaniment bass note. This means you can specify "on-bass" chords in which the main bass note for the chord is not the root of the chord. For a C major chord, for example, you could use E (the third) or G (the fifth) as the bass note rather than C. C C on E C on G The Full Keyboard mode Fingering =Full When the Full Keyboard Mode is selected, the PSR-550 will automatically create appropriate accompaniment while you play just about anything using both hands, anywhere on the keyboard. You do not have to worry about specifying the accompaniment chords. The name of the detected chord will appear in the display. • When the Full Keyboard mode is selected, the split point setting (see below) for the auto accompaniment will be ignored. The Multi Finger mode Fingering =Multi This is the default accompaniment mode. The Multi Finger mode automatically detects Single Finger or Fingered 1 chord fingerings, so you can use either type of fingering without having to switch fingering modes. • If you want to play minor, seventh or minor seventh chords using the Single Finger operation in the Multi Finger Mode, always press the closest white/black key(s) to the root of the chord. Accompaniment Split Point The point on the keyboard that separates the auto accompaniment section and the righthand section of the keyboard is called the "split point". The initial setting (factory setting) of the split point is "F#2"; however, this can be set to any key you wish. Refer to page 118 for instructions on how to set the split point. Split Point (F#2) Auto Accompaniment section 40 38
-
 1
1 -
2
-
3
-
4
-
5
-
6
-
7
-
8
-
9
-
10
-
11
-
12
-
13
-
14
-
15
-
16
-
17
-
18
-
19
-
20
-
21
-
22
-
23
-
24
-
25
-
26
-
27
-
28
-
29
-
30
-
31
-
32
-
33
-
34
-
 35
35 -
 36
36 -
 37
37 -
 38
38 -
 39
39 -
 40
40 -
 41
41 -
 42
42 -
 43
43 -
 44
44 -
 45
45 -
46
-
47
-
48
-
49
-
50
-
51
-
52
-
53
-
54
-
55
-
56
-
57
-
58
-
59
-
60
-
61
-
62
-
63
-
64
-
65
-
66
-
67
-
68
-
69
-
70
-
71
-
72
-
73
-
74
-
75
-
76
-
77
-
78
-
79
-
80
-
81
-
82
-
83
-
84
-
85
-
86
-
87
-
88
-
89
-
90
-
91
-
92
-
93
-
94
-
95
-
96
-
97
-
98
-
99
-
100
-
101
-
102
-
103
-
104
-
105
-
106
-
107
-
108
-
109
-
110
-
111
-
112
-
113
-
114
-
115
-
116
-
117
-
118
-
119
-
120
-
121
-
122
-
123
-
124
-
125
-
126
-
127
-
128
-
129
-
130
-
131
-
132
-
133
-
134
-
135
-
136
-
137
-
138
-
139
-
140
-
141
-
142
-
143
-
144
-
145
-
146
-
147
-
148
-
149
-
150
-
151
-
152
-
153
-
154
-
155
-
156
-
157
-
158
-
159
-
160
 |
 |
