Yamaha PSR-S900 Owner's Manual - Page 57
Singing Along with Song Playback (Karaoke) or Your Own Performance
 |
View all Yamaha PSR-S900 manuals
Add to My Manuals
Save this manual to your list of manuals |
Page 57 highlights
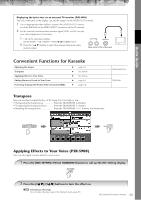
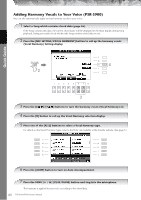
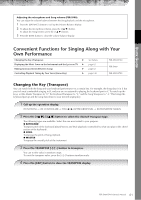
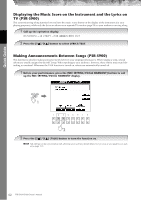
Singing Along with Song Playback (Karaoke) or Your Own Performance If the selected song has lyric data, you can have the lyrics shown in the display by playing back the song. Sing the song while viewing the lyrics on the display. Since the PSR-S900 is equipped with the MIC/LINE IN jack, you can sing a song using a microphone. Quick Guide Connecting a Microphone (PSR-S900 only) 1 Make sure you have a conventional dynamic microphone. 2 Set the [INPUT VOLUME] knob on the rear panel of the instrument to the minimum position. 3 Connect the microphone to the [MIC/LINE IN] jack. n Always set the INPUT VOLUME to minimum when nothing is connected to the [MIC/LINE IN] jack. Since the [MIC/LINE IN] jack is highly sensitive, it may pick up and produce noise even when nothing is connected. 3 2,5 4 4 Set the [LINE MIC] switch to "MIC." 5 (For microphones having a power source, turn on the power first.) Adjust the [INPUT VOLUME] knob while singing into the microphone. Adjust the control while checking the SIGNAL lamp. The SIGNAL lamp is located at the [MIC SETTING/VOCAL HARMONY] button at the left side of the top panel. This lamp lights to indicate that an audio signal is being received. Make sure to adjust the control so the lamp lights in green. Make sure that the lamp does not light in red, since this indicates that the input level is too high. Disconnecting the microphone 1 Set the [INPUT VOLUME] knob on the rear panel of the instrument to the minimum position. 2 Disconnect the microphone from the [MIC/LINE IN] jack. n Set the [INPUT VOLUME] knob to the minimum position before turning off the power. PSR-S900/S700 Owner's Manual 57
-
 1
1 -
2
-
3
-
4
-
5
-
6
-
7
-
8
-
9
-
10
-
11
-
12
-
13
-
14
-
15
-
16
-
17
-
18
-
19
-
20
-
21
-
22
-
23
-
24
-
25
-
26
-
27
-
28
-
29
-
30
-
31
-
32
-
33
-
34
-
35
-
36
-
37
-
38
-
39
-
40
-
41
-
42
-
43
-
44
-
45
-
46
-
47
-
48
-
49
-
50
-
51
-
 52
52 -
 53
53 -
 54
54 -
 55
55 -
 56
56 -
 57
57 -
 58
58 -
 59
59 -
 60
60 -
 61
61 -
 62
62 -
63
-
64
-
65
-
66
-
67
-
68
-
69
-
70
-
71
-
72
-
73
-
74
-
75
-
76
-
77
-
78
-
79
-
80
-
81
-
82
-
83
-
84
-
85
-
86
-
87
-
88
-
89
-
90
-
91
-
92
-
93
-
94
-
95
-
96
-
97
-
98
-
99
-
100
-
101
-
102
-
103
-
104
-
105
-
106
-
107
-
108
-
109
-
110
-
111
-
112
-
113
-
114
-
115
-
116
-
117
-
118
-
119
-
120
-
121
-
122
-
123
-
124
-
125
-
126
-
127
-
128
-
129
-
130
-
131
-
132
-
133
-
134
-
135
-
136
-
137
-
138
-
139
-
140
-
141
-
142
-
143
-
144
-
145
-
146
-
147
-
148
-
149
-
150
-
151
-
152
-
153
-
154
-
155
-
156
-
157
-
158
-
159
-
160
-
161
-
162
-
163
-
164
-
165
-
166
-
167
-
168
-
169
-
170
-
171
-
172
-
173
-
174
-
175
-
176
-
177
-
178
-
179
-
180
-
181
-
182
-
183
-
184
-
185
-
186
-
187
-
188
-
189
-
190
-
191
-
192
-
193
-
194
-
195
-
196
-
197
-
198
-
199
-
200
-
201
-
202
-
203
-
204
-
205
-
206
-
207
-
208
-
209
-
210
-
211
-
212
-
213
-
214
-
215
-
216
-
217
-
218
-
219
-
220
-
221
-
222
-
223
-
224
 |
 |
