Yamaha PSR-S900 Owner's Manual - Page 68
Basic Displays (Main Display and File Selection Display), Main Display
 |
View all Yamaha PSR-S900 manuals
Add to My Manuals
Save this manual to your list of manuals |
Page 68 highlights
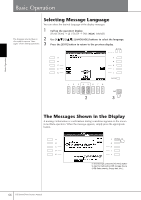
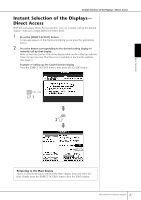
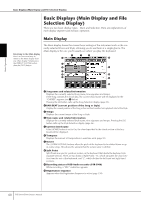
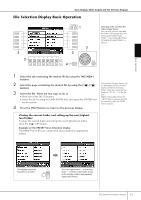
Basic Operation Basic Displays (Main Display and File Selection Display) Basic Displays (Main Display and File Selection Display) There are two basic display types - Main and Selection. Here are explanations of each display segment and its basic operation. Main Display Returning to the Main display Here's a convenient way to return to the Main display from any other display: Simply press the [DIRECT ACCESS] button, then the [EXIT] button. The Main display shows the current basic settings of the instrument such as the currently selected Voice and Style, allowing you to see them at a single glance. The Main display is the one you'll usually see when you play the keyboard. 6 7 8 9 ) 1 2 ! 3 4 @ 5 # $ 1 Song name and related information Displays the currently selected Song name, time signature and tempo. If the Song contains the chord data, the current chord name will be displayed in the "CHORD" segment (see 5 below). Pressing the [A] button calls up the Song Selection display (page 36). 2 BAR/BEAT (current position of the Song or Style) Displays the current position of the Song or bar and beat number from playback start of the Style. 3 Tempo Displays the current tempo of the Song or Style. 4 Style name and related information Displays the currently selected Style name, time signature and tempo. Pressing the [D] button calls up the Style Selection display (page 46). 5 Current chord name If the [ACMP] button is set to On, the chord specified in the chord section of the keyboard will be displayed. 6 Transpose Displays the amount of transposition in semitone units (page 59). 7 Octave The [UPPER OCTAVE] buttons allow the pitch of the keyboard to be shifted down or up in octave steps. This shows the amount that the octave value is shifted. 8 Split Point Split Points are specific positions (notes) on the keyboard that divide the keyboard into separate sections. There are two kinds of Split Points: "A", which separates the chord section from the rest of the keyboard, and "L", which divides the left-hand and right-hand sections. 9 Recording status of USB Audio recorder (PSR-S900) While recording, a "REC" indication appears. ) Registration Sequence Appears when the Registration Sequence is active (page 138). 68 PSR-S900/S700 Owner's Manual
-
 1
1 -
2
-
3
-
4
-
5
-
6
-
7
-
8
-
9
-
10
-
11
-
12
-
13
-
14
-
15
-
16
-
17
-
18
-
19
-
20
-
21
-
22
-
23
-
24
-
25
-
26
-
27
-
28
-
29
-
30
-
31
-
32
-
33
-
34
-
35
-
36
-
37
-
38
-
39
-
40
-
41
-
42
-
43
-
44
-
45
-
46
-
47
-
48
-
49
-
50
-
51
-
52
-
53
-
54
-
55
-
56
-
57
-
58
-
59
-
60
-
61
-
62
-
 63
63 -
 64
64 -
 65
65 -
 66
66 -
 67
67 -
 68
68 -
 69
69 -
 70
70 -
 71
71 -
 72
72 -
 73
73 -
74
-
75
-
76
-
77
-
78
-
79
-
80
-
81
-
82
-
83
-
84
-
85
-
86
-
87
-
88
-
89
-
90
-
91
-
92
-
93
-
94
-
95
-
96
-
97
-
98
-
99
-
100
-
101
-
102
-
103
-
104
-
105
-
106
-
107
-
108
-
109
-
110
-
111
-
112
-
113
-
114
-
115
-
116
-
117
-
118
-
119
-
120
-
121
-
122
-
123
-
124
-
125
-
126
-
127
-
128
-
129
-
130
-
131
-
132
-
133
-
134
-
135
-
136
-
137
-
138
-
139
-
140
-
141
-
142
-
143
-
144
-
145
-
146
-
147
-
148
-
149
-
150
-
151
-
152
-
153
-
154
-
155
-
156
-
157
-
158
-
159
-
160
-
161
-
162
-
163
-
164
-
165
-
166
-
167
-
168
-
169
-
170
-
171
-
172
-
173
-
174
-
175
-
176
-
177
-
178
-
179
-
180
-
181
-
182
-
183
-
184
-
185
-
186
-
187
-
188
-
189
-
190
-
191
-
192
-
193
-
194
-
195
-
196
-
197
-
198
-
199
-
200
-
201
-
202
-
203
-
204
-
205
-
206
-
207
-
208
-
209
-
210
-
211
-
212
-
213
-
214
-
215
-
216
-
217
-
218
-
219
-
220
-
221
-
222
-
223
-
224
 |
 |
