Yamaha RX-V371 Owners Manual - Page 22
Setting up speaker parameters, STEP 1: Display the setting menu - remote code
 |
View all Yamaha RX-V371 manuals
Add to My Manuals
Save this manual to your list of manuals |
Page 22 highlights
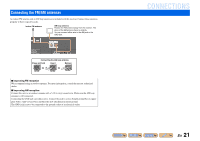
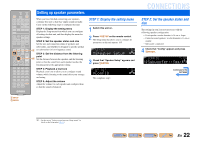
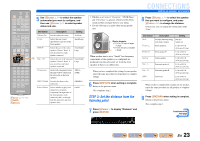
SOURCE 1 1 5 TRANSMIT CODE SET SLEEP RECEIVER HDMI 2 3 4 AV 2 3 4 AUDIO 1 2 V-AUX [ A ] [ B ] DOCK TUNER FM AM PRESET TUNING INFO MEMORY MOVIE ENHANCER SUR. DECODE MUSIC STEREO STRAIGHT BD DVD SETUP SCENE TV CD RADIO OPTION ENTER VOLUME RETURN DISPLAY TOP MENU REC POP-UP MENU MUTE 1 2 3 4 5 6 7 8 9 INPUT MUTE 0 10 TV TV VOL TV CH ENT Setting up speaker parameters When you have finished connecting your speakers, configure this unit so that they output sound normally. Carry out the following steps to configure this unit. STEP 1: Display the setting menu Display the Setup menu from which you can configure all settings for this unit, and then display the menu for speaker settings. STEP 2: Set the speaker status and size Set the size and connection status of speakers and subwoofers, and whether to designate a specific speaker i (or subwoofer) for low-frequency sound. STEP 3: Set the distance from the listening point j Set the distance between the speakers and the listening point so that the sound from each speaker reaches the listening point at the appropriate timing. STEP 4: Playback a test tone Playback a test tone to allow you to configure sound volumes while listening to the actual effect your settings are having. STEP 5: Adjust the volume Adjust the volume for each speaker and configure them so that the sound is balanced. STEP 1: Display the setting menu 1 Switch this unit on. 2 Press iSETUP on the remote control. The Setup menu that allows you to configure all parameters on this unit appears. J1 SETUP VOL. SW Speaker Setup L CR SL SR 3 Check that "Speaker Setup" appears and press jENTER. SP SET Config This completes step 1. VOL. SW L CR SL SR CONNECTIONS STEP 2: Set the speaker status and size The settings in step 2 are not necessary with the following speaker configuration: - Front speaker: woofer diameter is 16 cm or larger - Center/surround speakers: woofer diameter is 16 cm or smaller - Subwoofer: connected 4 Check that "Config" appears and press jENTER. CONFIG VOL. Subwoofer;;Yes SW L CR SL SR Continues to the next page i SETUP j ENTER J 1 : See the section "Setting various functions (Setup menu)" for details on the Setup menu (☞p. 41). En 22
-
 1
1 -
2
-
3
-
4
-
5
-
6
-
7
-
8
-
9
-
10
-
11
-
12
-
13
-
14
-
15
-
16
-
 17
17 -
 18
18 -
 19
19 -
 20
20 -
 21
21 -
 22
22 -
 23
23 -
 24
24 -
 25
25 -
 26
26 -
 27
27 -
28
-
29
-
30
-
31
-
32
-
33
-
34
-
35
-
36
-
37
-
38
-
39
-
40
-
41
-
42
-
43
-
44
-
45
-
46
-
47
-
48
-
49
-
50
-
51
-
52
-
53
-
54
-
55
-
56
-
57
-
58
-
59
-
60
-
61
-
62
-
63
-
64
-
65
-
66
-
67
-
68
-
69
-
70
-
71
-
72
-
73
-
74
-
75
-
76
-
77
-
78
-
79
-
80
-
81
-
82
-
83
-
84
-
85
-
86
-
87
-
88
 |
 |
