Yamaha RX-V371 Owners Manual - Page 34
Playing back tunes from your iPod™/iPhone™, Connecting the Yamaha iPod universal dock - receiver model
 |
View all Yamaha RX-V371 manuals
Add to My Manuals
Save this manual to your list of manuals |
Page 34 highlights
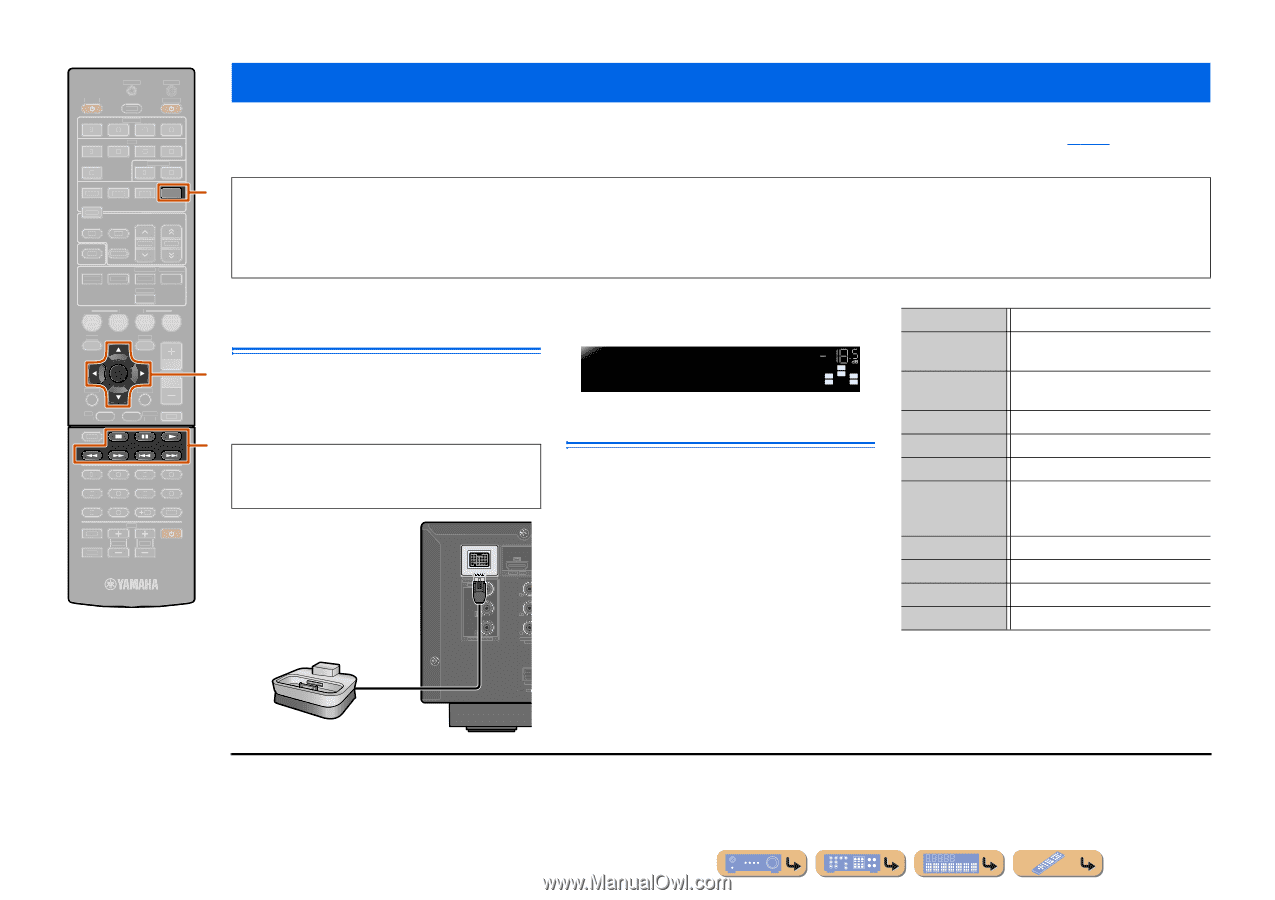
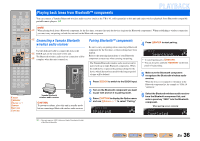
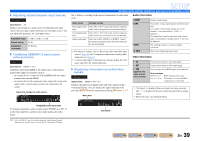
SOURCE 1 1 5 TRANSMIT CODE SET SLEEP RECEIVER HDMI 2 3 4 AV 2 3 4 AUDIO 1 2 V-AUX [ A ] [ B ] DOCK TUNER FM AM PRESET TUNING INFO MEMORY MOVIE ENHANCER SUR. DECODE MUSIC STEREO STRAIGHT BD DVD SETUP SCENE TV CD RADIO OPTION ENTER VOLUME RETURN DISPLAY TOP MENU REC POP-UP MENU MUTE 1 2 3 4 5 6 7 8 9 INPUT MUTE 0 10 TV TV VOL TV CH ENT d DOCK j Cursor B / C / D / E j ENTER ks ke kp kw kf k b ka Playing back tunes from your iPod™/iPhone™ PLAYBACK Once you have connected a Yamaha iPod universal dock (such as the YDS-12, sold separately) to this unit, you can enjoy playback of your iPod/iPhone using the remote control supplied with this unit. When playing back from an iPod/iPhone, you can also use the compressed music enhancer sound field programs (☞p. 29) to give compressed audio formats such as MP3 a sharper, more dynamic sound. d • iPhone 4, iPhone 3GS, iPhone 3G, iPhone, iPod touch (1st, 2nd, 3rd, and 4th generation), iPod (4th, and 5th generation, and Classic), iPod nano (1st, 2nd, 3rd, 4th, 5th, and 6th generation) and iPod mini are supported (As of October 2010). • When connecting an iPhone, please use a YDS-12. • Some features may not be compatible depending on the model or the software version of your iPod. • Some functions may not be available for some Yamaha iPod universal dock models. This explanation focuses on the YDS-12. Connecting the Yamaha iPod universal dock j Use the dedicated cable to connect the dock to the DOCK jack on the rear panel of this unit. Refer to the operating instructions of the iPod universal dock for information on how to connect your iPod/iPhone. k CAUTION To prevent accidents, place this unit in standby mode before connecting an iPod universal dock. COMPONENT VIDEO PR ARC HDMI OUT PR PB PB Y MONITOR OUT Y COMPON VIDEO Switch the power on and place your iPod/iPhone in the dock. The unit is now ready for playback. VOL. iPod connected SW L CR SL SR Controlling an iPod/iPhone After setting your iPod/iPhone in your dock, just press dDOCK to switch to DOCK input and you can operate your iPod/iPhone. You can use the remote control of this unit to carry out basic operations (playback, stop, skip etc) on your iPod/ iPhone. You can check song information on the iPod/ iPhone screen. dDOCK Switches to the DOCK (iPod) input. jCursor B / C J1 Move the cursor up and down to different fields. jCursor D / E J1 Returns to the previous menu or enter the menu you have selected. jENTER J1 Enters the selected menu. k w Searches backwards while held down. k f Searches forwards while held down. k b k a k s k e k p Skips to the beginning of the currently playing song. Pressing repeatedly skips one song backwards with each press. Skips to the beginning of the next song. Stops playback. Switches between playback and pause. Switches between playback and pause. OPTICA AV Yamaha iPod universal dock J 1 : These keys may not work for some types of iPod. In this case, carry out these operations directly with your iPod. En 34
-
 1
1 -
2
-
3
-
4
-
5
-
6
-
7
-
8
-
9
-
10
-
11
-
12
-
13
-
14
-
15
-
16
-
17
-
18
-
19
-
20
-
21
-
22
-
23
-
24
-
25
-
26
-
27
-
28
-
 29
29 -
 30
30 -
 31
31 -
 32
32 -
 33
33 -
 34
34 -
 35
35 -
 36
36 -
 37
37 -
 38
38 -
 39
39 -
40
-
41
-
42
-
43
-
44
-
45
-
46
-
47
-
48
-
49
-
50
-
51
-
52
-
53
-
54
-
55
-
56
-
57
-
58
-
59
-
60
-
61
-
62
-
63
-
64
-
65
-
66
-
67
-
68
-
69
-
70
-
71
-
72
-
73
-
74
-
75
-
76
-
77
-
78
-
79
-
80
-
81
-
82
-
83
-
84
-
85
-
86
-
87
-
88
 |
 |