Yamaha RX-V371 Owners Manual - Page 58
Switching the input source on this, unit automatically when listening, to TV audio, Control, TVAudio
 |
View all Yamaha RX-V371 manuals
Add to My Manuals
Save this manual to your list of manuals |
Page 58 highlights
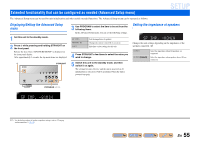
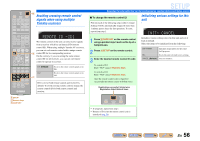
SOURCE 1 1 5 TRANSMIT CODE SET SLEEP RECEIVER HDMI 2 3 4 AV 2 3 4 AUDIO 1 2 V-AUX [ A ] [ B ] DOCK TUNER FM AM PRESET TUNING INFO MEMORY MOVIE ENHANCER SUR. DECODE MUSIC STEREO STRAIGHT BD DVD SETUP SCENE TV CD RADIO OPTION ENTER VOLUME RETURN DISPLAY TOP MENU REC POP-UP MENU MUTE ■ Switching the input source on this unit automatically when listening to TV audio When the HDMI Control (☞p. 57) is operating properly, the input source of this unit is automatically changed to match operations carried out on the TV. The default input jack is AV4. If the AV4 optical digital jack is connected to the TV's audio output jack, then you can enjoy TV sound through this unit right away. Audio output (Optical) i OPTICAL j TV O O DOCK COMPONENT VIDEO PR ARC HDMI OUT PR (BD/DVD) HDMI 1 HDMI 2 PB PB Y MONITOR OUT Y COMPONENT VIDEO VIDEO HDMI 3 HDMI 4 MONITOR OUT OPTICAL AV 1 COAXIAL AV 2 COAXIAL (CD) AV 3 OPTICAL ( TV ) AV 5 AV OUT A AUDIO 1 AUDIO 2 1 2 3 4 5 6 7 8 9 INPUT MUTE 0 10 TV TV VOL TV CH ENT To use other jacks to input audio signals from TV, carry out the following procedure. 1 Connect this unit and the TV with an HDMI cable. 2 Connect TV's audio output to this unit. The input jacks listed below are available to input TV's audio signals. Use the same jack type as used for the TV. TV output jack Input jack Optical digital audio output AV1 or AV4 (default) Coaxial digital audio output AV2 or AV3 Analog stereo output AV5, AUDIO1, or AUDIO2 Available input jacks DOCK COMPONENT VIDEO PR ARC HDMI OUT PR (BD/DVD) HDMI 1 HDMI 2 PB PB Y MONITOR OUT Y COMPONENT VIDEO VIDEO HDMI 3 HDMI 4 MONITOR OUT OPTICAL COAXIAL COAXIAL (CD) OPTICAL AV OUT AUDIO OUT i SETUP j Cursor B / C / D / E j ENTER 3 Press iSETUP. J1 SETUP Using the HDMI Control function 4 Use jCursor B / C to select "HDMI Setup" and press jENTER. HDMI VOL. Control;;;;Off SW L CR SL SR 5 Make sure that "Control" is selected, and then use jCursor D / E to select "On." HDMI VOL. Control;;;;;On SW L CR SL SR 6 Press jCursor C to select "TVAudio" and select the input jack connected in step 2 using jCursor D / E. HDMI VOL. TVAudio;;;;AV4 SW L CR SL SR 7 Press iSETUP when you have finished changing the settings. If the TV hereafter transmits audio output signals, this unit will automatically switch to the input source chosen in step 6. J 1 : Refer to the "Setting various functions (Setup menu)" (☞p. 41) for details on the Setup menu. En 58
-
 1
1 -
2
-
3
-
4
-
5
-
6
-
7
-
8
-
9
-
10
-
11
-
12
-
13
-
14
-
15
-
16
-
17
-
18
-
19
-
20
-
21
-
22
-
23
-
24
-
25
-
26
-
27
-
28
-
29
-
30
-
31
-
32
-
33
-
34
-
35
-
36
-
37
-
38
-
39
-
40
-
41
-
42
-
43
-
44
-
45
-
46
-
47
-
48
-
49
-
50
-
51
-
52
-
 53
53 -
 54
54 -
 55
55 -
 56
56 -
 57
57 -
 58
58 -
 59
59 -
 60
60 -
 61
61 -
 62
62 -
 63
63 -
64
-
65
-
66
-
67
-
68
-
69
-
70
-
71
-
72
-
73
-
74
-
75
-
76
-
77
-
78
-
79
-
80
-
81
-
82
-
83
-
84
-
85
-
86
-
87
-
88
 |
 |
