Yamaha S08 Owner's Manual - Page 33
Using the S08 as a Multitimbral Tone Generator (Multi Edit
 |
View all Yamaha S08 manuals
Add to My Manuals
Save this manual to your list of manuals |
Page 33 highlights
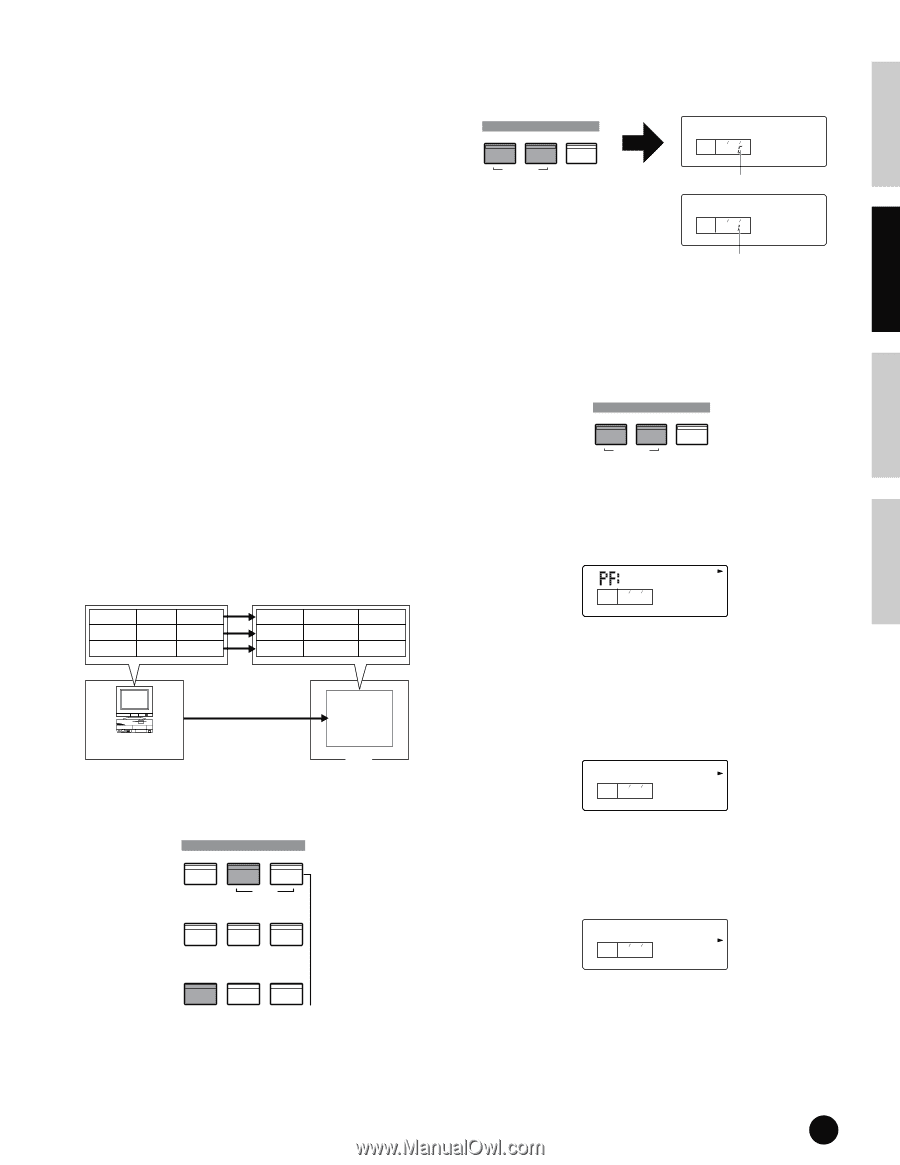
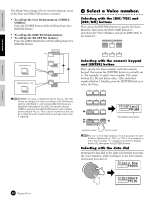
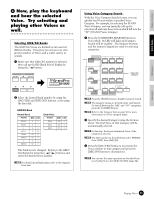
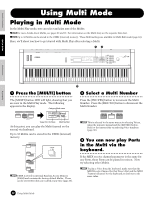
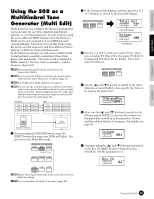
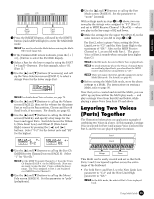
Basics Section Quick Guide Reference Appendix Using the S08 as a Multitimbral Tone Generator (Multi Edit) Multi mode lets you configure the S08 as a multitimbral tone generator for use with computer-based music software or external sequencers. If each track in a song file uses a different MIDI channel, then the Parts in a Multi can be each assigned to those MIDI channels correspondingly. Therefore, you can play back a song file on an external sequencer and have different Voices playing on different tracks simultaneously. In the following example, we will create a Multi suited to playing back a song file consisting of three Parts: piano, bass and drums. The piano track is assigned to MIDI channel 2, the bass track to channel 3, and the drums to channel 10. n The particular part(s) can be switched on/off temporarily (Mute). n You can hear the difference between the newly edited Multi and the same Multi prior to editing (page 41). n For details about MIDI channels, see page 72. n You can use the included sequencer software (Windows only; see the attached Installation Guide) to play multiple Parts on the S08. Before doing that, however, make sure that all connections between the computer and the S08 have been properly made (page 14). Song File Track 1 Track 2 Track 3 Piano Transmit Ch.2 Bass Transmit Ch.3 Drums Transmit Ch.10 Multi Part 2 Part 3 Part 10 Piano Voice Receive Ch.2 Bass Voice Receive Ch.3 Drum Voice Receive Ch.10 Tone generator Computer (sequencer software) S08 1 After pressing the [MULTI] button, press the [EDIT] button (the respective LEDs will light). You are now in the Multi Edit mode. VOICE MODE MULTI SEQ PLAY DEMO UTILITY CONTROLLER CARD EDIT JOB STORE COMPARE PLAY/STOP n Before entering the Multi Edit mode, you need to select a Multi for editing. n You can initialize the Multi, if necessary (page 48). 2 If the Common Edit display is shown, press the [+] or [-] button to switch to the Part Edit display. PART/ ELEMENT/ KEY - + MUTE COMMON Total Vol PAGE PART ELEM KEY 2 P 127 Common indicator Volume PAGE PART ELEM KEY 2 P 100 Part indicator 3 Use the [+] and [-] buttons to select Parts. Here, you can select P2 (Part 2) for the piano, P3 (Part 3) for bass and P10 (Part 10) for drums. First, let's select P2 (Part 2). PART/ ELEMENT/ KEY - + MUTE COMMON 4 Use the [▲] and [▼] buttons to switch to the Voice Selection screen (PAGE 1), then specify the Voice to be used as the piano Part. GrandPno XG001 PAGE PART ELEM KEY 1 P2 5 Next, use the [▲] and [▼] buttons to switch to the Volume screen (PAGE 2), then set the volume for the piano Part as well as its Pan position, Chorus and Reverb Send levels, if necessary. For details, see page 65. Volume PAGE PART ELEM KEY 2 P2 001 6 Continue using the [▲] and [▼] buttons and switch to the Rcv Ch (MIDI Receive Channel) screen (PAGE 6). Set the parameter to 2. Rcv Ch PAGE PART ELEM KEY 6 P2 02 Using Multi Mode 33
-
 1
1 -
2
-
3
-
4
-
5
-
6
-
7
-
8
-
9
-
10
-
11
-
12
-
13
-
14
-
15
-
16
-
17
-
18
-
19
-
20
-
21
-
22
-
23
-
24
-
25
-
26
-
27
-
 28
28 -
 29
29 -
 30
30 -
 31
31 -
 32
32 -
 33
33 -
 34
34 -
 35
35 -
 36
36 -
 37
37 -
 38
38 -
39
-
40
-
41
-
42
-
43
-
44
-
45
-
46
-
47
-
48
-
49
-
50
-
51
-
52
-
53
-
54
-
55
-
56
-
57
-
58
-
59
-
60
-
61
-
62
-
63
-
64
-
65
-
66
-
67
-
68
-
69
-
70
-
71
-
72
-
73
-
74
-
75
-
76
-
77
-
78
-
79
-
80
-
81
-
82
-
83
-
84
-
85
-
86
-
87
-
88
 |
 |