Yamaha S08 Owner's Manual - Page 42
Set the Common, Parameters, Set the Element, GENERAL Common General, CONTROLLER Common Controller - voice list
 |
View all Yamaha S08 manuals
Add to My Manuals
Save this manual to your list of manuals |
Page 42 highlights
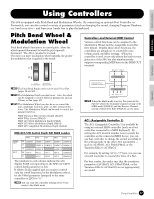
Appendix Reference Quick Guide Basics Section 3 Set the Common Parameters Each Voice consists of up to four Elements. Here, the parameters common to all Elements are explained. ● GENERAL (Common General) In PAGES 1 to 4, you can set the Voice Name, Voice output settings and other general parameters. ● CONTROLLER (Common Controller) In PAGES 5 to 10, you can assign and set various functions for the controllers on the front (such as the Modulation and Pitch Bend Wheels) and the controllers connectable to the rear panel. For example, you can assign parameters to the Modulation Wheel so that you can change the tone of Voice in real time. For details about different controller uses, see page 38. ● EFFECT (Common Effect) In PAGES 11 to 17, you can set the Effects parameters for the Voice. There are System Effects (Reverb and Chorus) and Variation Effects. 4 Set the Element Parameters n The Element settings whose Element Switch is set "off" cannot be changed and "***" appears in the display. Monitoring the Element for Editing (Checking the Voice Structure and Muting) Since Voices are made up of a maximum of four Elements, you can better hear the edits you make by setting only the Elements you are editing to sound. Check how many Elements are used with the steps below. n You can also check the number of Elements used by referring to the Voice List in the separate Data List. 1 In the Voice Edit mode, press the [+] or [-] button to switch to the Element Edit display. 2 Use the [ ] button to switch to the Element Sw screen (PAGE 1). 3 Move the cursor to the desired Element by using the [+]/[-] buttons. The voice being edited is made up of the Elements which are indicated by "on." For example, you can check which Elements create which specific sounds in the case of a Voice made up of Elements 1 and 2 - following the steps below. 4 Move the cursor to Element 1 (E1) by using the [-] button. 42 Voice Edit 5 Press the [MUTE] button. E1 flashes and the selected Element is muted. When you play a key, only Element 2 will sound. Cancel mute by pressing the [MUTE] button again. 6 Move the cursor to Element 2 (E2) by using the [+] button. 7 Press the [MUTE] button. E2 flashes and the selected Element is muted. When you play a key, only Element 1 will sound. Cancel mute by pressing the MUTE button again. By performing the above operation, you can check the sound of the specific Element you wish to edit, and mute the other Elements so that you can clearly hear the changes you make. After you finish editing, cancel muting for all Elements. Now, all the Element sounds (including the one you edited) are mixed - letting you hear how the changes you made affect the overall sound of the Voice. Element Edit Process Element 1~4 PEG FEG AEG PITCH FILTER AMP OSC LFO Effect ● OSC/MIX (Oscillator/Mix) In PAGES 1 to 6, you can set the various parameters controlling the waveforms on which the Voice is based. You can select the Wave used for the Element, the volume and note range of each Element and so on. Element Sw (Element Switch) Determines whether each Element sounds or not. Wave Number Select the Wave for each Element. Level Pan Set the volume (output level) and stereo pan position of each Element. NtLmt-L/H (Note Limit Low/High) VelLmt-L/H (Velocity Limit Low/High) Set the note range for each Element (the range of notes on the keyboard over which the Element will sound) and also the velocity response (the range of note velocities within which the Element will sound). You can assign different settings for each Element. With these parameters, you can layer Elements and control their output.
-
 1
1 -
2
-
3
-
4
-
5
-
6
-
7
-
8
-
9
-
10
-
11
-
12
-
13
-
14
-
15
-
16
-
17
-
18
-
19
-
20
-
21
-
22
-
23
-
24
-
25
-
26
-
27
-
28
-
29
-
30
-
31
-
32
-
33
-
34
-
35
-
36
-
 37
37 -
 38
38 -
 39
39 -
 40
40 -
 41
41 -
 42
42 -
 43
43 -
 44
44 -
 45
45 -
 46
46 -
 47
47 -
48
-
49
-
50
-
51
-
52
-
53
-
54
-
55
-
56
-
57
-
58
-
59
-
60
-
61
-
62
-
63
-
64
-
65
-
66
-
67
-
68
-
69
-
70
-
71
-
72
-
73
-
74
-
75
-
76
-
77
-
78
-
79
-
80
-
81
-
82
-
83
-
84
-
85
-
86
-
87
-
88
 |
 |
