Zenith DVR313 Operating Guide - Page 25
Before Operation Continued
 |
UPC - 044642302436
View all Zenith DVR313 manuals
Add to My Manuals
Save this manual to your list of manuals |
Page 25 highlights
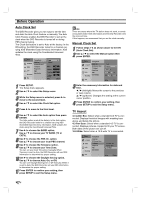
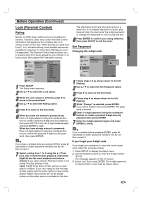
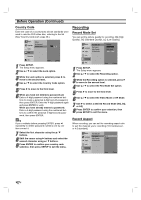
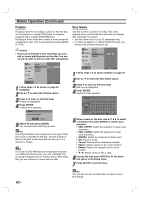
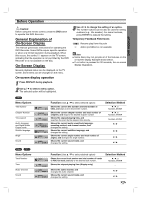
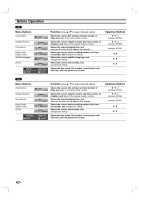
DVR HOOKUP Before Operation (Continued) Auto Chapter When recording in Video mode, chapter markers are put in every three minutes on the default setting. You can change this interval to 3 minutes, 5 minutes or 10 minutes. If you select Not Use, switch off automatic chapter marking altogether with the No Separation setting Setup Language Audio Rec Mode Set Rec Aspect Auto Chapter DV Rec Audio Lock Recording Disc Not Use 3 Min 5 Min 10 Min Prev. Select DV Rec Audio You need to set this if you have a camcorder using 32kHz/12-bit sound connected to the front panel DV IN jack. Some digital camcorders have two stereo tracks for audio. One is recorded at the time of shooting; the other is for overdubbing after shooting. On the Audio 1 setting, the sound that was recorded while shooting is used. On the Audio 2 setting, the overdubbed sound is used. 1 Press SETUP. The Setup menu appears. 2 Use v / V to select the Disc option. 3 While the Disc option is selected, press B to move to the second level. 4 Use v / V to select the Initialize option. 5 Press B to move to the third level. Start icon is highlighted. 6 Press ENTER. Disc Initialize menu appears. Disc Initialize Select a Mode VR Mode Video Mode 7 Use b / B to select a desired Initialize Mode (VR Mode or Video Mode) then press ENTER. It takes a few moments to initialize the disc. Caution If you want to change the disc format, everything recorded on the disc will be erased. Setup Language Audio Rec Mode Set Rec Aspect Auto Chapter DV Rec Audio Lock Recording Disc Audio 1 Audio 2 Prev. Select Disc Initialize If you're recording on a DVD-R disc, the recording mode will always be Video mode. If you are using a DVD-RW disc, by default it will be VR mode. You can change this to Video mode from the Setup menu. Setup Language Audio Initialize Finalize Disc Name Protection Lock Recording Disc Start Prev. Select 8 Press SETUP to exit the menu. Protection When recording in VR mode, set to ON to prevent accidental recording, editing or erasing of the disc loaded. If you need to unlock the disc to make edits, select OFF. Setup Language Audio Initialize Finalize Disc Name Protection Lock Recording Disc OFF ON Prev. Select 25
-
 1
1 -
2
-
3
-
4
-
5
-
6
-
7
-
8
-
9
-
10
-
11
-
12
-
13
-
14
-
15
-
16
-
17
-
18
-
19
-
 20
20 -
 21
21 -
 22
22 -
 23
23 -
 24
24 -
 25
25 -
 26
26 -
 27
27 -
 28
28 -
 29
29 -
 30
30 -
31
-
32
-
33
-
34
-
35
-
36
-
37
-
38
-
39
-
40
-
41
-
42
-
43
-
44
-
45
-
46
-
47
-
48
-
49
-
50
-
51
-
52
 |
 |