ZyXEL NBG5715 User Guide - Page 24
The ZyXEL NetUSB Share Center Utility
 |
View all ZyXEL NBG5715 manuals
Add to My Manuals
Save this manual to your list of manuals |
Page 24 highlights
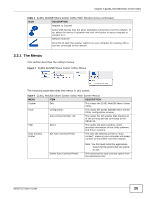
Chapter 3 ZyXEL NetUSB Share Center Utility Note: The following operating systems are supported: Windows XP/Vista/7 (32 and 64-bit versions). 3 To open the ZyXEL NetUSB Share Center Utility, double-click its system tray icon. 3.2 The ZyXEL NetUSB Share Center Utility This section describes the ZyXEL NetUSB Share Center Utility main window. Figure 6 ZyXEL NetUSB Share Center Utility Main Window The following table describes the icons in this window. Table 3 ZyXEL NetUSB Share Center Utility Main Window Icons ICON DESCRIPTION Configure Server Click to open the NBG5715's built-in Web Configurator, which you can use to set up the NBG5715 (see Chapter 4 on page 29 for details). Auto-Connect Printer Click this if you want to automatically connect to the printer each time your start your computer. Note: You must first install the appropriate print driver on each computer for which you intend to use this feature. See the documentation that came with your printer for instructions on how to do this. Connect Select a USB device and then click this button to connect to it. Your computer can connect to as many USB devices as are connected to the NBG5715. Disconnect Select a device to which your computer is connected and then click this button to disconnect from it. 24 NBG5715 User's Guide
-
 1
1 -
2
-
3
-
4
-
5
-
6
-
7
-
8
-
9
-
10
-
11
-
12
-
13
-
14
-
15
-
16
-
17
-
18
-
 19
19 -
 20
20 -
 21
21 -
 22
22 -
 23
23 -
 24
24 -
 25
25 -
 26
26 -
 27
27 -
 28
28 -
 29
29 -
30
-
31
-
32
-
33
-
34
-
35
-
36
-
37
-
38
-
39
-
40
-
41
-
42
-
43
-
44
-
45
-
46
-
47
-
48
-
49
-
50
-
51
-
52
-
53
-
54
-
55
-
56
-
57
-
58
-
59
-
60
-
61
-
62
-
63
-
64
-
65
-
66
-
67
-
68
-
69
-
70
-
71
-
72
-
73
-
74
-
75
-
76
-
77
-
78
-
79
-
80
-
81
-
82
-
83
-
84
-
85
-
86
-
87
-
88
-
89
-
90
-
91
-
92
-
93
-
94
-
95
-
96
-
97
-
98
-
99
-
100
-
101
-
102
-
103
-
104
-
105
-
106
-
107
-
108
-
109
-
110
-
111
-
112
-
113
-
114
-
115
-
116
-
117
-
118
-
119
-
120
-
121
-
122
-
123
-
124
-
125
-
126
-
127
-
128
-
129
-
130
-
131
-
132
-
133
-
134
-
135
-
136
-
137
-
138
-
139
-
140
-
141
-
142
-
143
-
144
-
145
-
146
-
147
-
148
-
149
-
150
-
151
-
152
-
153
-
154
-
155
-
156
-
157
-
158
-
159
-
160
-
161
-
162
-
163
-
164
-
165
-
166
-
167
-
168
-
169
-
170
-
171
-
172
-
173
-
174
-
175
-
176
-
177
-
178
-
179
-
180
-
181
-
182
-
183
-
184
-
185
-
186
-
187
-
188
-
189
-
190
-
191
-
192
-
193
-
194
-
195
-
196
-
197
-
198
-
199
-
200
-
201
-
202
-
203
-
204
-
205
-
206
-
207
-
208
-
209
-
210
-
211
-
212
-
213
-
214
-
215
-
216
-
217
-
218
-
219
-
220
-
221
-
222
-
223
-
224
-
225
-
226
-
227
-
228
-
229
-
230
-
231
-
232
-
233
-
234
-
235
-
236
-
237
-
238
-
239
-
240
-
241
-
242
-
243
-
244
-
245
-
246
-
247
-
248
-
249
-
250
-
251
-
252
 |
 |
