2009 BMW 5 Series Owner's Manual - Page 248
2009 BMW 5 Series Manual
Page 248 highlights
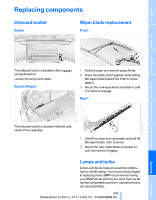
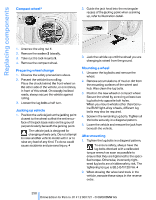
Replacing components Turning lamps* H3 bulb, 55 watts 1. Remove the sealing cap, refer to Access to lamps. 2. Push the locking bar to the side out of the anchor and fold upward. Side-mounted turn signals 5-watt bulb, W5W 1. Press back against the front edge of the lamp with the tip of your finger, then pivot it out. 2. Turn the bulb holder to the left and remove. 3. Remove the connector and take out the bulb. 4. Replace the bulb and reinstall. 5. Fold down the locking bar and engage it. 6. Reconnect the connector. 7. Mount the sealing cap. Watch the markings on the bulb when doing so. 3. Remove the bulb for replacement. Side marker lamps, front and rear To replace, please go to your BMW center or a workshop that works according to BMW repair procedures with correspondingly trained personnel. Turn signals, front 21-watt bulb, PY21W 1. Turn the bulb holder to the left and remove. Tail lamps Sedan > Turn signals 1, tail lamps 6 and side marker lamps 7 are designed using LED technology. In the event of a malfunction, please go to your BMW center or a workshop that works according to BMW repair procedures with correspondingly trained personnel. > Backup lamps: 16-watt bulb, W16W > Other lamps: 21-watt bulb, P21W 2. Apply gentle pressure to the bulb while turning it to the left for removal and replacement. 246 Online Edition for Part no. 01 41 2 600 721 - © 08/08 BMW AG
-
 1
1 -
2
-
3
-
4
-
5
-
6
-
7
-
8
-
9
-
10
-
11
-
12
-
13
-
14
-
15
-
16
-
17
-
18
-
19
-
20
-
21
-
22
-
23
-
24
-
25
-
26
-
27
-
28
-
29
-
30
-
31
-
32
-
33
-
34
-
35
-
36
-
37
-
38
-
39
-
40
-
41
-
42
-
43
-
44
-
45
-
46
-
47
-
48
-
49
-
50
-
51
-
52
-
53
-
54
-
55
-
56
-
57
-
58
-
59
-
60
-
61
-
62
-
63
-
64
-
65
-
66
-
67
-
68
-
69
-
70
-
71
-
72
-
73
-
74
-
75
-
76
-
77
-
78
-
79
-
80
-
81
-
82
-
83
-
84
-
85
-
86
-
87
-
88
-
89
-
90
-
91
-
92
-
93
-
94
-
95
-
96
-
97
-
98
-
99
-
100
-
101
-
102
-
103
-
104
-
105
-
106
-
107
-
108
-
109
-
110
-
111
-
112
-
113
-
114
-
115
-
116
-
117
-
118
-
119
-
120
-
121
-
122
-
123
-
124
-
125
-
126
-
127
-
128
-
129
-
130
-
131
-
132
-
133
-
134
-
135
-
136
-
137
-
138
-
139
-
140
-
141
-
142
-
143
-
144
-
145
-
146
-
147
-
148
-
149
-
150
-
151
-
152
-
153
-
154
-
155
-
156
-
157
-
158
-
159
-
160
-
161
-
162
-
163
-
164
-
165
-
166
-
167
-
168
-
169
-
170
-
171
-
172
-
173
-
174
-
175
-
176
-
177
-
178
-
179
-
180
-
181
-
182
-
183
-
184
-
185
-
186
-
187
-
188
-
189
-
190
-
191
-
192
-
193
-
194
-
195
-
196
-
197
-
198
-
199
-
200
-
201
-
202
-
203
-
204
-
205
-
206
-
207
-
208
-
209
-
210
-
211
-
212
-
213
-
214
-
215
-
216
-
217
-
218
-
219
-
220
-
221
-
222
-
223
-
224
-
225
-
226
-
227
-
228
-
229
-
230
-
231
-
232
-
233
-
234
-
235
-
236
-
237
-
238
-
239
-
240
-
241
-
242
-
 243
243 -
 244
244 -
 245
245 -
 246
246 -
 247
247 -
 248
248 -
 249
249 -
 250
250 -
 251
251 -
 252
252 -
 253
253 -
254
-
255
-
256
-
257
-
258
-
259
-
260
-
261
-
262
-
263
-
264
-
265
-
266
-
267
-
268
-
269
-
270
-
271
-
272
-
273
-
274
-
275
-
276
-
277
-
278
-
279
-
280
-
281
-
282
-
283
-
284
-
285
-
286
-
287
-
288
-
289
-
290
-
291
-
292
-
293
-
294
 |
 |
