Akai MPC1000 Operation Manual - Page 42
Deleting an event, Entering an event (Step recording), Detailed setting for step recording
 |
View all Akai MPC1000 manuals
Add to My Manuals
Save this manual to your list of manuals |
Page 42 highlights
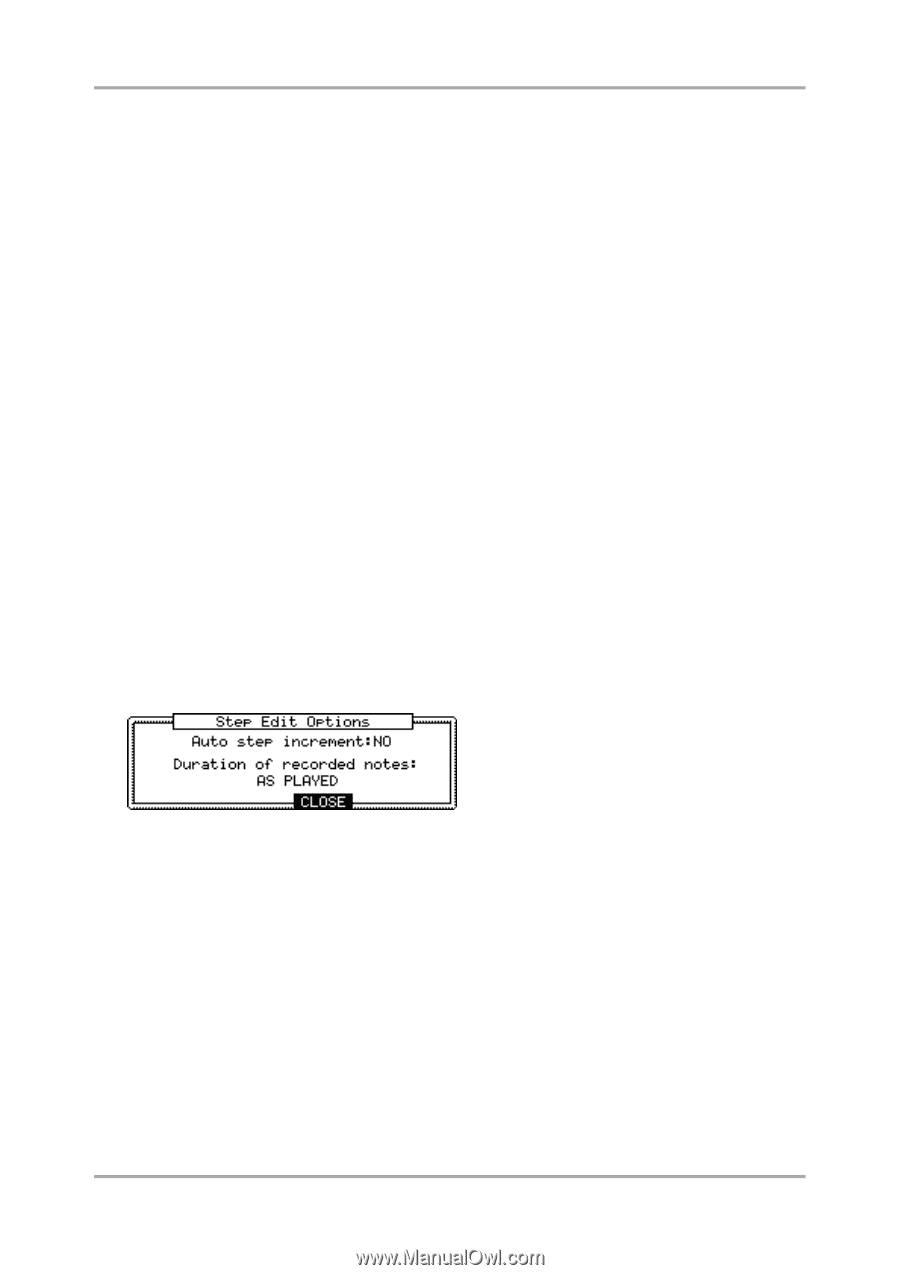
Step editing Deleting an event To delete the selected event, proceed as follows. 01. In the event list, select the event that you wish to delete. You can select several events by pressing the down cursor key while holding the [SHIFT] key. 02. Press the [F4] (DELETE) key. The selected event will be deleted. Entering an event (Step recording) In the STEP EDIT mode, when you hit a pad, or when the MPC1000 receives MIDI data from an external device, you can record the event in the current time position (the time displayed in the Now field). Move the event to the desired time position by moving through the event list with the up/down cursor keys, or by setting the time position in the Now field, and you can add events to the desired time position one by one. This method, recording each event individually when MPC1000 is in the stop mode, is called step recording. 01. In the STEP EDIT mode, Press the [REC] key or the [OVER DUB] key. The LED of the [OVER DUB] key will be lit, which indicates that you can now enter events by hitting a pad. 02. Move through the list with the up/down cursor keys, or select the Now field, to select the time position to insert event. 03. Hit a pad. The event of the pad will be recorded. 04. Press the [STOP] key. The LED of the [OVER DUB] key will be turned off and you can finish the step recording. Detailed setting for step recording Pressing the [WINDOW] key in the STEP EDIT mode brings up the Step Edit Options window, where you can make various settings for the step recording. Auto step increment field If you select YES, the MPC1000 will automatically update the sequence according to the setting of the timing correct when it receives a pad event or a note event. Duration of recorded notes field You can determines how the length that a pad (MIDI keyboard) is pressed affects the event to recorded during step recording. AS PLAYED The length that a pad (MIDI keyboard) is pressed will be applied to the event. When you hit a pad (MIDI keyboard), the metronome sound will start automatically. Refer to the metronome sound to set the length to press a key. When you release a pad (MIDI keyboard), the length that a key was pressed will be entered in the D (duration) field. TC VALUE% When set to 100%, the value set in the timing correct will be entered in the D (duration) field, regardless of the length that you actually pressed the pad (MIDI keyboard). Selecting the TC VALUE% will display the field, where you can set the percentage of the duration to apply to the current timing correct value. (Ex. 50% will set duration to one-half timing correct value.) -34-
-
 1
1 -
2
-
3
-
4
-
5
-
6
-
7
-
8
-
9
-
10
-
11
-
12
-
13
-
14
-
15
-
16
-
17
-
18
-
19
-
20
-
21
-
22
-
23
-
24
-
25
-
26
-
27
-
28
-
29
-
30
-
31
-
32
-
33
-
34
-
35
-
36
-
 37
37 -
 38
38 -
 39
39 -
 40
40 -
 41
41 -
 42
42 -
 43
43 -
 44
44 -
 45
45 -
 46
46 -
 47
47 -
48
-
49
-
50
-
51
-
52
-
53
-
54
-
55
-
56
-
57
-
58
-
59
-
60
-
61
-
62
-
63
-
64
-
65
-
66
-
67
-
68
-
69
-
70
-
71
-
72
-
73
-
74
-
75
-
76
-
77
-
78
-
79
-
80
-
81
-
82
-
83
-
84
-
85
-
86
-
87
-
88
-
89
-
90
-
91
-
92
-
93
-
94
-
95
-
96
-
97
-
98
-
99
-
100
-
101
-
102
-
103
-
104
 |
 |