Akai MPC1000 Operation Manual - Page 56
Recording a sample, Preparing the recording
 |
View all Akai MPC1000 manuals
Add to My Manuals
Save this manual to your list of manuals |
Page 56 highlights
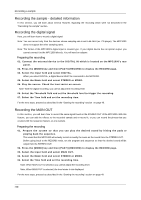
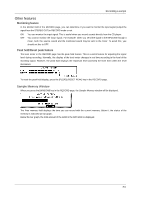
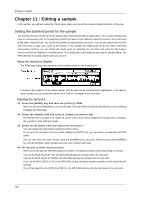
Recording a sample Chapter 10 : Recording a sample In this chapter, you will lean how to record from an analog external device (CD player's analog output, microphone, etc...) so that you can play the sound by hitting the pads. Preparing the recording 01. Connect the external device to the RECORD IN, which is located on the MPC1000's rear panel. The format of the analog input of the MPC1000 is standard phone jack. If your device's format is different, you will need an adapter. 02. Press the [MODE] key and then [PAD 5] (RECORD). When you press the [MODE] key, its LED will blink. Pressing [PAD 5] with the [MODE] key's LED on displays the RECORD page, where you set the setting for the recording. 03. Select the Input field, and select the recording source. ANALOG The MPC1000 will record the incoming signal from the RECORD IN on the rear panel. DIGITAL The MPC1000 will record the incoming signal from the DIGITAL IN on the rear panel. MAIN OUT The MPC1000 will record the same signal with the signal from the STEREO OUT on the rear panel. For this example, please select ANALOG. 04. Select the Mode field and select STEREO or MONO. STEREO The MPC1000 will record the left and right channel signals as a stereo sample. MONO The MPC1000 will record only the left channel signal. 05. Play the source. Check the level meter on screen and adjust the recording level using the [REC GAIN] knob. Note: When you select DIGITAL or MAIN OUT in the Input field, you cannot adjust the recording level with the [REC GAIN] knob. The level meter moves according to the input level. If the meter goes too far to the right, the sound will be distorted, but if the sound level is too low, the sample will gain a lot of noise. Set the level as high as possible without reaching the right edge (clip). 06. Select the Threshold field and set the threshold level to start the recording. When the MPC1000 is in the recording enable mode, it starts the recording automatically when the level of the incoming source exceeds the threshold level. If you set the threshold level too high, the MPC1000 may not start the recording when you play the input source, or the beginning of the recording may be missing. If you set the threshold level too low, the MPC1000 may start the recording before you play the external source. Set this to the appropriate level using the level meter. The threshold level will be indicated as " " as the figure below. 07. Select the Time field and set the recording time. The MPC1000 will record for the time set in this field. We recommend you set the time a little longer than the actual recording time. You can finish the recording manually. -48-
-
 1
1 -
2
-
3
-
4
-
5
-
6
-
7
-
8
-
9
-
10
-
11
-
12
-
13
-
14
-
15
-
16
-
17
-
18
-
19
-
20
-
21
-
22
-
23
-
24
-
25
-
26
-
27
-
28
-
29
-
30
-
31
-
32
-
33
-
34
-
35
-
36
-
37
-
38
-
39
-
40
-
41
-
42
-
43
-
44
-
45
-
46
-
47
-
48
-
49
-
50
-
 51
51 -
 52
52 -
 53
53 -
 54
54 -
 55
55 -
 56
56 -
 57
57 -
 58
58 -
 59
59 -
 60
60 -
 61
61 -
62
-
63
-
64
-
65
-
66
-
67
-
68
-
69
-
70
-
71
-
72
-
73
-
74
-
75
-
76
-
77
-
78
-
79
-
80
-
81
-
82
-
83
-
84
-
85
-
86
-
87
-
88
-
89
-
90
-
91
-
92
-
93
-
94
-
95
-
96
-
97
-
98
-
99
-
100
-
101
-
102
-
103
-
104
 |
 |
