Apple M8840LL/A Setup Guide
Apple M8840LL/A - Power Mac - G4 Manual
 |
UPC - 718908440841
View all Apple M8840LL/A manuals
Add to My Manuals
Save this manual to your list of manuals |
Apple M8840LL/A manual content summary:
- Apple M8840LL/A | Setup Guide - Page 1
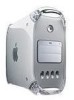
Setting Up Your Power Macintosh G4 Includes setup and expansion information for your Power Macintosh G4 - Apple M8840LL/A | Setup Guide - Page 2
manual is accurate. Apple is not responsible for printing or clerical errors. Apple Computer, Inc. 1 Infinite Loop Cupertino, CA 95014-2084 408-996-1010 http://www.apple.com Apple, the Apple Apple Computer, Inc., registered in the U.S. and other countries. The Apple Store is a trademark of Apple - Apple M8840LL/A | Setup Guide - Page 3
Modem 18 Connecting to an Ethernet Network 19 Turning the Computer On 20 Problems Turning Your Computer On? 22 What's Next? 22 Turning the Computer Off 23 Securing the Computer 24 2 Working Inside the Computer 25 About Memory 26 DRAM Configurations 27 About Internal Storage Options 27 About the - Apple M8840LL/A | Setup Guide - Page 4
Installing DRAM 36 Installing a Hard Disk or Other Internal Storage Device 38 Installing a PCI Expansion Card 49 Replacing the Battery 52 Closing the Computer 53 What's Next? 55 Communications Regulation Information 57 Laser Information 58 Telephone and Modem Information 58 Mouse Information 62 4 - Apple M8840LL/A | Setup Guide - Page 5
- Apple M8840LL/A | Setup Guide - Page 6
Computer Apple USB keyboard (optional) 6-pin-to-4-pin FireWire cable Phone cord (comes with optional internal modem) Monitor Apple USB mouse Rear carrier drive installation screws (4) Computer power cord - Apple M8840LL/A | Setup Guide - Page 7
documentation included with your computer's software. If you plan to use your computer as a server or if you want to install additional drives, memory, or PCI cards inside the computer before you set up, turn to Chapter 2, "Working Inside the Computer," on page 25. Positioning the Computer - Apple M8840LL/A | Setup Guide - Page 8
Your Computer at a Glance Monitor Power button Apple USB keyboard Apple USB mouse CD-ROM, DVD-ROM, or DVD-RAM drive CCD-ROM, DVD-ROM, or DVD-RAM drive Open button Zip drive (optional) Speaker Power button / Power-on light ¥ Programmer's button P Reset button 8 Chapter 1 - Apple M8840LL/A | Setup Guide - Page 9
you to write information on DVD-RAM discs. For more information about the optional DVD-RAM drive and the disc types supported, see Apple's World Wide Web site: www.apple.com/support/ C CD-ROM, DVD-ROM, or DVD-RAM drive Open button Opens the drive tray Zip drive (optional) Works with Zip disks - Apple M8840LL/A | Setup Guide - Page 10
Your Computer's Ports and Connectors FireWire ports (2) W Internal modem port (optional) G Ethernet port (10/100 twisted-pair Ethernet) USB ports (2) ≈ Sound input port - Sound output port Lockable cover latch Monitor power socket ≤ Power socket ™ Monitor port (PCI slot 1) Access covers for - Apple M8840LL/A | Setup Guide - Page 11
or a mouse ≈ Sound input port Connects your Macintosh to an Apple PlainTalk microphone or other audio input equipment - Sound output port Connects to a monitor Access covers for expansion slots (3) Your Macintosh supports up to four peripheral component interconnect (PCI) cards. In most - Apple M8840LL/A | Setup Guide - Page 12
Plugging In the Computer Before you plug your Macintosh into a wall socket, carefully read all the setup instructions in this chapter. Then, before you connect any other equipment, follow the instructions in this section to plug it in. When you are ready to begin, follow these steps: 1 Make sure the - Apple M8840LL/A | Setup Guide - Page 13
Voltage Switch Settings for Different Locations Country Bermuda, Canada, Jamaica, Japan, Mexico, Philippines, Puerto Rico, Saudi Arabia, Taiwan, United States, Venezuela Switch Setting 115 Bahrain, Brazil, France, Indonesia, Italy, Lebanon, Peru, South Korea, Spain1 115 or 230 Australia, - Apple M8840LL/A | Setup Guide - Page 14
2 Plug one end of the computer's power cord into the recessed power socket marked with the symbol (≤) on the back of the computer. Warning To prevent electrical shock, fire, or damage to the computer, the power cord must fit completely over the prongs inside the socket. Power cord socket Power cord - Apple M8840LL/A | Setup Guide - Page 15
port or an Apple Desktop Bus (ADB) port are not supported. Before you connect a monitor to the computer, check the instructions that came with computer. Some monitors have the cable attached. Check the monitor's manual for any additional instructions. m If you have a monitor with a high-density D- - Apple M8840LL/A | Setup Guide - Page 16
dealer.) Monitor port on the computer Monitor port on the computer Mac-to-VGA adapter Connector on VGA and some Apple monitor cables (D-Sub 15 connector) Connector on some Apple monitor cables (DB-15 connector) 5 Connect any additional cables from the monitor to the computer. If you use a USB - Apple M8840LL/A | Setup Guide - Page 17
monitor works as a self-powered or bus-powered USB hub, and what devices you can connect to it. 2 Plug the Apple USB mouse cable into one of the ports on the Apple USB keyboard. You can plug the mouse into a USB port on a monitor or other device, but it's best to plug - Apple M8840LL/A | Setup Guide - Page 18
by lifting it and flipping the foot toward the back. The Apple USB keyboard can be tilted up slightly or can lie flat. install an internal modem. You can order an internal modem online from The Apple Store: www.apple.com/store Important Make sure you connect the modem to an analog phone line-the kind - Apple M8840LL/A | Setup Guide - Page 19
outlet. Also look for instructions about installing modem software and services and resources provided on a 10 megabit (Mbit) or 100 Mbit Ethernet network. Your computer alone lets you store Apple. See your Apple-authorized dealer for more information on Apple Ethernet media adapters. Setting Up 19 - Apple M8840LL/A | Setup Guide - Page 20
time, follow these steps: 1 Turn on the monitor. See the information that came with your monitor for the location of the power button. On newer Apple monitors, the power button, which can also turn on the computer, is located on the front. The power indicator light may not come on until - Apple M8840LL/A | Setup Guide - Page 21
't start up the computer, press the power button (®) on the front of the computer. You can also press the power button (®) on the Apple USB keyboard. Note: The Apple USB keyboard power button works only if the keyboard is connected to one of the computer's built-in USB ports. Computer power button - Apple M8840LL/A | Setup Guide - Page 22
items to see if you can identify the problem: m Is the computer plugged into a power that can help (see the monitor instruction manual). m Is the computer in sleep? troubleshooting handbook that came with your computer for help. What's Next? m For information about installing additional drives, memory - Apple M8840LL/A | Setup Guide - Page 23
computer. 2 Press the Return key or click Shut Down on the screen. If any applications are still open, a message asks if you want to save your work before the computer. If you have problems turning the computer on or off, see the troubleshooting handbook that came with your computer for more information - Apple M8840LL/A | Setup Guide - Page 24
this port and can secure your computer to your workspace. Follow the instructions supplied with the locking cable to secure it to your computer. When , feed the cable through the lockable latch on the cover to prevent memory, disk drives, and expansion cards from being removed. Security cables that - Apple M8840LL/A | Setup Guide - Page 25
that you have an Apple-certified technician install memory, PCI expansion cards, and internal storage devices. Consult the service and support information that came with your computer for instructions on how to contact an Apple-authorized service provider or Apple for service. If you install these - Apple M8840LL/A | Setup Guide - Page 26
66 MHz graphics card that supplies the computer's monitor port. Standard Macintosh models come with a minimum of 16 megabytes (MB) of SDRAM video memory. You can use the Apple System Profiler to check the amount of DRAM and VRAM installed in your computer. (The SDRAM DIMM slots are numbered starting - Apple M8840LL/A | Setup Guide - Page 27
pin module m Maximum number of 16 memory devices on DIMM m Unbuffered; do Mbit) device technology. For instructions on installing DRAM, see Apple or from other manufacturers. For more information on purchasing an internal Zip drive, visit The Apple Store on the World Wide Web at: http://store.apple - Apple M8840LL/A | Setup Guide - Page 28
Note: The maximum number of drives that can function in the lower drive bays is two ATA drives or three SCSI drives. For technical information about the power requirements for devices the computer can accommodate, see the electronic documentation that came with the computer. CD-ROM/DVD-ROM/DVD-RAM - Apple M8840LL/A | Setup Guide - Page 29
about devices supported, see your Apple-authorized dealer and the support section of Apple's Web site: www.apple.com/support/ Important Hard are installing SCSI drives, you must install a SCSI PCI card to support the drive. The accessory kit that came with your computer has a bag with four low - Apple M8840LL/A | Setup Guide - Page 30
to your Macintosh. To do this, you need to add a PCI card that supports the device. Instructions for PCI card installation appear in the section "Installing a PCI Expansion Card" on page 49. Instructions for drive installation appear in the section "Installing a Hard Disk or Other Internal Storage - Apple M8840LL/A | Setup Guide - Page 31
specifies that an Apple-certified technician must install the card (usually because the installation requires special training or tools), consult the service and support information that came with your computer for instructions on how to contact an Appleauthorized service provider for assistance. If - Apple M8840LL/A | Setup Guide - Page 32
your Apple-authorized dealer or service provider. Installing Memory, an Internal Storage Device, or a PCI Expansion Card, or Replacing the Battery Warning Always shut down the computer before opening it to avoid damaging its internal components. These instructions describe how to install memory, an - Apple M8840LL/A | Setup Guide - Page 33
components, inside the computer. To avoid generating static electricity, do not walk around the room until you have completed the installation of the expansion card, memory, or internal storage device and closed the computer. 6 Unplug the power cord. Working Inside the Computer 33 - Apple M8840LL/A | Setup Guide - Page 34
7 Lift the latch on the side of the computer. Lift the latch to unlock the side panel. 34 Chapter 2 - Apple M8840LL/A | Setup Guide - Page 35
8 Gently lower the panel onto a clean, flat surface. Lower the side of the computer onto a soft clean cloth to avoid scratching the case. Gently lower the side panel until it lies flat. Working Inside the Computer 35 - Apple M8840LL/A | Setup Guide - Page 36
9 Go to the section that provides the instructions for the item you want to install or Card" on page 49 "Replacing the Battery" on page 52 Installing DRAM Important Before installing memory, read "About Memory" at the beginning of this chapter and follow the steps in "Opening the Computer." 1 - Apple M8840LL/A | Setup Guide - Page 37
2 Align a DRAM DIMM in the DRAM slot as pictured and push the DIMM down until the ejectors snap into place. Important Do not touch the DIMM's connectors. Handle the DIMM only by the edges. DRAM DIMM (Your DIMM's shape and components may vary.) The DRAM DIMM is designed to fit into the slot only - Apple M8840LL/A | Setup Guide - Page 38
page 32. If you want to add a SCSI drive to a computer, you must first install an appropriate PCI card. Follow any instructions that came with the card and the instructions in the section "Installing a PCI Expansion Card" on page 49. After the card is installed, return to this section. It's easiest - Apple M8840LL/A | Setup Guide - Page 39
ribbon cable from the drive. If you're working with SCSI drives, disconnect the power cord bundle from the main logic board. Unplug the power cord bundle from the main logic board. Unlock the power cord bundle plug by pressing the small catch located on the side of the plug. (Side view) Unplug - Apple M8840LL/A | Setup Guide - Page 40
2 If you're removing a drive carrier that has a drive attached, remove the power cord bundle from the drive. In standard configurations, an Ultra ATA drive is in drive position 3 (the rear). Unplug the power cord bundle from the hard disk drive. There is no catch on this plug. The plug is held - Apple M8840LL/A | Setup Guide - Page 41
3 Remove the low-profile attachment screw from the drive carrier and tilt the carrier up to remove it from the computer. The head of the attachment screw is designed to work specifically with the drive carrier. Set the screw aside for now; you will use it when you put the carrier back in. The - Apple M8840LL/A | Setup Guide - Page 42
its jumper pins. Drives vary considerably and you should check the instructions that came with the device for information on selecting its setting. on configuring drives. If you still have questions, you can also contact an Apple-authorized dealer, who may be able to install the drive for a fee. m - Apple M8840LL/A | Setup Guide - Page 43
holes, as shown on the right side of the illustration. Note: The tinted screws illustrated below indicate the four screws that came in the computer's accessory kit. Use them where shown. Where untinted screws are shown, use the screws that came with the new drive. Attach an additional ATA drive - Apple M8840LL/A | Setup Guide - Page 44
m If you're installing a 1.0-inch or 1.6-inch SCSI drive to the carrier in drive position 1 or 2, attach the underside of the drive to the carrier (as shown below). Attach additional SCSI drives (1" or 1.6" high) to the two flat drive carriers by screwing them into position from the bottom. Position - Apple M8840LL/A | Setup Guide - Page 45
6 To replace the carrier and drive, align the tabs on the rear of the carrier with the slots in the computer chassis and slide the carrier in. Slide the hard disk drive into the computer at an angle, and lower it into position. Make sure the two tabs on the underside of the drive carrier engage the - Apple M8840LL/A | Setup Guide - Page 46
8 Plug the power cord bundles into the hard disk drives and arrange them so they fit around the side of the drives. Plug the power cord bundles into the hard disk drives. Be sure to press them firmly into position. Tuck the excess power cord bundle cable around the side of the hard disk drives - Apple M8840LL/A | Setup Guide - Page 47
9 Reconnect the main power cable bundle to the main logic board and the ribbon cable to the drives to the other SCSI drive. See the instructions that came with your SCSI PCI card or drive for information on connecting the ribbon cable. Plug the power cord bundle back into the main logic board. Plug - Apple M8840LL/A | Setup Guide - Page 48
10 If you have installed two or more SCSI drives, tape the SCSI data cable to the top of the drives in positions 1 and 2. If you're installing a SCSI drive in drive position 1 or 2, put the ribbon cable on top of the drives. You can tape the ribbon cable to the tops of the drives with double-stick - Apple M8840LL/A | Setup Guide - Page 49
Installing a PCI Expansion Card Important Before installing a PCI expansion card, read "About PCI Expansion Cards" on page 30 and follow the steps in "Opening the Computer" on page 32. 1 Remove the screw that holds the port access cover in place, pull out the access cover, and set it aside. 2 If you - Apple M8840LL/A | Setup Guide - Page 50
until the connector is inserted all the way into the slot. If you're installing a 12-inch card, make sure the card engages the appropriate guide at the front of the computer. Reinstall the screw to secure the card in place. Port access opening PCI slot If the PCI card you - Apple M8840LL/A | Setup Guide - Page 51
computer, skip ahead to "Closing the Computer" later in this chapter. To install additional items inside your computer, go to the section that provides the instructions you need. To install New battery Go to the section "Replacing the Battery" on page 52 Working Inside the Computer 51 - Apple M8840LL/A | Setup Guide - Page 52
Replacing the Battery 1 Remove the battery from its holder, noting the orientation of the battery's positive and negative ends. Important Batteries contain chemicals, some of which may be harmful to the environment. Please dispose of used batteries according to your local environmental laws and - Apple M8840LL/A | Setup Guide - Page 53
Closing the Computer Warning Never turn on your computer unless all of its internal and external parts are in place and it is closed. Operating the computer when it is open or missing parts can damage your computer or cause injury. 1 Raise the computer's side panel and press it against the case. - Apple M8840LL/A | Setup Guide - Page 54
2 Squeeze the side panel until it snaps securely into place. Place your thumbs on these two screws and squeeze the side panel firmly closed. 3 After you have closed the computer, return to Chapter 1, "Setting Up," if you are setting up for the first time or if you need help reconnecting the cables. - Apple M8840LL/A | Setup Guide - Page 55
may need to be initialized with a diskformatting utility. See the documentation that came with the equipment for additional installation or configuration instructions. Some older devices may require updated drivers to work with your computer. (A driver is special software that is installed in your - Apple M8840LL/A | Setup Guide - Page 56
- Apple M8840LL/A | Setup Guide - Page 57
instructions if interference to radio or television reception is suspected. Radio and Television Interference The equipment described in this manual generates , consult an Apple-authorized service provider or Apple. See the service and support information that came with your Apple product. Or, - Apple M8840LL/A | Setup Guide - Page 58
other than those specified in your equipment's manual may result in hazardous radiation exposure. Do not For your safety, have this equipment serviced only by an Apple-authorized service provider. If you have an internal Apple CD-ROM, DVD-ROM, or DVD instructions for details. 58 Laser Information - Apple M8840LL/A | Setup Guide - Page 59
people. If disconnecting the modem eliminates the problem, the modem itself may need service. See the service and support information that came with your Apple product for instructions on how to contact Apple or an Appleauthorized service provider for assistance. If you do not disconnect - Apple M8840LL/A | Setup Guide - Page 60
ées par l'utilisateur ou en raison d'un mauvais fonctionnement. Veuillez contacter Apple pour des informations supplémentaires: Apple Canada, Inc. 7495 Birchmount Road Markham, Ontario Canada L3R 5G2 Service à la clientèle d'Apple Canada: 800-263-3394 Pour sa propre protection, l'utilisateur doit - Apple M8840LL/A | Setup Guide - Page 61
336 / EWG und 92 / 31 / EWG. Information You Need in France Ce matériel est conforme aux normes applicables de sécurité éléctrique d'après la directive 73 / 23 / CEE et aux normes applicables de comptabilité éléctromagnétique d'après la directive 89 / 336 / CEE, modifié par la directive 92 / 31 / CEE - Apple M8840LL/A | Setup Guide - Page 62
Information You Need in New Zealand This modem is fully approved to operate on the New Zealand telecommunications network under Telepermit number PTC 211/98/119. All telecommunications devices are required to hold a Telepermit and be labelled accordingly with the approved Telepermit number to comply
-
 1
1 -
 2
2 -
 3
3 -
 4
4 -
 5
5 -
 6
6 -
 7
7 -
8
-
9
-
10
-
11
-
12
-
13
-
14
-
15
-
16
-
17
-
18
-
19
-
20
-
21
-
22
-
23
-
24
-
25
-
26
-
27
-
28
-
29
-
30
-
31
-
32
-
33
-
34
-
35
-
36
-
37
-
38
-
39
-
40
-
41
-
42
-
43
-
44
-
45
-
46
-
47
-
48
-
49
-
50
-
51
-
52
-
53
-
54
-
55
-
56
-
57
-
58
-
59
-
60
-
61
-
62
 |
 |

Setting Up Your
Power Macintosh G4
Includes setup and expansion information
for your Power Macintosh G4