Asus VIA User Manual - Page 26
Central Processing Unit CPU
 |
View all Asus VIA manuals
Add to My Manuals
Save this manual to your list of manuals |
Page 26 highlights
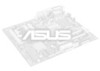
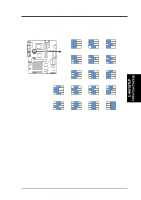
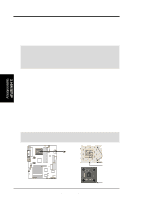
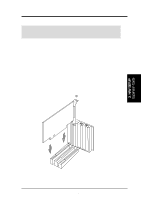
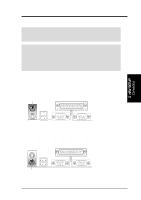
3. HARDWARE SETUP 3.6 Central Processing Unit (CPU) The motherboard provides a Socket 462 or Socket A for CPU installation. The CPU that came with the motherboard should have a fan and heatsink attached to it to prevent overheating. If this is not the case, then purchase and install a set before you turn on your system. WARNING! Make sure that the heatsink is mounted tightly against the processor. Make sure also that there is sufficient air circulation across the processor's heatsink by regularly checking that your CPU fan is working. Without sufficient circulation, the processor could overheat and damage both the processor and the motherboard. You may install an auxiliary fan, if necessary. To install a CPU, first turn off your system and remove its cover. Locate the Socket 462 and open it by first pulling the lever sideways away from the socket, then upwards. The socket lever must be fully opened (90 to 100 degrees) when installing or removing the CPU. Insert the CPU with the correct orientation. The notched corner should be oriented toward the blank space on the socket nearest the lever. The CPU has a corner pin for two of the four corners, and will only fit in the orientation as shown. Ensure that the CPU is exactly parallel to the socket base so the pins make good contact and are not bent. Take care not to exert too much force, but press the CPU down gently into the slot. Once completely inserted, close the socket lever while holding down the CPU. With the added weight of the CPU fan and heatsink locking brace, no extra force is required to keep the CPU in place. The CPU fan and heatsink should cover the entire face of the CPU. NOTE: If necessary, do not forget to set the correct Bus Frequency and Multiple for your processor or else boot-up may not be possible. Frequency multiple settings are available only on unlocked processors. CAUTION! Be careful not to scrape the motherboard surface when mounting a clamp-style processor fan or else damage may occur to the motherboard. 3. H/W SETUP System Memory 01 01 01 AMD™ Athlon A7V A7V Socket 462 (Socket A) 26 ASUS A7V User's Manual BLANK LEVER LOCK NOTCH
-
 1
1 -
2
-
3
-
4
-
5
-
6
-
7
-
8
-
9
-
10
-
11
-
12
-
13
-
14
-
15
-
16
-
17
-
18
-
19
-
20
-
 21
21 -
 22
22 -
 23
23 -
 24
24 -
 25
25 -
 26
26 -
 27
27 -
 28
28 -
 29
29 -
 30
30 -
 31
31 -
32
-
33
-
34
-
35
-
36
-
37
-
38
-
39
-
40
-
41
-
42
-
43
-
44
-
45
-
46
-
47
-
48
-
49
-
50
-
51
-
52
-
53
-
54
-
55
-
56
-
57
-
58
-
59
-
60
-
61
-
62
-
63
-
64
-
65
-
66
-
67
-
68
-
69
-
70
-
71
-
72
-
73
-
74
-
75
-
76
-
77
-
78
-
79
-
80
-
81
-
82
-
83
-
84
-
85
-
86
-
87
-
88
-
89
-
90
-
91
-
92
-
93
-
94
-
95
-
96
-
97
-
98
-
99
-
100
 |
 |