Asus VIA User Manual - Page 77
Boot Menu
 |
View all Asus VIA manuals
Add to My Manuals
Save this manual to your list of manuals |
Page 77 highlights
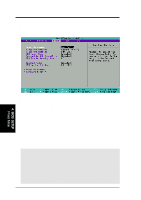
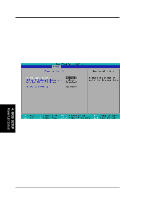
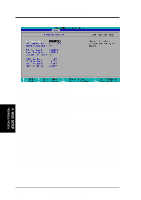
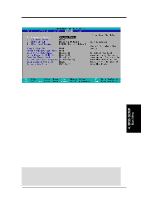
4. BIOS SETUP 4.6 Boot Menu 4. BIOS SETUP Boot Menu Boot Sequence The Boot menu allows you to select among the four possible types of boot devices listed using the up and down arrow keys. By using the or key, you can promote devices and by using the key, you can demote devices. Promotion or demotion of devices alters the priority which the system uses to search for a boot device on system power up. Configuration fields include Removable Devices, IDE Hard Drive, ATAPI CD-ROM, and Other Boot Device. Removable Device [Legacy Floppy] Configuration options: [Disabled] [Legacy Floppy] [LS120] [ZIP-100] [ATAPI MO] [USB FDD] [USB ZIP] IDE Hard Drive This field allows you to select which IDE hard disk drive to use in the boot sequence. Pressing [Enter] will show the product IDs of all connected IDE hard disk drives. ATAPI CD-ROM This field allows you to select which ATAPI CD-ROM drive to use in the boot sequence. Pressing [Enter] will show the product IDs of all your connected ATAPI CD-ROM drives. IMPORTANT: Make sure the ATAPI CD-ROM drive that you want to use in the boot sequence is connected to either the PRIMARY or SECONDARY IDE connectors, not to the ATA100 connectors. Currently, the Promise® Ultra DMA/100 chip does not support this feature. ASUS A7V User's Manual 77
-
 1
1 -
2
-
3
-
4
-
5
-
6
-
7
-
8
-
9
-
10
-
11
-
12
-
13
-
14
-
15
-
16
-
17
-
18
-
19
-
20
-
21
-
22
-
23
-
24
-
25
-
26
-
27
-
28
-
29
-
30
-
31
-
32
-
33
-
34
-
35
-
36
-
37
-
38
-
39
-
40
-
41
-
42
-
43
-
44
-
45
-
46
-
47
-
48
-
49
-
50
-
51
-
52
-
53
-
54
-
55
-
56
-
57
-
58
-
59
-
60
-
61
-
62
-
63
-
64
-
65
-
66
-
67
-
68
-
69
-
70
-
71
-
 72
72 -
 73
73 -
 74
74 -
 75
75 -
 76
76 -
 77
77 -
 78
78 -
 79
79 -
 80
80 -
 81
81 -
 82
82 -
83
-
84
-
85
-
86
-
87
-
88
-
89
-
90
-
91
-
92
-
93
-
94
-
95
-
96
-
97
-
98
-
99
-
100
 |
 |
