Bernina 810 Manual - Page 17
Automatic, stitches
 |
View all Bernina 810 manuals
Add to My Manuals
Save this manual to your list of manuals |
Page 17 highlights
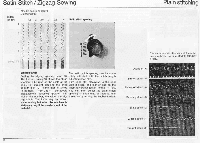
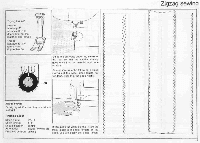
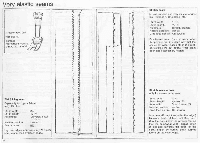
'AikAW4 ,15V3MMVIIII Automatic stitches F r r 1:: E 16 O 13 Zigzag foot 000 Needle: 80-70 Embroidery thread: 30 0 I mom.. 2 3 -4 Automatic Pull lever 13 to right and set it next to desired pattern. When doing this do not leave the needle down in the material. Stitch width: 4 Stitch length: 1 Needle position: centre Drop feed control: sewing Paper underlay when needed Satin Stitch (Close zigzag) Stitch width: 4-1'h Stitch length: almost 0 Needle position: centre Automatic: zigzag WANWV (1) Drop feed control: sewing When embroidering it is advisable to lay paper underneath to prevent the material from puckering. (Do not use tissue paper, as this is too soft. Typewriting paper is excellent.) The satin stitch spacing can be accurately set by turning the stitch adjustment knob (19) from stop ..0" to the left (direction of arrow. (See also page 10)
-
 1
1 -
2
-
3
-
4
-
5
-
6
-
7
-
8
-
9
-
10
-
11
-
 12
12 -
 13
13 -
 14
14 -
 15
15 -
 16
16 -
 17
17 -
 18
18 -
 19
19 -
 20
20 -
 21
21 -
 22
22 -
23
-
24
-
25
-
26
-
27
-
28
-
29
-
30
-
31
-
32
-
33
-
34
-
35
-
36
-
37
-
38
-
39
-
40
-
41
-
42
-
43
-
44
-
45
-
46
-
47
-
48
-
49
-
50
-
51
-
52
-
53
-
54
-
55
-
56
-
57
 |
 |
