Brother International ADS-3000N Network Users Guide
Brother International ADS-3000N Manual
 |
View all Brother International ADS-3000N manuals
Add to My Manuals
Save this manual to your list of manuals |
Brother International ADS-3000N manual content summary:
- Brother International ADS-3000N | Network Users Guide - Page 1
Network User's Guide Version C ENG - Brother International ADS-3000N | Network Users Guide - Page 2
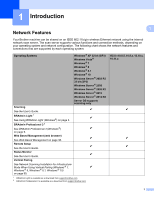
Setup™ (WPS 19 Configuration in Ad-hoc Mode ...22 Using a Configured SSID ...22 Configure Your Machine for a Wireless Network Using the Machine's Control Panel Setup ® Network Manually 37 4 Web Based Management 38 Overview...38 Configure Your Machine Settings ...39 Set a Login Password...40 - Brother International ADS-3000N | Network Users Guide - Page 3
Network Configuration (Windows 52 Change the Scan to SharePoint Configuration (Windows 54 Configure TCP/IP Advanced Settings...56 Address Book Import/Export (ADS-2800W / ADS Template 75 IKEv2 Settings for an IPsec Template 77 Manual Settings for an IPsec Template 80 Restricting Scan Functions - Brother International ADS-3000N | Network Users Guide - Page 4
7 Troubleshooting 87 Overview...87 Identifying Your Problem ...87 8 Additional Network Settings (Windows ®) 97 Setting Types...97 Install Drivers Used for Scanning via Web Services (Windows Vista ®, Windows ® 7, Windows® 8, Windows ® 8.1, Windows ® 10) ...97 Network Scanning Installation for - Brother International ADS-3000N | Network Users Guide - Page 5
Network Scanning Installation for Infrastructure Mode When Using Vertical Pairing (Windows ® 7, r Windows ® 8, Windows ® 8.1, Windows ® 10) on page 99. 1 BRAdmin Light is available as a download from support.brother.com 2 BRAdmin Professional 3 is available as a download from support.brother - Brother International ADS-3000N | Network Users Guide - Page 6
panel, BRAdmin Professional 3, or Web Based Management. Security 1 Your Brother machine employs some of the latest network security and encryption protocols available. (See Security Features on page 63.) Wi-Fi Direct® (ADS-2800W / ADS-3600W) 1 Wi-Fi Direct ® is one of the wireless configuration - Brother International ADS-3000N | Network Users Guide - Page 7
How to Check the Network Status (ADS-2800W / ADS-3600W) 2 1 On your machine's LCD, press . 2 Press Network. 3 Press Wired LAN. 4 Press Wired Status. 5 Press Status. Using BRAdmin Light (Windows®) 2 The BRAdmin Light utility is designed for initial setup of Brother network-connected devices. It also - Brother International ADS-3000N | Network Users Guide - Page 8
Changing Your Network Settings Setting the IP address, Subnet Mask and Gateway Using BRAdmin Light 2 NOTE • Go to your model's Downloads page on the Brother Solutions Center at support.brother.com to download the latest version of Brother's BRAdmin Light. 2 • If you require more advanced - Brother International ADS-3000N | Network Users Guide - Page 9
/ ADS-3600W). To find the MAC Address, press > Network > WLAN > MAC Address. To find the Node Name, press > Network > WLAN > TCP/IP > Node Name. 4 Select STATIC from the Boot Method list. Type the IP Address, Subnet Mask and Gateway (if needed) for your machine. 5 Click OK. 6 Your Brother machine - Brother International ADS-3000N | Network Users Guide - Page 10
devices on your network and export the log data in HTML, CSV, TXT, or SQL format. NOTE • Use the latest version of the BRAdmin Professional 3 utility. Go to your model's Downloads page on the Brother Solutions Center at support.brother.com to download Brother's BRAdmin Professional 3. This utility - Brother International ADS-3000N | Network Users Guide - Page 11
Device Status (ALL) Refreshes the status of the devices that BRAdmin Professional is communicating with. 3 Set up Unconfigured Devices If your network-connected Brother device does not have a valid IP address, BRAdmin Professional allows you to set your device's IP address, subnet mask, gateway - Brother International ADS-3000N | Network Users Guide - Page 12
a Wireless Network (ADS-2800W / ADS-3600W) 3 Overview 3 To connect your machine to your wireless network, we recommend following one of the setup methods outlined in the Quick Setup Guide. Go to your model's page on the Brother Solutions Center at solutions.brother.com/manuals to download the - Brother International ADS-3000N | Network Users Guide - Page 13
Network (ADS-2800W / ADS-3600W) Confirm Your Network Environment 3 Connected to a Computer with a WLAN Access Point/Router in the Network (Infrastructure Mode) 3 3 1 5 4 2 3 1 WLAN access point/router 1 1 If your computer supports your Brother machine in a wireless network environment. - Brother International ADS-3000N | Network Users Guide - Page 14
a WLAN Access Point/Router in the Network (Ad-hoc Mode) 3 This type of network does not have a central WLAN access point/router. Each wireless client communicates directly with the other. When the Brother wireless machine (your machine) is part of this network, it receives all scan jobs directly - Brother International ADS-3000N | Network Users Guide - Page 15
AES TKIP 1 Network Key - For example: 3 Network name (SSID) HELLO Communication Mode Infrastructure Authentication method WPA2-PSK Encryption mode AES Network key 12345678 NOTE If your router uses WEP encryption, enter the key used as the first WEP key. Your Brother machine supports the use - Brother International ADS-3000N | Network Users Guide - Page 16
Configuring Your Machine for a Wireless Network (ADS-2800W / ADS-3600W) 2 Do one of the following: Windows ® a Insert the supplied DVD-ROM into your DVD-ROM drive. b Select Wireless Network Connection (Wi-Fi), and then click Next. 3 c Click Wireless Setup. 12 - Brother International ADS-3000N | Network Users Guide - Page 17
Configuring Your Machine for a Wireless Network (ADS-2800W / ADS-3600W) Macintosh a Download the full driver and software package from the Brother Solutions Center (support.brother.com). b Double-click the BROTHER icon on your desktop. c Double-click Utilities. 3 d Double-click Wireless - Brother International ADS-3000N | Network Users Guide - Page 18
Configuring Your Machine for a Wireless Network (ADS-2800W / ADS-3600W) 3 Select Setup with a USB cable (Recommended), and then click Next. We recommend using a USB cable temporarily. 3 NOTE If this screen appears, read the Important Notice. Confirm the SSID and Network Key, select the Checked and - Brother International ADS-3000N | Network Users Guide - Page 19
Configuring Your Machine for a Wireless Network (ADS-2800W / ADS-3600W) 5 Click Next. (Windows® Only) 3 6 Do one of the following: • Select the SSID you want to use and click Next. Then configure Network Key and go to 0. • If the SSID you want to use is not broadcasting, click Advanced and go to 7. - Brother International ADS-3000N | Network Users Guide - Page 20
Configuring Your Machine for a Wireless Network (ADS-2800W / ADS-3600W) 7 Type a new SSID in the Name(SSID) field, and then click Next. 3 8 Select the Authentication Method and Encryption Mode from the drop-down lists, type a network key in the Network Key field, and then click Next and go to 0. 16 - Brother International ADS-3000N | Network Users Guide - Page 21
Network (ADS-2800W / ADS-3600W) 9 Type a new Network key in the Network Key field, and then click Next. 3 0 Click Next. The machine receives the settings. (The following screen may differ depending on your settings.) NOTE DO NOT disconnect the USB cable until the on-screen instruction confirms - Brother International ADS-3000N | Network Users Guide - Page 22
as shown below. 3 3 2 Place the Brother machine within range of your wireless access point/router. The range may differ depending on your environment. Refer to the instructions provided with your wireless access point/router. 3 On the machine's LCD, press > Network > WLAN > WPS. When Enable WLAN - Brother International ADS-3000N | Network Users Guide - Page 23
Configuring Your Machine for a Wireless Network (ADS-2800W / ADS-3600W) Using the PIN Method of Wi-Fi Protected Setup™ (WPS) 3 If your WLAN access point/router supports WPS (PIN Method), configure the machine using the instructions. NOTE The Personal Identification Number (PIN) Method is one of - Brother International ADS-3000N | Network Users Guide - Page 24
or Windows ® 10 as a Registrar, you can install the scanner driver after the wireless configuration by following the on-screen instructions. To install the full driver and software package, follow the steps in the Quick Setup Guide for installation. Windows Vista®/Windows ® 7/Windows® 8/Windows - Brother International ADS-3000N | Network Users Guide - Page 25
LAN Error Codes (ADS-2800W / ADS-3600W) on page 89 and correct the error. Windows ® You have completed the wireless network setup. To continue installing the drivers and software necessary for operating your device, put the DVD-ROM into your DVD drive. 3 NOTE If the Brother screen does not - Brother International ADS-3000N | Network Users Guide - Page 26
with your computer or contact your network administrator. Network name (SSID) Communication Mode Ad-hoc Encryption mode NONE WEP Network key - For example: 3 Network name (SSID) HELLO Communication Mode Ad-hoc Encryption mode WEP NOTE Your Brother machine supports the use of the first WEP - Brother International ADS-3000N | Network Users Guide - Page 27
Configuring Your Machine for a Wireless Network (ADS-2800W / ADS-3600W) 2 Do one of the following: Windows ® a Insert the supplied DVD-ROM into your DVD-ROM drive. b Select Wireless Network Connection (Wi-Fi), and then click Next. 3 c Click Wireless Setup. 23 - Brother International ADS-3000N | Network Users Guide - Page 28
Configuring Your Machine for a Wireless Network (ADS-2800W / ADS-3600W) Macintosh a Download the full driver and software package from the Brother Solutions Center (support.brother.com). b Double-click the BROTHER icon on your desktop. c Double-click Utilities. 3 d Double-click Wireless - Brother International ADS-3000N | Network Users Guide - Page 29
Configuring Your Machine for a Wireless Network (ADS-2800W / ADS-3600W) 3 Select Setup with a USB cable (Recommended), and then click Next. We recommend using a USB cable temporarily. 3 NOTE If this screen appears, read the Important Notice. Confirm the SSID and Network Key, select the Checked and - Brother International ADS-3000N | Network Users Guide - Page 30
Configuring Your Machine for a Wireless Network (ADS-2800W / ADS-3600W) 5 Click Next. (Windows® Only) 3 6 Click Advanced. NOTE If the list is blank, confirm that the access point has power and is broadcasting the SSID, - Brother International ADS-3000N | Network Users Guide - Page 31
Configuring Your Machine for a Wireless Network (ADS-2800W / ADS-3600W) 7 Check the This is an Ad-hoc network and there is no access point. and then click Next. 3 8 Select the Authentication Method and Encryption Mode from the drop-down lists, type a network key in the Network Key field, and then - Brother International ADS-3000N | Network Users Guide - Page 32
Configuring Your Machine for a Wireless Network (ADS-2800W / ADS-3600W) 9 Click Next. The machine receives the settings. (Encryption Mode is WEP in the following example.) 3 0 Disconnect the USB cable between the computer and the machine. A Click Finish. 28 - Brother International ADS-3000N | Network Users Guide - Page 33
the use of multiple WEP keys, however your Brother machine supports the use of the first WEP key only. • If you need assistance during setup and want to contact Brother Customer Service, make sure you have your SSID (Network Name) and Network Key ready. We cannot help you find this information - Brother International ADS-3000N | Network Users Guide - Page 34
LCD displays Connected. You have completed the wireless network setup. To install the drivers and software necessary for operating your machine, insert the installation DVD-ROM into your computer's drive or go to your model's Downloads page on the Brother Solutions Center at support.brother.com 30 - Brother International ADS-3000N | Network Users Guide - Page 35
Setup™ (WPS). You can also configure a wireless network by manually setting an SSID and password. Your Brother machine's Wi-Fi Direct ® feature supports WPA2™ security with AES encryption. 1 2 1 Mobile device 2 Your Brother machine NOTE • Although the Brother machine can be used in both a wired - Brother International ADS-3000N | Network Users Guide - Page 36
-Fi Protected Setup™ (WPS) Configure Your Wi-Fi Direct® Network Manually Wi-Fi Direct ® Network Configuration Overview 3 The following instructions offer five methods for configuring your Brother machine in a wireless network environment. Select the method you prefer for your environment. Check - Brother International ADS-3000N | Network Users Guide - Page 37
Press [OK] to connect. appears on the LCD. Press OK to connect. 1 Press > Network > Wi-Fi Direct > Push Button. 2 Activate Wi-Fi Direct ® on your mobile device (see your mobile device's user's guide for instructions) when Activate Wi-Fi Direct on other device. Then Press [OK]. appears on the machine - Brother International ADS-3000N | Network Users Guide - Page 38
your mobile device's WPS one-push configuration method (see your mobile device's user's guide for instructions) when Activate Wi-Fi Direct on other device. Then Press [OK]. appears on the machine's LCD. Press OK on your Brother machine. This will start the Wi-Fi Direct ® setup. To cancel, press - Brother International ADS-3000N | Network Users Guide - Page 39
Network (ADS-2800W / ADS-3600W) 4 Do one of the following: If your Brother network setup. Configure Your Wi-Fi Direct® Network Using the PIN Method of Wi-Fi Protected Setup™ (WPS) 3 If your mobile device supports user's guide for instructions), and then press OK on your Brother machine. The Wi- - Brother International ADS-3000N | Network Users Guide - Page 40
Configuring Your Machine for a Wireless Network (ADS-2800W / ADS-3600W) 6 The machine waits for a connection request from your mobile device. When PIN Code appears, mobile device connects successfully, the machine's LCD displays Connected. You have now completed the Wi-Fi Direct ® network setup. 3 36 - Brother International ADS-3000N | Network Users Guide - Page 41
Configuring Your Machine for a Wireless Network (ADS-2800W / ADS-3600W) Configure Your Wi-Fi Direct® Network Manually 3 If your mobile device does not support Wi-Fi Direct ® or WPS, you must configure a Wi-Fi Direct ® network manually. NOTE When the machine receives the Wi-Fi Direct ® request - Brother International ADS-3000N | Network Users Guide - Page 42
Brother machine and scan server. Change network and machine configuration details (see Configure Your Machine Settings on page 39). 4 Configure settings to restrict unauthorized access from others. • See Set a Login Password on page 40. • See Configure Active Directory LDAP Authentication (ADS - Brother International ADS-3000N | Network Users Guide - Page 43
Management, you must configure a CA certificate before starting Web Based Management. See Manage Multiple Certificates on page 69. 2 No password is required by default. Type the password if you have set one, and then click . 3 You can now configure your machine settings. NOTE If you have changed - Brother International ADS-3000N | Network Users Guide - Page 44
Management. 1 Start Web Based Management and access your Brother machine (see step 1 on page 39). 2 When the Web Based Management screen appears, click the Administrator tab, and then click Login Password in the left navigation bar. 3 Type the password you want to use (up to 32 characters). 4 Retype - Brother International ADS-3000N | Network Users Guide - Page 45
LDAP Authentication 4 LDAP Authentication restricts the use of your Brother machine. If LDAP Authentication is enabled, the machine's control panel will be locked. You cannot change the machine's settings until you enter a user ID and password. • Obtains email address depending on the user ID from - Brother International ADS-3000N | Network Users Guide - Page 46
save your user ID. Type the IP address or the server name (for example: ad.example.com) of the LDAP Server. Select this option to obtain your machine's email address panel will be locked until you enter your User ID and password on the machine's control panel. 1 On the machine's control panel, use - Brother International ADS-3000N | Network Users Guide - Page 47
password. NOTE 4 • Active Directory Authentication supports Kerberos authentication. • You must configure Simple Network Time Protocol (SNTP) (Network time server) first. 1 Start Web Based Management and access your Brother the server name (for example: "ad.example.com") of the Active Directory - Brother International ADS-3000N | Network Users Guide - Page 48
instructions. ID, and Password. 2 ADS-3600W) 4 The LDAP protocol allows you to search for email addresses from your server using the Scan to E-mail server function. Changing LDAP Configuration 4 1 Start Web Based Management and access your Brother machine (see step 1 on page 39). 2 Click Network - Brother International ADS-3000N | Network Users Guide - Page 49
. Password The availability supports Kerberos Authentication, we recommend selecting Kerberos for the Authentication setting. It provides strong authentication between the LDAP server and your machine. You must configure the SNTP protocol (network ADS-2800W / ADS-3600W) in the User's Guide. 45 - Brother International ADS-3000N | Network Users Guide - Page 50
. 9 Press Apply. 0 Press OK. 4 NOTE Press Options to adjust your scan settings before scanning the document. A Press Start. NOTE • The LDAP function of this machine supports LDAPv3. • For more information, click on the right side of the LDAP setting screen. 46 - Brother International ADS-3000N | Network Users Guide - Page 51
functionality will work without changing any initial settings. 4 1 Start Web Based Management and access your Brother machine (see step 1 on page 39). 2 When the Web Based Management screen appears, click Network, and then click the Protocol menu in the left navigation bar. 3 Select the SNTP check - Brother International ADS-3000N | Network Users Guide - Page 52
Web Based Management Synchronization Interval Type the number of hours between server synchronization attempts (between 1 and 168 hours). NOTE • You must configure Date&Time to synchronize the time used by the machine with the SNTP time server. Click Date&Time, and then configure Date&Time on the - Brother International ADS-3000N | Network Users Guide - Page 53
settings: Profile Name (up to 15 characters) Host Address Username Password Store Directory File Name Quality Auto Color detect adjust File Type Password for Secure PDF (ADS-2400N / ADS-3000N) Document Size Margin Settings File Size Auto Deskew Skip Blank - Brother International ADS-3000N | Network Users Guide - Page 54
network or on the Internet. For more information about Scan to SFTP, see Scan Documents to an SFTP Server in the User's Guide. 1 Start Web Based Management and access your Brother Color detect adjust File Type Password for Secure PDF (ADS-2400N / ADS-3000N) Document Size Margin Settings - Brother International ADS-3000N | Network Users Guide - Page 55
Web Based Management Continuous Scan (ADS-2800W / ADS-3600W) Port Number You can change the port number used to access the SFTP server. The default for this setting is port 21. In most cases, this setting can remain set as default. 7 Click Submit. 4 51 - Brother International ADS-3000N | Network Users Guide - Page 56
time zone, see the User's Guide.) 1 Start Web Based Management and access your Brother machine (see step 1 on Network settings: Profile Name (up to 15 characters) Network Folder Path File Name Quality Auto Color detect adjust File Type Password for Secure PDF (ADS-2400N / ADS-3000N - Brother International ADS-3000N | Network Users Guide - Page 57
Web Based Management Use PIN for Authentication PIN Code Auth. Method Username Password Date&Time 7 Click Submit. 4 53 - Brother International ADS-3000N | Network Users Guide - Page 58
Guide. NOTE Scan to Sharepoint supports NTLMv2 Authentication. 4 You must configure the SNTP protocol (network , see the User's Guide.) 1 Start Web Based Management and access your Brother machine (see step File Type Password for Secure PDF (ADS-2400N / ADS-3000N) Document Size Margin - Brother International ADS-3000N | Network Users Guide - Page 59
Web Based Management Skip blank page sensitivity 2-sided Scan Brightness Contrast Continuous Scan (ADS-2800W / ADS-3600W) Use PIN for Authentication PIN Code Auth. Method 4 Username Password Date&Time 7 Click Submit. 55 - Brother International ADS-3000N | Network Users Guide - Page 60
Web Based Management Configure TCP/IP Advanced Settings 4 1 Start Web Based Management and access your Brother machine (see step 1 on page 39). 2 Click the Network tab, and then select your connection type (Wired or Wireless). 3 Select TCP/IP in the left navigation menu. 4 Click Advanced - Brother International ADS-3000N | Network Users Guide - Page 61
Web Based Management Primany DNS Server IP Address, Secondary DNS Server IP Address Type the server's IP address. The Secondary DNS server IP Address is used as a backup to the Primary DNS server IP address. If the Primary DNS server is unavailable, the machine will contact the Secondary DNS - Brother International ADS-3000N | Network Users Guide - Page 62
Web Based Management Address Book Import/Export (ADS-2800W / ADS-3600W) Address Book Import 1 Start Web Based Management and access your Brother machine (see step 1 on page 39). 2 Click the Address Book tab. 3 Select Import in the left navigation menu. 4 Input "Address Book" data file or "Group" - Brother International ADS-3000N | Network Users Guide - Page 63
5 Scan to E-mail Server (ADS-2800W / ADS-3600W) 5 Overview 5 The Scan to E-mail Server function allows you to send scanned documents as attachments via email. 3 2 2 1 4 1 Sender 2 Email server 3 Internet 4 Receiver Size Restrictions - Brother International ADS-3000N | Network Users Guide - Page 64
ADS-2800W / ADS-3600W) Configure the Scan to E-mail Server Settings 5 Before using the Scan to E-mail Server function, you must configure your Brother machine to communicate with your network Name and password 5 If you are unsure of any of these items, contact your network administrator. NOTE - Brother International ADS-3000N | Network Users Guide - Page 65
then press OK. 4 Press Start. For more information about email settings, see Send Scanned Documents Directly to an Email Address (ADS-2800W / ADS-3600W) in the User's Guide. After the document is scanned, it is sent to the specified email address automatically via your SMTP server. When finished - Brother International ADS-3000N | Network Users Guide - Page 66
mail Server (ADS-2800W / ADS-3600W) and time. 1 On your machine's LCD, press . 5 2 Press Network. 3 Press E-mail. 4 Press Setup Mail TX. 5 Press Notification report; otherwise the request will be ignored. • This Brother machine cannot receive email messages. To use the TX Verification - Brother International ADS-3000N | Network Users Guide - Page 67
6 Security Features 6 Overview 6 Your Brother machine employs some of the latest network security and encryption protocols available. These network features can be integrated into your overall network security plan to help protect your data and prevent unauthorized access to the machine. You can - Brother International ADS-3000N | Network Users Guide - Page 68
(ADS-2800W / ADS- 3 No password is required by default. Type a password if you have set one, and then click . 4 Click Network. 5 Service Provider (ISP) for more information. 8 When finished, click Submit. The Test Send E-mail Configuration dialog box appears. 9 Follow the on-screen instructions - Brother International ADS-3000N | Network Users Guide - Page 69
TLS 6 This machine supports SSL/TLS to send value is changed to match the protocol. To change the port number manually, select SSL/TLS, and then type the port number. 6 contact your network administrator or ISP (Internet Service Provider). In most cases, the secured webmail services require - Brother International ADS-3000N | Network Users Guide - Page 70
node name. • For example: http://brnxxxxxxxxxxxx/ The NetBIOS name can be found in the Network Configuration Report. 3 No password is required by default. Type a password if you have set one, and then press . 4 Click the Network tab. 5 Click the Security tab. 6 Click Client Key Pair in the left - Brother International ADS-3000N | Network Users Guide - Page 71
name. 6 • For example: http://brnxxxxxxxxxxxx/ The NetBIOS name can be found in the Network Configuration Report. 3 No password is required by default. Type a password if you have set one, and then press . 4 Click the Network tab. 5 Click the Security tab. 6 Click Client Key Pair in the left - Brother International ADS-3000N | Network Users Guide - Page 72
name. • For example: 6 http://brnxxxxxxxxxxxx/ The NetBIOS name can be found in the Network Configuration Report. 3 No password is required by default. Type a password if you have set one, and then press . 4 Click the Network tab. 5 Click the Security tab. 6 Click Server Public Key in the left - Brother International ADS-3000N | Network Users Guide - Page 73
/ You can find the NetBIOS name on your machine's control panel under Node Name. 3 No password is required by default. Type a password if you have set one, and then click . 4 Click the Network tab, and then click Security. 5 Click CA Certificate. 6 Click Import CA Certificate and select the - Brother International ADS-3000N | Network Users Guide - Page 74
/ 6 You can find the NetBIOS name on your machine's control panel under Node Name. 3 No password is required by default. Type a password if you have set one, and then click . 4 Click the Network tab, and then click Security. 5 Click CA Certificate. 6 Select the certificate you want to export - Brother International ADS-3000N | Network Users Guide - Page 75
IPsec 6 IPsec supports the following functions: IPsec transmissions According to the IPsec setting conditions, the network-connected computer sends connected to the network. • Your Brother machine is configured for IPsec communication. • The computer connected to your Brother machine is configured - Brother International ADS-3000N | Network Users Guide - Page 76
http://192.168.1.2. 3 No password is required by default. Type a password if you have set one, and then click . 4 Click the Network tab. 5 Click the Security packets. When using Web Services, you must select Allow for All Non- IPsec Traffic. If you selected Drop, Web Services cannot be used. 0 - Brother International ADS-3000N | Network Users Guide - Page 77
's address bar, type the IP address of your machine. For example: http://192.168.1.2. 3 No password is required by default. Type a password if you have set one, and then click . 4 Click the Network tab. 5 Click the Security tab. 6 Click the IPsec Address Template menu in the left navigation bar - Brother International ADS-3000N | Network Users Guide - Page 78
browser's address bar, type the IP address of your machine. For example: http://192.168.1.2. 3 No password is required by default. Type a password if you have set one, and then click . 4 Click the Network tab. 5 Click the Security tab. 6 Click IPsec Template in the left navigation bar. The Template - Brother International ADS-3000N | Network Users Guide - Page 79
on the selected template. NOTE The default template may differ depending on whether you Use Prefixed Template, select IKEv1, IKEv2, or Manual. If you selected a setting other than Custom over an unprotected network. The Diffie-Hellman key exchange method uses a discrete logarithm problem, not the - Brother International ADS-3000N | Network Users Guide - Page 80
Security Features NOTE • ESP is a protocol for carrying out encrypted communication using IPsec. ESP encrypts the payload (communicated contents) and adds additional information. The IP packet consists of the header and the encrypted payload, which follows the header. In addition to the encrypted - Brother International ADS-3000N | Network Users Guide - Page 81
Security, IKEv1 Medium Security, IKEv2 High Security, or IKEv2 Medium Security. The setting items are different depending on the selected template. NOTE The default template may differ depending on whether you selected Main or Aggressive for Negotiation Mode on the IPsec configuration screen. 77 - Brother International ADS-3000N | Network Users Guide - Page 82
you selected Custom in Use Prefixed Template, select IKEv1, IKEv2, or Manual. If you selected a setting other than Custom, the IKE, authentication be securely exchanged over an unprotected network. 6 The Diffie-Hellman key exchange method uses a discrete logarithm problem, not the secret key, to - Brother International ADS-3000N | Network Users Guide - Page 83
Security Features Encapsulation Mode Select Transport or Tunnel. Remote Router IP-Address Specify the IP address (IPv4 or IPv6) of the remote router. Enter this information only when the Tunnel mode is selected. NOTE SA (Security Association) is an encrypted communication method using IPsec or - Brother International ADS-3000N | Network Users Guide - Page 84
). The password must be entered two times for confirmation. Certificate Click this button to move to the Certificate configuration screen. Manual Settings for are different depending on the selected template. NOTE The default template may differ depending on whether you selected Main or - Brother International ADS-3000N | Network Users Guide - Page 85
(ESP) Specify the key to use for encryption. Type the In/Out values. These settings are necessary when Custom is selected in Use Prefixed Template, Manual is selected in IKE, and ESP is selected in Protocol in Encapsulating Security. NOTE The number of characters you can set may differ depending on - Brother International ADS-3000N | Network Users Guide - Page 86
Security Features NOTE • ESP is a protocol for carrying out encrypted communication using IPsec. ESP encrypts the payload (communicated contents) and adds additional information. The IP packet consists of the header and the encrypted payload, which follows the header. In addition to the encrypted - Brother International ADS-3000N | Network Users Guide - Page 87
Start your web browser. 2 In your browser's address bar, type the IP address of your machine. For example: http://192.168.1.2. 3 No password is required by default. Type a password if you have set one, and then press . 6 4 Click the Scan tab. 5 Click the Scan from PC menu in the navigation bar - Brother International ADS-3000N | Network Users Guide - Page 88
about how to reset the password contact Brother Customer Service. NOTE • Secure Function Lock can be set using Web Based Management or BRAdmin Professional 3 (Windows ® only). • Only administrators can set limitations and make changes for each user. • (For ADS-3600W) Use card authentication - Brother International ADS-3000N | Network Users Guide - Page 89
Web Based Management 6 Set up groups with restrictions and users with a password and card ID (NFC ID) 1. You can set up to the user name up to 20 characters. 7 In the PIN Number box, type a four-digit password. 8 (For ADS-3600W) In the Card ID box, type the card number (up to 16 characters). 1 - Brother International ADS-3000N | Network Users Guide - Page 90
Brother's site. NOTE If you use a proxy server for internet communication, you will need to enter the details in the Proxy setting. 1 Start your web browser. 2 In your browser's address bar, type the IP address of your machine. For example: http://192.168.1.2. 3 No password is required by default - Brother International ADS-3000N | Network Users Guide - Page 91
7 Troubleshooting 7 Overview 7 This chapter explains how to resolve typical network problems you may encounter when using your Brother machine. To download other manuals for your machine, go to your model's page on the Brother Solutions Center at solutions.brother.com/manuals Identifying Your - Brother International ADS-3000N | Network Users Guide - Page 92
correct. Wi-Fi Direct ® Confirm the SSID and password. When you are configuring the network manually, the SSID and password are displayed on your Brother machine. If your mobile device supports the manual configuration, the SSID and password will be displayed on your mobile device's screen. You - Brother International ADS-3000N | Network Users Guide - Page 93
Troubleshooting Problem There is a wireless computer, Bluetoothsupported device, microwave oven, or digital cordless phone near the Brother machine or the mobile device. If you have checked and tried all of the above, but still cannot complete the Wi-Fi Direct ® configuration, do - Brother International ADS-3000N | Network Users Guide - Page 94
If your problem is not solved, the SSID or network settings you entered may be incorrect. Confirm the wireless network settings. 7 For Ad-hoc mode, Brother machine supports the use of the first WEP key only. The wireless security information (Authentication method/Encryption method/Network Key - Brother International ADS-3000N | Network Users Guide - Page 95
is not found on the network during the Brother Device installation. 7 Question Interface Solution Is your computer connected wired/ to the network? wireless Make sure your computer is connected to a network (for example, a LAN environment or Internet services. For further support, contact your - Brother International ADS-3000N | Network Users Guide - Page 96
Troubleshooting The Brother machine cannot scan over the network. The Brother machine is not found on the network even after successful installation. 7 Question Interface Solution Are you using security software? wired/ See I am using security software. on page 94. wireless Is your Brother - Brother International ADS-3000N | Network Users Guide - Page 97
Yes. Are you connecting the Brother machine to the network using wireless capabilities? wireless I have checked and tried all of the above, but the Brother machine does not scan. Is there anything else I can do? wired/ wireless 4 Follow the on-screen instructions. If the correct IP address - Brother International ADS-3000N | Network Users Guide - Page 98
box. To allow access, see your security software instructions or ask the manufacturer. I want to know the necessary port number for the security software settings. wired/ wireless The following port numbers are used for Brother network features: Network scanning i Port number 54925/Protocol UDP - Brother International ADS-3000N | Network Users Guide - Page 99
Troubleshooting I want to check that my network devices are working properly. 7 Question Interface Solution Is your Brother machine, access point/router or network hub turned on? wired/ Make sure you have confirmed all instructions in Make sure you have wireless checked the following: on page - Brother International ADS-3000N | Network Users Guide - Page 100
(ADS-2800W / ADS-3600W) on page 9. If the LCD message shows Connection Failed, ask your network administrator whether your IP address is valid or not. I have checked and tried all of the above, however, I am still having problems. Is there anything else I can do? wireless See the instructions - Brother International ADS-3000N | Network Users Guide - Page 101
scanner icon. Windows Vista ®/Windows ® 7/Windows ® 8/Windows ® 8.1 Right -click the machine you want to install. Windows ® 10 Click the machine you want to install. NOTE The Web Services Name for the Brother machine is your model name and MAC Address (Ethernet Address) (for example, Brother ADS - Brother International ADS-3000N | Network Users Guide - Page 102
Additional Network Settings (Windows ®) 3 Start an installation for the machine: Windows Vista®/Windows® 7 Click Install in the machine's drop-down menu. Windows ® 8/Windows ® 8.1 Select the machine you want to install. Windows ® 10 Click Add devices. 8 98 - Brother International ADS-3000N | Network Users Guide - Page 103
network, and then install the scanner driver using this feature. Follow the steps below: NOTE • If you have set your machine's Web Services feature to Off, you must set it back to On. The default setting of the Web Services for the Brother to your network in advance. See the instructions supplied - Brother International ADS-3000N | Network Users Guide - Page 104
Supported Protocols and Security Features A Interface Network (common) Ethernet Wireless (ADS-2800W / ADS-3600W) Protocol (IPv4) Protocol (IPv6) Network (Security) Email (Security) (ADS-2800W / ADS-3600W) Network (Wireless) (ADS-2800W / ADS-3600W) Wired Wireless (ADS-2800W / ADS Web Services ( - Brother International ADS-3000N | Network Users Guide - Page 105
Total Pages Scanned / Replace Count / Reset Count / Error Count / Error History Volume Beep Panel - (ADS-2800W / Backlight / Dim Timer ADS-3600W minutes). Display your Brother machine's maintenance information CSV file. A Display all network connected devices. After configuring Contact - Brother International ADS-3000N | Network Users Guide - Page 106
Appendix Main Category Address book (ADS-2800W / ADS-3600W) E-mail (ADS-2800W / ADS-3600W) Sub Category Function Menu - Address - Setup Groups - LDAP - Import - Export - E- and Delivery Notification. Click SMTP to Jump to Network > Network > Protocol > SMTP > Advanced Setting. A 102 - Brother International ADS-3000N | Network Users Guide - Page 107
to USB 1~5 / Scan to E-mail Server 1~10 / Scan to FTP/SFTP 1~15 / Scan to Network/SharePoint 1~15 Scan File Name / Quality / Auto Color detect adjust / File Type / Password for Secure PDF (ADS-2400N / ADS-3000N) / - Scan to USB Document Size / Margin Settings / File Size / Auto Deskew / Skip - Brother International ADS-3000N | Network Users Guide - Page 108
Scan / Brightness / Contrast / Continuous Scan (ADS-2800W / ADS-3600W) / Port Number - Profile (Network) Profile Name / Network Folder Path / File Name / Quality / Auto Color detect adjust / File Type / Password for Secure PDF (ADS-2400N / ADS-3000N) / Document Size / Margin Settings / File - Brother International ADS-3000N | Network Users Guide - Page 109
/ Auto Color detect adjust / File Type / Password for Secure PDF (ADS-2400N / ADS-3000N) / Document Size / Margin Settings / Configure Password / Date&Time - Scan to Network Device (ADS-2400N / ADS-3000N) Network Device1 / Type / Destionation / Network Device2 / Type / Destionation / Network - Brother International ADS-3000N | Network Users Guide - Page 110
using your Brother machine's LCD. - Signed PDF Select the Cerificate / Cerificate Configure the certificate settings for Signed PDF. Date / Clock Type / Time / Time - Date & Time Zone / Auto Daylight / Synchronize with SNTP server / SNTP Machine Reset / Network / - Reset Menu Address - Brother International ADS-3000N | Network Users Guide - Page 111
Services / Proxy / Network Scan / SMTP / FTP Server / FTP Client / SFTP / TFTP / WebDAV / CIFS / LDAP / mDNS / LLMNR / SNTP Configure your Brother mail (ADS-2800W / Address / SMTP / Date&Time / ADS-3600W) Administrator Address Network Ethernet Authentication Password / Client Certificate / Server - Brother International ADS-3000N | Network Users Guide - Page 112
/ Authentication Method / Encryption Mode / A Network key Wireless (Enterprise) Current Status / Communication Mode / Wireless Network Name (SSID) / Channel / Authentication Method / Inner Authentication Method / Encryption Mode / User ID / Password / Client Certificate / Server Certificate - Brother International ADS-3000N | Network Users Guide - Page 113
Certificate and Private Key Configure the Certificate settings. CA Certificate CA Certificate List / Import CA Certificate Configure the CA Certificate settings. Network (continue) Security Client Key Pair Server Public Key Client Key Pair List / Create New Client Key Pair Server Public Key - Brother International ADS-3000N | Network Users Guide - Page 114
44 M MAC Address 4, 5, 6, 97 N Network Connection Repair Tool 92 P PIN Method 19 R Remote Setup 1 S SMTP-AUTH 64 Status Monitor 1 Supported protocols and security features 100 V Vertical Pairing 1, 97 W Web Based Management (web browser 1, 6 Web Services 97 Wireless network 8 WPS (Wi-Fi
-
 1
1 -
 2
2 -
 3
3 -
 4
4 -
 5
5 -
 6
6 -
 7
7 -
8
-
9
-
10
-
11
-
12
-
13
-
14
-
15
-
16
-
17
-
18
-
19
-
20
-
21
-
22
-
23
-
24
-
25
-
26
-
27
-
28
-
29
-
30
-
31
-
32
-
33
-
34
-
35
-
36
-
37
-
38
-
39
-
40
-
41
-
42
-
43
-
44
-
45
-
46
-
47
-
48
-
49
-
50
-
51
-
52
-
53
-
54
-
55
-
56
-
57
-
58
-
59
-
60
-
61
-
62
-
63
-
64
-
65
-
66
-
67
-
68
-
69
-
70
-
71
-
72
-
73
-
74
-
75
-
76
-
77
-
78
-
79
-
80
-
81
-
82
-
83
-
84
-
85
-
86
-
87
-
88
-
89
-
90
-
91
-
92
-
93
-
94
-
95
-
96
-
97
-
98
-
99
-
100
-
101
-
102
-
103
-
104
-
105
-
106
-
107
-
108
-
109
-
110
-
111
-
112
-
113
-
114
 |
 |

Version C
ENG
Network User’s Guide