Brother International EF4-B561 Service Manual - Page 21
measurement
 |
View all Brother International EF4-B561 manuals
Add to My Manuals
Save this manual to your list of manuals |
Page 21 highlights
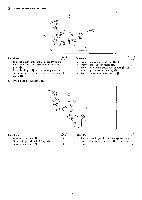
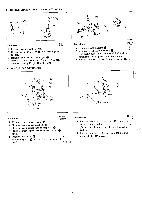
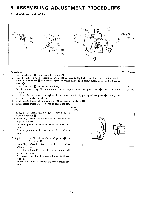
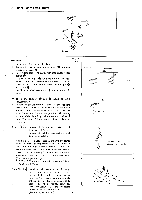
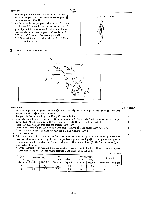
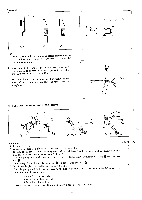
Procedures Q'ty of screw 8 Turn the pulley until under looper to the left mostly, and then temporarily fasten movable needle guard (3 2 to under looper holder 0. 9 Match the under looper point with the needle center on the needle's upward travel, move movable needle guard Q until it contacts needle, adjust the clearance between the under looper point and needle to 0 to 0.05mm, and fasten movable needle guard 0. * 0.02 to 0.05mm for cotton fabrics; 0 to 0.03mm for chemical fabrics. Ei OVER LOOPER MECHANISM -0 -0.05mm Procedures Q'ty of screw 1 Fit over looper holder guide assembly 0 onto flame (0 and over looper driving lever onto over looper lever shaft 0 at the same time. 2 Temporarily fasten over looper holder guide assembly 0. 3 3 Move the over looper driving lever 0 up or down until there is the least resistance so over looper driving lever is in alignment with over looper lever shaft 0, and then temporarily fasten it. 1 (Turn the pulley, make sure that the machine smoothly.) 4 Insert over looper Q all the way into over looper holder 0, and temporarily fasten it. 1 (Turn the pulley in order to make sure that the machine runs smoothly. ) 5 Install needle plate. 2 6 Select the correct distance A and B from the table below according to your machine specifications, make an adjustment by moving the over looper holder guide assembly 0 to the right or left, (decide A measurement), by moving over looper driving lever 0 to up or down (decide B measurement), and then fasten them securely. * When changing your machine from the standard specifications to the high-lift specifications, replace over looper and over looper holder assembly, and make an adjustment. (Unit: mm) Spec. Single needle Twin needles (four threads) Twin needles (mock safety) Safety stitch Distance Standard High-lift Standard High-lift Standard High-lift Standard High-lift A 7.2 8.2 7.2 8.2 7.2 8.2 7.2 8.2 B 5.6 5.6 5.6 5.6 5.6 5.6 5 5 - 19 -
-
 1
1 -
2
-
3
-
4
-
5
-
6
-
7
-
8
-
9
-
10
-
11
-
12
-
13
-
14
-
15
-
 16
16 -
 17
17 -
 18
18 -
 19
19 -
 20
20 -
 21
21 -
 22
22 -
 23
23 -
 24
24 -
 25
25 -
 26
26 -
27
-
28
-
29
-
30
-
31
-
32
-
33
-
34
-
35
-
36
-
37
-
38
-
39
 |
 |
