Brother International EF4-B561 Service Manual - Page 27
accordance
 |
View all Brother International EF4-B561 manuals
Add to My Manuals
Save this manual to your list of manuals |
Page 27 highlights
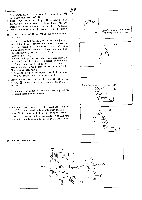
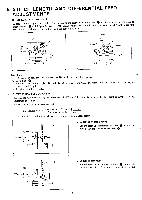
lE DOUBLE CHAIN STITCH LOOPER THREAD TAKE-UP AND THREAD GUIDE MECHANISM Parallel -- E)l 3 Reference line Loose (1) 7 Tighten 6 mm Procedures Q'ty of screw 1 Fit double chain stitch thread take-up 0 onto crank shaft. 2 Install thread handler to thread take-up bracket 011 1 parallel to it. 3 Install thread take-up bracket op to machine body. 2 (Insert thread handler 0 onto double chain stitch thread take-up 0 in accordance with the slot of double chain stitch thread take-up.) * Thread consumption and timing of thread release are adjusted by moving thread handler 0. (When the top of thread handler is raised, the looper thread tension decreases, and when it is lowered, the looper thread increases.) 4 Turn the pulley until needle bar s raised to the highest position. # The below items (0 and Q should be taken simultaneously. 5 Set double chain stitch thread take-up 0 at a point where thread handler Q is in the center of the slot. 6 Adjust the distance between the top end of double 2 chain stitch thread take-up 0 and thread take-up bracket 0 to 6mm, and fasten it. * When double chain stitch thread take-up is advanced (counterclockwise), the looper thread tension increases; and when it is moved back (clockwise), the looper thread tension decreases. 7 Install thread guide (R) 0 and (L) Q on thread take- 2 up bracket (0, making sure that they are equidistant from the reference line on thread take-up holder in the thread slot. Unclockwise Double chain Clockwise Loosen Stitch th ead take-up Tighten - 25 -
-
 1
1 -
2
-
3
-
4
-
5
-
6
-
7
-
8
-
9
-
10
-
11
-
12
-
13
-
14
-
15
-
16
-
17
-
18
-
19
-
20
-
21
-
 22
22 -
 23
23 -
 24
24 -
 25
25 -
 26
26 -
 27
27 -
 28
28 -
 29
29 -
 30
30 -
 31
31 -
 32
32 -
33
-
34
-
35
-
36
-
37
-
38
-
39
 |
 |
