Brother International KE-430D Instruction Manual - English - Page 16
Brother International KE-430D Manual
 |
View all Brother International KE-430D manuals
Add to My Manuals
Save this manual to your list of manuals |
Page 16 highlights
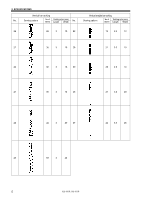
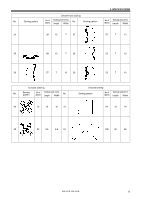
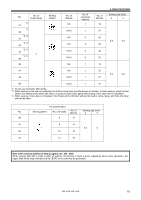
2. SPECIFICATIONS No. No. of button holes *3 14 *4 36 *3 28 *4 37 *3 15 *4 38 *3 29 *4 39 16 Sewing pattern No. of threads 6-6 6-6 8-8 8-8 10-10 10-10 12-12 12-12 6-5 No. of crossover stitches 0 0 0 0 0 0 0 0 1 No. of stitches 24 24 28 28 32 32 36 36 18 Sewing size (mm) X Y 17 8-7 1 22 30 4 10-9 1 26 3.4 3.4 18 6-6 1 19 19 8-8 1 23 31 10-10 1 27 45 12-12 1 31 *3 20 6-6 0 24 *4 40 6-6 0 24 *3 32 8-8 0 28 *4 41 8-8 0 28 *3 33 10-10 0 32 *4 42 10-10 0 32 *3 When sewing of one side is completed, the button clamp rises and the thread is trimmed. To finish sewing, press the foot switch until sewing of the other side starts, or press the foot switch again after sewing of the other side is completed. *4 When sewing of one side is completed, the thread will be trimmed without the button clamp rising, and then the other side will be sewn. 9 KE-430D, BE-438D
-
 1
1 -
2
-
3
-
4
-
5
-
6
-
7
-
8
-
9
-
10
-
 11
11 -
 12
12 -
 13
13 -
 14
14 -
 15
15 -
 16
16 -
 17
17 -
 18
18 -
 19
19 -
 20
20 -
 21
21 -
22
-
23
-
24
-
25
-
26
-
27
-
28
-
29
-
30
-
31
-
32
-
33
-
34
-
35
-
36
-
37
-
38
-
39
-
40
-
41
-
42
-
43
-
44
-
45
-
46
-
47
-
48
-
49
-
50
-
51
-
52
-
53
-
54
-
55
-
56
-
57
-
58
-
59
-
60
-
61
-
62
-
63
-
64
-
65
-
66
 |
 |
