Brother International PR-1000 Upgrade KIT CW Operation Manual PRCW1 - Page 3
Before You Start, New Features
 |
View all Brother International PR-1000 manuals
Add to My Manuals
Save this manual to your list of manuals |
Page 3 highlights
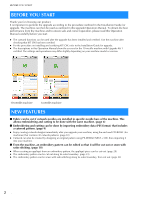
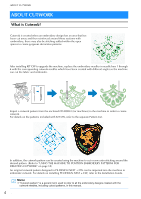
BEFORE YOU START BEFORE YOU START Thank you for choosing our product. It is important to perform the upgrade according to the procedure outlined in the Installation Guide for upgrade. The machine can then be used as outlined in this upgrade Operation Manual. To obtain the best performance from the machine and to ensure safe and correct operation, please read this Operation Manual carefully before you start. z The cutwork functions can be used after the upgrade has been installed and certified. Use the machine after checking that KIT CW has been certified. z For the procedure on installing and certifying KIT CW, refer to the Installation Guide for upgrade. z The descriptions in this Operation Manual show the screens for the 10-needle machine with Upgrade Kit 1 certified. The settings and operations may differ slightly depending on your machine model or version. 10-needle machine 6-needle machine NEW FEATURES ■ Fabric can be cut if cutwork needles are installed in specific needle bars of the machine. This allows embroidering and cutting to be done with the same machine. (page 4) ■ Embroidering and cutting can be done by importing embroidery data (PES format) that includes a cutwork pattern. (page 4) z Enjoy creating cutwork designs immediately after you upgrade your machine, using the enclosed CD-ROM1 (for machines) that contains 30 cutwork patterns. (page 10) z Cutwork can also be created by designing an original pattern using PE-DESIGN NEXT + CW, then importing it into your machine. ■ From the machine, an embroidery pattern can be edited so that it will be cut out or sewn with satin stitching. (page 18) z When creating an appliqué from an embroidery pattern, the appliqué piece can be cut out. (page 20) z The embroidery pattern can be cut out along its outer boundary. (page 23) z The embroidery pattern can be sewn with satin stitching along its outer boundary, then cut out. (page 24) 2
-
 1
1 -
 2
2 -
 3
3 -
 4
4 -
 5
5 -
 6
6 -
 7
7 -
 8
8 -
 9
9 -
10
-
11
-
12
-
13
-
14
-
15
-
16
-
17
-
18
-
19
-
20
-
21
-
22
-
23
-
24
-
25
-
26
-
27
-
28
-
29
-
30
-
31
-
32
-
33
-
34
-
35
 |
 |
