Brother International Quattro 2 6700D My Custom Design Guide - English - Page 12
Embroidery Data Check Screen, Key functions
 |
View all Brother International Quattro 2 6700D manuals
Add to My Manuals
Save this manual to your list of manuals |
Page 12 highlights
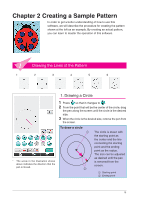
Embroidery Data Check Screen Once you are finished drawing the pattern, press the convert key in the pattern drawing screen to convert the image data to embroidery data. When the data is converted, the embroidery data check screen appears. 2 1 The total number of stitches is displayed. 1 3 2 The necessary amount of time required to sew the 4 pattern is displayed. (The amount of time needed to change threads is not included.) 7 3 The number of colors are displayed. 5 6 4 The part of the pattern that will be sewn with the thread color shown first in the thread order list below is 8 displayed. 5 The size of the pattern is displayed. 6 The types of embroidery frames that can be used are shown. The icons for the embroidery frames that can be used appear in color. 7 Embroidery pattern display area The actual dimension of the pattern area is the size of the extra large embroidery frame (30 cm (height) × 20 cm (width)). The pattern moves to the center of the display area and the embroidery data is displayed. ■ Key functions Key Key Name Store key 8 The names of the thread colors and their sewing order are displayed. Description Press this key to save the embroidery data. Reference 37 Return key Press this key to return to the pattern drawing screen. The 35 embroidery data is changed back to image data and the pat- tern colors can be changed or the pattern can be edited. Next thread key Press this key to show the part of the pattern that will be - sewn with the next thread color when checking the sewing order. Each press of this key shows the next part of the pattern. Thread back Press this key to show the part of the pattern that will be sewn - key with the previous thread color when checking the sewing order. Each press of this key shows the previous part of the pat- tern. Image key Press this key to view an image of the pattern as it will be 36 sewn. 12
-
 1
1 -
2
-
3
-
4
-
5
-
6
-
 7
7 -
 8
8 -
 9
9 -
 10
10 -
 11
11 -
 12
12 -
 13
13 -
 14
14 -
 15
15 -
 16
16 -
 17
17 -
18
-
19
-
20
-
21
-
22
-
23
-
24
-
25
-
26
-
27
-
28
-
29
-
30
-
31
-
32
-
33
-
34
-
35
-
36
-
37
-
38
-
39
-
40
-
41
-
42
-
43
-
44
-
45
-
46
-
47
-
48
-
49
 |
 |
