Brother International Quattro 2 6700D My Custom Design Guide - English - Page 13
Creating a Sample Pattern, Drawing the Lines of the Pattern
 |
View all Brother International Quattro 2 6700D manuals
Add to My Manuals
Save this manual to your list of manuals |
Page 13 highlights
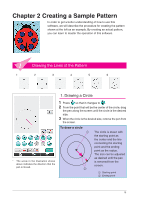
Chapter 2 Creating a Sample Pattern In order to get a better understanding of how to use this software, we will describe the procedure for creating the pattern shown at the left as an example. By creating an actual pattern, you can learn to master the operation of this software. 1 Drawing the Lines of the Pattern 1 2 3 4 5 6 1. Drawing a Circle * The arrow in the illustration shown above indicates the direction that the pen is moved. 1 Press so that it changes to . 2 From the point that will be the center of the circle, drag the pen along the screen until the circle is the desired size. 3 When the circle is the desired size, remove the pen from the screen. To draw a circle 1 2 The circle is drawn with the starting point as the center and the line connecting the starting point and the ending point as the radius. The size can be adjusted as desired until the pen is removed from the screen. 1 Starting point 2 Ending point 13
-
 1
1 -
2
-
3
-
4
-
5
-
6
-
7
-
 8
8 -
 9
9 -
 10
10 -
 11
11 -
 12
12 -
 13
13 -
 14
14 -
 15
15 -
 16
16 -
 17
17 -
 18
18 -
19
-
20
-
21
-
22
-
23
-
24
-
25
-
26
-
27
-
28
-
29
-
30
-
31
-
32
-
33
-
34
-
35
-
36
-
37
-
38
-
39
-
40
-
41
-
42
-
43
-
44
-
45
-
46
-
47
-
48
-
49
 |
 |
