Brother International Quattro 2 6700D My Custom Design Guide - English - Page 33
Specifying the Stitch Density, To select a finer
 |
View all Brother International Quattro 2 6700D manuals
Add to My Manuals
Save this manual to your list of manuals |
Page 33 highlights
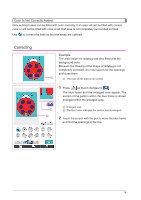
4. Specifying the Stitch Density 1 Press or beside . (The default setting is 100 % when the application is started up.) To select a coarser density, press . To select a finer density, press . ← ← 90 % → 100 % → 110 % Setting examples 90 % (coarse) 100 % (standard) 110 % (fine) Notes • It is recommended that a finer stitch density be selected if a detailed drawing is created. • If areas of the embroidery shrinks when a trial embroidery of the design is sewn, specify a coarser stitch density. Continue sewing trial embroidery while adjusting the stitch density. 2 After the desired settings are specified, press . The screen returns to the one displayed before the stitch settings screen was displayed. 33
-
 1
1 -
2
-
3
-
4
-
5
-
6
-
7
-
8
-
9
-
10
-
11
-
12
-
13
-
14
-
15
-
16
-
17
-
18
-
19
-
20
-
21
-
22
-
23
-
24
-
25
-
26
-
27
-
 28
28 -
 29
29 -
 30
30 -
 31
31 -
 32
32 -
 33
33 -
 34
34 -
 35
35 -
 36
36 -
 37
37 -
 38
38 -
39
-
40
-
41
-
42
-
43
-
44
-
45
-
46
-
47
-
48
-
49
 |
 |

33
4. Specifying the Stitch Density
1
Press
or
beside
.
(
The default setting is
100 %
when the application is
started up
.)
To select a coarser density, press
. To select a finer
density, press
.
←
←
90 %
→
100 %
→
110 %
Setting examples
90 % (coarse)
100 % (standard)
110 % (fine)
Notes
•
It is recommended that a finer stitch density be selected if a detailed
drawing is created.
•
If areas of the embroidery shrinks when a trial embroidery of the
design is sewn, specify a coarser stitch density. Continue sewing
trial embroidery while adjusting the stitch density.
2
After the desired settings are specified, press
.
The screen returns to the one displayed before the
stitch settings screen was displayed.