Brother International Quattro 2 6700D My Custom Design Guide - English - Page 47
Correcting Shrinkage, Shrinkage
 |
View all Brother International Quattro 2 6700D manuals
Add to My Manuals
Save this manual to your list of manuals |
Page 47 highlights
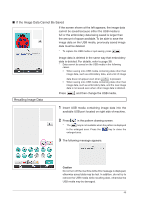
Correcting Shrinkage When created embroidery data is sewn, areas of the embroidery may shrink. If this occurs, correct the shrinkage. ■ Shrinkage The size of the pattern is enlarged and areas (fill stitches) shrink along the sewing direction. Since areas shrink while lines (satin stitches) are sewn with the size before shrinking, the lines and areas are no longer aligned. In order to prevent this, adjust the length of the lines so that they are in the sewing direction and are larger than the original data. ← Sewing direction → Original data ←← Sewing direction →→ Adjusted data Each arrow represents a shrinkage adjustment value (0.1 mm increments) 1 Display in the pattern drawing screen the data with shrunken areas, and then press . The screen shown at the left appears. 2 Press or beside . To lengthen the stitching, press . To shorten the stitching, press . Each press of mm. makes the stitching longer by 0.1 Each press of mm. makes the stitching shorter by 0.1 A setting between 0.0 mm and 2.0 mm in 0.1 mm increments can be specified. Notes • Normally, the default setting of 0.3 mm is used. • Continue sewing trial embroidery while making adjustments. • The larger the pattern size, the easier shrinkage will occur. • Shrinkage is also related to the sewing direction and stitch density of the fill stitches. Also try adjusting these settings. 47
-
 1
1 -
2
-
3
-
4
-
5
-
6
-
7
-
8
-
9
-
10
-
11
-
12
-
13
-
14
-
15
-
16
-
17
-
18
-
19
-
20
-
21
-
22
-
23
-
24
-
25
-
26
-
27
-
28
-
29
-
30
-
31
-
32
-
33
-
34
-
35
-
36
-
37
-
38
-
39
-
40
-
41
-
 42
42 -
 43
43 -
 44
44 -
 45
45 -
 46
46 -
 47
47 -
 48
48 -
 49
49
 |
 |
