Brother International Quattro 2 6700D My Custom Design Guide - English - Page 17
Selecting, To draw a selection frame
 |
View all Brother International Quattro 2 6700D manuals
Add to My Manuals
Save this manual to your list of manuals |
Page 17 highlights
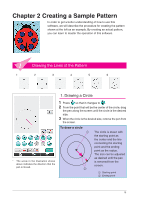
4. Selecting For example, select the section to be deleted here. * Before moving, copying or deleting sections, use to select the area to be moved, copied or deleted. 1 Press so that it changes to . 2 From the top-left corner of the section, drag the pen along the screen so that the section completely fits within the red frame (selection frame) that is drawn. * The selection frame appears in red. 3 When the frame is the desired size, remove the pen from the screen. Notes • If the desired area could not be selected (the selection frame could not be drawn), try drawing it again. Touch the screen with the pen to erase the selection frame that was originally drawn, and then draw a new selection frame. • After a selection frame is drawn, pressing any key other than the copy key or the delete key erases the selection frame. To draw a selection frame The red frame is drawn with the straight line connecting the starting point and the ending 1 point as the diagonal. The selected area is the part within that frame. The size can be adjusted as desired until the pen is removed from the screen. * An angled selection frame, like the one shown at the 3 2 right, cannot be drawn. 1 Starting point 2 Ending point 3 Selected area 17
-
 1
1 -
2
-
3
-
4
-
5
-
6
-
7
-
8
-
9
-
10
-
11
-
 12
12 -
 13
13 -
 14
14 -
 15
15 -
 16
16 -
 17
17 -
 18
18 -
 19
19 -
 20
20 -
 21
21 -
 22
22 -
23
-
24
-
25
-
26
-
27
-
28
-
29
-
30
-
31
-
32
-
33
-
34
-
35
-
36
-
37
-
38
-
39
-
40
-
41
-
42
-
43
-
44
-
45
-
46
-
47
-
48
-
49
 |
 |
