Brother International Quattro 2 6700D My Custom Design Guide - English - Page 31
Specifying Stitching Settings, Displaying the Stitching Settings, Screen
 |
View all Brother International Quattro 2 6700D manuals
Add to My Manuals
Save this manual to your list of manuals |
Page 31 highlights
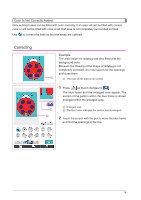
3 Specifying Stitching Settings Lines of the drawing are sewn with satin stitches and areas are sewn with fill stitches. The following settings can be specified. 1 Satin stitch (lines): thickness and stitch density 2 Fill stitch (areas): sewing direction and stitch density If the drawing data is saved, the settings can be changed after a trial embroidery of the design is sewn. (Refer to "Saving Image Data" on page 42.) 1. Displaying the Stitching Settings Screen 1 Press . 2 The screen shown at the left appears. 1 Reduces the size of the pattern The size of the drawn pattern can be changed. (Refer to page 34.) 2 Specifies the width of the satin stitches used to sew the lines of the drawing (Refer to page 32.) 1 3 Specifies the sewing direction for fill stitches (Refer to page 32.) 2 3 4 Specifies the stitch density (Refer to page 33.) 4 5 Corrects shrinkage When sewing embroidery, stitched areas may shrink. If 5 this happens, the stitching can be corrected to prevent shrinkage. (Refer to page 47.) * To quit specifying settings, press . Notes • You can use the pen tablet for operations in the stitching settings screen while moving tablet pen without touching tablet until you are ready to make selection. 31
-
 1
1 -
2
-
3
-
4
-
5
-
6
-
7
-
8
-
9
-
10
-
11
-
12
-
13
-
14
-
15
-
16
-
17
-
18
-
19
-
20
-
21
-
22
-
23
-
24
-
25
-
 26
26 -
 27
27 -
 28
28 -
 29
29 -
 30
30 -
 31
31 -
 32
32 -
 33
33 -
 34
34 -
 35
35 -
 36
36 -
37
-
38
-
39
-
40
-
41
-
42
-
43
-
44
-
45
-
46
-
47
-
48
-
49
 |
 |
