Brother International Quattro 2 6700D My Custom Design Guide - English - Page 28
area can be filled with the selected color., changes
 |
View all Brother International Quattro 2 6700D manuals
Add to My Manuals
Save this manual to your list of manuals |
Page 28 highlights
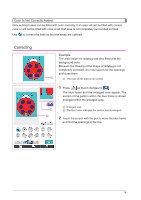
4 When a color is selected, the palette is automatically closed. The color changes to the color selected with . In addition, changes to , indicating that an area can be filled with the selected color. * After the color of an area is selected, lines of the drawing other than those drawn freehand to close openings cannot be added, edited or their color changed. To change a line, continue pressing until the drawing returns to the condition before the first color of an area was selected. 5 Touch the area to be filled with the color. The area is filled with the color. Notes • Color can only fill an outlined area. If the desired area is not filled with color or if an area that you did not want to fill with color is filled, correct the lines. (Refer to "Color Is Not Correctly Added" on page 29.) In addition, a very small area (thin area) cannot be filled with color. In this case, continue pressing until the drawing returns to the condition before the first color of an area was selected, and then correct the lines to make the area larger. 6 Fill the other areas with color as described in steps 1 through 5. If you fill the wrong area or if you wish to change the color, repeat steps 1 through 5 to change the color. Notes • The order in which colors are added is the same as the sewing order. 28
-
 1
1 -
2
-
3
-
4
-
5
-
6
-
7
-
8
-
9
-
10
-
11
-
12
-
13
-
14
-
15
-
16
-
17
-
18
-
19
-
20
-
21
-
22
-
 23
23 -
 24
24 -
 25
25 -
 26
26 -
 27
27 -
 28
28 -
 29
29 -
 30
30 -
 31
31 -
 32
32 -
 33
33 -
34
-
35
-
36
-
37
-
38
-
39
-
40
-
41
-
42
-
43
-
44
-
45
-
46
-
47
-
48
-
49
 |
 |
