Campbell Scientific CSAT3 CSAT3 3-D Sonic Anemometer - Page 14
Mounting
 |
View all Campbell Scientific CSAT3 manuals
Add to My Manuals
Save this manual to your list of manuals |
Page 14 highlights
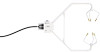
CSAT3 Three Dimensional Sonic Anemometer 4.2 Mounting The current mounting configuration for the CSAT3 includes a CM250 Leveling Mount, which should be mounted on the end of a 1.31" diameter crossarm such as the CM20X. Mount it so that the bolt on the end points upward, and secure it in place by tightening the set screws with the 3/16" Allen wrench that came with the CM250. The CSAT3 is then mounted to the CM250 by screwing the bolt into the anemometer block. See FIGURE 4-1. CAUTION Do not carry the CSAT3 by the arms or the strut between the arms. Always hold the CSAT3 by the block, where the upper and lower arms connect. Older CSAT3s were mounted with a boom design. In this case, the sonic anemometer is mounted to a vertical 3/4" diameter US bore pipe with a 3/4" by 3/4" crossover fitting (p/n 1017). The fitting is included with the CSAT3. The fitting will accommodate up to a 1" outside diameter pipe. Attach the crossover fitting to the vertical pipe and lightly tighten the vertical set screws. Insert the horizontal mounting arm into the crossover fitting and lightly tighten the horizontal set screws. Point the horizontal arm into the prevailing wind. Tighten all the fitting set screws. Mount the anemometer head to the horizontal arm. Lightly tighten the bolt underneath the anemometer block (see FIGURE 4-2, FIGURE 4-3, and FIGURE 4-4). CAUTION Over-tightening bolts will damage or deform the mounting hardware. Attach the electronics box to the body of the tripod or tower. Make sure the connectors are pointing downward and the CSAT3 label is right-side-up. Use a 1/2" wrench to tighten the nuts. Connect the cable from the anemometer head to the connector on the electronics box labeled Transducer Head. 1.31" OD Crossarm 26559 CM250 Leveling Mount FIGURE 4-1. CSAT3 coordinate system and current captive mounting hardware (s/n 0631 to current) 6
-
 1
1 -
2
-
3
-
4
-
5
-
6
-
7
-
8
-
 9
9 -
 10
10 -
 11
11 -
 12
12 -
 13
13 -
 14
14 -
 15
15 -
 16
16 -
 17
17 -
 18
18 -
 19
19 -
20
-
21
-
22
-
23
-
24
-
25
-
26
-
27
-
28
-
29
-
30
-
31
-
32
-
33
-
34
-
35
-
36
-
37
-
38
-
39
-
40
-
41
-
42
-
43
-
44
-
45
-
46
-
47
-
48
-
49
-
50
-
51
-
52
-
53
-
54
-
55
-
56
-
57
-
58
-
59
-
60
-
61
-
62
-
63
-
64
-
65
-
66
-
67
-
68
-
69
-
70
-
71
-
72
 |
 |
