Canon 3000F PhotoStudio_manual.pdf - Page 60
Making a Panoramic Photo, Applying an Oil Painting Effect, Applying a Motion Blur Effect - windows 10
 |
UPC - 013803028430
View all Canon 3000F manuals
Add to My Manuals
Save this manual to your list of manuals |
Page 60 highlights
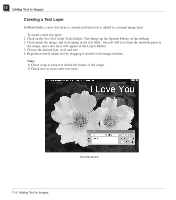
10 Applying Special Effects Making a Panoramic Photo PhotoStudio's Stitch command makes a panoramic photo by seamlessly stitching two images together. To turn two images into a panoramic photo: 1. Open the images on the desktop, then make one of the image windows active. 2. Click Effects on the Main Menu, then choose Stitch from the drop-down menu. This brings up the Stitch dialog box. 3. From the drop-down file list, select a second image to be stitched to the active image. 4. Select a stitching mode: Right, Left, Top, or Bottom. 5. Use all of the controls buttons, if necessary, to align the two images. 6. Click OK to stitch the images, or press Cancel to abort. Applying an Oil Painting Effect The Oil Painting command can turn an image into a work of art in a matter of seconds by applying various effects to the image. To turn an image into an oil painting: 1. Click Effects on the Main Menu, choose Fine Art from the drop-down menu, then select Oil Painting from the submenu. The Oil Painting dialog box appears. 2. Drag the Intensity slider to set the intensity of the effect to be applied. 3. View different parts of the image by dragging within the Before or After window. 4. Preview the effect in the After window before applying it. 5. Click OK to apply the effect, or press Cancel to abort. Applying a Motion Blur Effect The Motion Blur effect turns photos into a blurry state, alleviating detail by softening transitions between colors. To apply the Motion Blur effect: 1. Click Effects on the Main Menu, then choose Motion Blur from the drop-down menu. The Motion Blur dialog box appears. 2. In the Motion Blur dialog box, click an arrow to indicate the direction of the movement. 3. Drag the Speed slider to set the "speed" of the movement. 4. View different parts of the image by dragging within the Before or After window. 5. Preview the effect in the After window before applying it. 6. Click OK to apply the effect, or press Cancel to abort. 10-2 Applying Special Effects
-
 1
1 -
2
-
3
-
4
-
5
-
6
-
7
-
8
-
9
-
10
-
11
-
12
-
13
-
14
-
15
-
16
-
17
-
18
-
19
-
20
-
21
-
22
-
23
-
24
-
25
-
26
-
27
-
28
-
29
-
30
-
31
-
32
-
33
-
34
-
35
-
36
-
37
-
38
-
39
-
40
-
41
-
42
-
43
-
44
-
45
-
46
-
47
-
48
-
49
-
50
-
51
-
52
-
53
-
54
-
 55
55 -
 56
56 -
 57
57 -
 58
58 -
 59
59 -
 60
60 -
 61
61 -
 62
62 -
 63
63 -
 64
64 -
 65
65 -
66
-
67
-
68
-
69
-
70
-
71
-
72
-
73
-
74
-
75
-
76
-
77
-
78
-
79
-
80
-
81
-
82
-
83
 |
 |
