Canon 3000F PhotoStudio_manual.pdf - Page 72
Using the Layers Palette
 |
UPC - 013803028430
View all Canon 3000F manuals
Add to My Manuals
Save this manual to your list of manuals |
Page 72 highlights
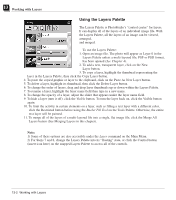
13 Working with Layers Using the Layers Palette The Layers Palette is PhotoStudio's "control center" for layers. It can display all of the layers of an individual image file. With the Layers Palette, all the layers of an image can be viewed, arranged, and merged. To use the Layers Palette: 1. Open an image file. The photo will appear as Layer 0 in the Layers Palette unless a multi-layered file, PSF or PSD format, has been opened (See Chapter 4). 2. To add a new, transparent layer, click on the New Layer button. 3. To copy a layer, highlight the thumbnail representing the layer in the Layers Palette, then click the Copy Layer button. 4. To paste the copied graphic or layer to the clipboard, click on the Paste As New Layer button. 5. To delete a layer, highlight its thumbnail, then click the Delete Layer button. 6. To change the order of layers, drag and drop layer thumbnails up or down within the Layers Palette. 7. To rename a layer, highlight the layer name field then type in a new name. 8. To change the opacity of a layer, adjust the slider that appears under the layer name field. 9. To hide a layer (turn it off), click the Visible button. To turn the layer back on, click the Visible button again. 10. To limit the activity in certain elements on a layer, such as filling a text layer with a different color, click the Restricted button before using the Bucket Fill Tool on the Tools Palette. Otherwise, the entire text layer will be painted. 11. To merge all of the layers of a multi-layered file into a single, flat image file, click the Merge All Layers button (See Merging Layers in this chapter). Note: 1) Some of these options are also accessible under the Layer command on the Main Menu. 2) For Steps 7 and 8, change the Layers Palette into its "floating" state, or click the Control button (insert icon here) on the snapped Layers Palette to access all of the controls. 13-2 Working with Layers
-
 1
1 -
2
-
3
-
4
-
5
-
6
-
7
-
8
-
9
-
10
-
11
-
12
-
13
-
14
-
15
-
16
-
17
-
18
-
19
-
20
-
21
-
22
-
23
-
24
-
25
-
26
-
27
-
28
-
29
-
30
-
31
-
32
-
33
-
34
-
35
-
36
-
37
-
38
-
39
-
40
-
41
-
42
-
43
-
44
-
45
-
46
-
47
-
48
-
49
-
50
-
51
-
52
-
53
-
54
-
55
-
56
-
57
-
58
-
59
-
60
-
61
-
62
-
63
-
64
-
65
-
66
-
 67
67 -
 68
68 -
 69
69 -
 70
70 -
 71
71 -
 72
72 -
 73
73 -
 74
74 -
 75
75 -
 76
76 -
 77
77 -
78
-
79
-
80
-
81
-
82
-
83
 |
 |
