Canon MF7280 imageCLASS MF7280 Reference Guide
Canon MF7280 - ImageCLASS B/W Laser Manual
 |
UPC - 013803056129
View all Canon MF7280 manuals
Add to My Manuals
Save this manual to your list of manuals |
Canon MF7280 manual content summary:
- Canon MF7280 | imageCLASS MF7280 Reference Guide - Page 1
Reference Guide Read this guide first. Please read this guide before operating this equipment. After you finish reading this guide, store it in a safe place for future reference. ENG - Canon MF7280 | imageCLASS MF7280 Reference Guide - Page 2
0 Ot¯ imageCLASS MF7280 Reference Guide - Canon MF7280 | imageCLASS MF7280 Reference Guide - Page 3
PCL/UFR II Printer Guide CD-ROM • PCL Printer Driver Installation and Instructions • UFR II Printer Driver Installation and Instructions • Fax Driver Installation and Instructions PCL Driver Guide CD-ROM UFR II Driver Guide CD-ROM Fax Driver Guide CD-ROM • To view the manual in PDF format - Canon MF7280 | imageCLASS MF7280 Reference Guide - Page 4
and Device Status Chapter 5 System Manager Settings Chapter 6 Routine Maintenance Chapter 7 Troubleshooting Chapter 8 Appendix Includes report samples, specifications, and index. Considerable effort has been made to ensure that this manual is free of inaccuracies and omissions. However, as we are - Canon MF7280 | imageCLASS MF7280 Reference Guide - Page 5
Commission xiii Laser Safety xiv International Energy Star-Program xv Trademarks xv Copyright xvi Disclaimers xvi Legal Limitations on the Usage of Your Product and the Use of Images . . . . .xvii Customer Support xviii For Canadian Users xviii Important Safety Instructions xix Installation - Canon MF7280 | imageCLASS MF7280 Reference Guide - Page 6
Parts and Functions 1-14 Main Power and Control Panel Power 1-15 How to Turn ON the Main Power 1-15 Control Panel Power Switch 1-20 System Settings 1-21 Chapter 2 Basic Operations What This Machine Can Do 2-2 Overview of the imageCLASS MF7280 the Toner Save Mode 3-22 Printer Density 3-23 v - Canon MF7280 | imageCLASS MF7280 Reference Guide - Page 7
Inch Entry 3-24 Auto Paper Selection/Auto Drawer Switching 3-26 Identifying the Type of Paper in a Paper Source 3-29 Energy Consumption in the Sleep Mode 3-32 Standard Paper for the Stack Bypass 3-34 Paper Feed Method 3-40 Changing the Language Shown on the Touch Panel Display 3-41 Reversing - Canon MF7280 | imageCLASS MF7280 Reference Guide - Page 8
6-12 Replacing the Cartridge 6-14 Routine Cleaning 6-23 Platen Glass and Underside of the Feeder 6-24 Manual Feeder Cleaning 6-25 Transfer Roller Cleaning 6-30 Fixing Unit Cleaning 6-32 Automatic Feeder Cleaning 6-37 Consumables 6-39 Chapter 7 Troubleshooting Reducing the Frequency of - Canon MF7280 | imageCLASS MF7280 Reference Guide - Page 9
Service Call Message 7-31 If You Cannot Solve the Problem 7-33 Chapter 8 Appendix Report Samples 8-2 User's Data List 8-2 Department ID List 8-2 Specifications 8-3 Main Unit 8-3 Relationship between Original Orientation and Preprinted Paper Output Chart 8-7 Index 8-8 viii - Canon MF7280 | imageCLASS MF7280 Reference Guide - Page 10
Preface Thank you for purchasing the Canon imageCLASS MF7280. Please read this manual thoroughly before operating the machine in order to familiarize yourself with its capabilities, and to make the most of its many functions. After reading this manual, store it in a safe place for future reference. - Canon MF7280 | imageCLASS MF7280 Reference Guide - Page 11
• Touch Panel Display Keys: Examples: • Control Panel Keys: Examples: [Key Name] [Cancel] [Done] + (Key Name) (Start) (Stop) Displays Used in This Manual The keys which you should press are marked with a , as shown below. When multiple keys can be pressed on the touch panel display - Canon MF7280 | imageCLASS MF7280 Reference Guide - Page 12
may sometimes have to wait their turn before they can be printed. To avoid confusion when reading this manual, the terms "scanning," "printing," and "copying," used throughout this manual are defined below. When making a copy, the process of scanning originals and printing copies may be described as - Canon MF7280 | imageCLASS MF7280 Reference Guide - Page 13
Printing Outputting a copy, fax, or outputting data sent from a personal computer to the machine. Copying Printing data scanned from an original. xii - Canon MF7280 | imageCLASS MF7280 Reference Guide - Page 14
imageCLASS MF7280: Model F189000 This device complies with Part accordance with the instructions, may cause to correct the interference by one or more of the following Part 15 of the FCC Rules. Do not make any changes or modifications to the equipment unless otherwise specified in this manual - Canon MF7280 | imageCLASS MF7280 Reference Guide - Page 15
"SUPPORT" page on Canon USAs Web site (http://www.usa.canon.com). Canon U.S.A. Inc. One Canon Plaza, Lake Success, NY 11042, U.S.A. TEL No. (516) 328-5600 Laser Safety Reference Guide. The labels shown below are attached to the laser scanner unit inside the machine and next to the cartridge, behind - Canon MF7280 | imageCLASS MF7280 Reference Guide - Page 16
are office equipment, such as computers, displays, printers, facsimiles, and copiers. The standards and logos are uniform among participating nations. Trademarks Canon, the Canon logo, imageCLASS, and NetSpot are registered trademarks of Canon Inc. in the United States and may also be trademarks or - Canon MF7280 | imageCLASS MF7280 Reference Guide - Page 17
Copyright Copyright 2006 by Canon Inc. All rights reserved. No part of this publication may be reproduced or transmitted in any form or by any means, electronic or mechanical, including photocopying and recording, or by any - Canon MF7280 | imageCLASS MF7280 Reference Guide - Page 18
of these documents is set forth below. This list is intended to be a guide only. If you are uncertain about the legality of using your product to scan, (canceled or uncanceled) • Identifying Badges or Insignias • Selective Service or Draft Papers • Checks or Drafts Issued by Governmental Agencies - Canon MF7280 | imageCLASS MF7280 Reference Guide - Page 19
to provide trouble-free operation. If you encounter a problem with the machine's operation, try to solve it by using the information in Chapter 7, "Troubleshooting," If you cannot solve the problem or if you think your machine needs servicing, contact Canon Authorized Service Facilities or - Canon MF7280 | imageCLASS MF7280 Reference Guide - Page 20
instructions. Also, since it may result in unexpected accidents or injuries, do not perform any operation unless otherwise specified in the manual substances come into contact with electrical parts inside the machine, it may Then, contact Canon Authorized Service Facilities or the Canon Customer Care - Canon MF7280 | imageCLASS MF7280 Reference Guide - Page 21
on the machine. These openings are provided for proper ventilation of working parts inside the machine. Blocking these openings can cause the machine to fire or electrical shock. If an extension cord must be used, however, use one rated for voltages of 120 V AC and over, untie the cord binding, and - Canon MF7280 | imageCLASS MF7280 Reference Guide - Page 22
, or strange smells, immediately turn OFF the main power switch, and disconnect the power cord from the power outlet. Then, contact Canon Authorized Service Facilities or the Canon Customer Care Center. Continued use of the machine in this condition may result in a fire or electrical shock. • Do not - Canon MF7280 | imageCLASS MF7280 Reference Guide - Page 23
resulting in injury. • If the laser beam escapes from the machine, exposure may cause serious damage to your eyes. • The laser beam can be harmful to human open covers other than those instructed in this manual. • Do not remove the caution label attached to the fixing unit and the duplex unit. xxii - Canon MF7280 | imageCLASS MF7280 Reference Guide - Page 24
other metal objects to touch the inside of the machine, as this may result in burns or electrical shock. • Do not burn or throw used cartridges into open flames, as this may cause the toner remaining inside the cartridges to ignite, resulting in burns or a fire. xxiii - Canon MF7280 | imageCLASS MF7280 Reference Guide - Page 25
when inspecting the inside of the machine, do not touch the fixing unit and its surroundings, as doing so may result in burns or electrical shock. • When removing jammed paper or replacing the cartridge, take care not to allow the toner to come into contact with your hands or clothing, as this will - Canon MF7280 | imageCLASS MF7280 Reference Guide - Page 26
in places exposed to open flames, as this may cause the toner or paper to ignite, resulting in burns or a fire. • When discarding used cartridges, put the cartridges into a bag to prevent the toner remaining inside the cartridges from scattering, and dispose of them in a location away from open - Canon MF7280 | imageCLASS MF7280 Reference Guide - Page 27
turn ON the main power. Installation Location and Handling 1-2 Installation Precautions 1-2 Handling Precautions 1-8 Parts and Their Functions 1-11 External View 1-11 Feeder 1-12 Internal View 1-13 Control Panel Parts and Functions 1-14 Main Power and Control Panel Power 1-15 How to Turn - Canon MF7280 | imageCLASS MF7280 Reference Guide - Page 28
Before You Start Using This Machine Installation Location and Handling 1 This section describes precautions for installation location and handling. We recommend that you read this section prior to using this machine. Installation Precautions Avoid Installing the Machine in the Following - Canon MF7280 | imageCLASS MF7280 Reference Guide - Page 29
Before You Start Using This Machine ■ Avoid poorly ventilated locations. This machine generates a slight amount of ozone during normal use. Although sensitivity to ozone may vary, this amount is not harmful. Ozone may be more noticeable during extended use or long production runs, especially in - Canon MF7280 | imageCLASS MF7280 Reference Guide - Page 30
Before You Start Using This Machine ■ Avoid locations that are subject to vibration. For example, avoid installing the machine on unstable floors or stands. 1 ■ Avoid exposing the machine to rapid changes in temperature. If the room in which the machine is installed is cold but rapidly heated, - Canon MF7280 | imageCLASS MF7280 Reference Guide - Page 31
Before You Start Using This Machine Select a Safe Power Supply ■ Plug the machine into a standard 120 V AC, three-wire grounded outlet. ■ Make sure that the power supply for the machine is safe, and has a steady voltage. 1 ■ Do not connect other electrical equipment to the same power outlet to - Canon MF7280 | imageCLASS MF7280 Reference Guide - Page 32
Before You Start Using This Machine Provide Adequate Installation Space ■ Provide enough space on each side of the machine for unrestricted operation. 4" (100 mm) or more 1 49 1/4" (1,249 mm) 40 1/8" (1,018 mm) NOTE Be sure to provide enough space over the top of the machine to be able to open the - Canon MF7280 | imageCLASS MF7280 Reference Guide - Page 33
of its attachments. 1 ■ When carrying the machine, be sure to hold the parts indicated below. Failure to do so may cause the machine to be dropped and Machine Grasp these handles Grasp these handles ■ If you have a back problem, make sure to check the weight of this machine before carrying. - Canon MF7280 | imageCLASS MF7280 Reference Guide - Page 34
Handling Precautions ■ Some parts inside the machine are subject to high-voltages and temperatures. Take adequate precautions when inspecting the inside of the machine. Do not carry out any inspections not described in this 1 manual. ■ Do not attempt to disassemble or modify the machine. - Canon MF7280 | imageCLASS MF7280 Reference Guide - Page 35
or unusual noise, immediately turn the main power switch OFF, disconnect the power cord from the power outlet, and then call Canon Authorized Service Facilities or the Canon Customer Care Center. Using the machine in this state may cause a fire or electrical shock. Also, avoid placing objects around - Canon MF7280 | imageCLASS MF7280 Reference Guide - Page 36
■ This machine generates a slight amount of ozone during normal use. Although sensitivity to ozone may vary, this amount is not harmful. Ozone may be more noticeable during extended use or long production runs, especially in poorly ventilated rooms. It is recommended that the room be appropriately - Canon MF7280 | imageCLASS MF7280 Reference Guide - Page 37
and Their Functions This section provides you with the names and functions of all the parts on the 1 outside and inside of the main unit, feeder, and control panel. External View a e b d c a Feeder Originals placed in the feeder are automatically fed sheet by sheet to the scanning area - Canon MF7280 | imageCLASS MF7280 Reference Guide - Page 38
This Machine d a Feeder Cover Open this cover to remove jammed originals. b Slide Guides Adjust the slide guides to match the width of the original. c Original Supply Tray Originals placed here are automatically not place any objects in the original output area. 1-12 Parts and Their Functions - Canon MF7280 | imageCLASS MF7280 Reference Guide - Page 39
When toner runs out, pull out the cartridge, and replace it with a new one. c Front Cover Open this cover to replace the cartridges and drum cartridges. d Paper Drawer's Left Cover Open these covers when clearing a paper jam in Paper Drawer 2. e Fixing Unit When paper jam occurs in the fixing unit - Canon MF7280 | imageCLASS MF7280 Reference Guide - Page 40
indicator flashes, follow the instructions that appear on the touch panel display. When the Error indicator maintains a steady red light, contact Canon Authorized Service Facilities or the Canon Customer Care Center. l screen for each function is shown on this display. 1-14 Parts and Their Functions - Canon MF7280 | imageCLASS MF7280 Reference Guide - Page 41
Main Power and Control Panel Power The machine is provided with two power switches, a main power switch and a 1 control panel power switch. How to Turn ON the Main Power This section explains how to turn ON the main power. Before You Start Using This Machine 1 Make sure that the power plug is - Canon MF7280 | imageCLASS MF7280 Reference Guide - Page 42
Before You Start Using This Machine 3 The screen shown below is displayed while the system software is loading. ❑ The Start Up screen is displayed until the machine is ready to scan. 1 If a message is displayed on the touch panel display, proceed to step 4. The screen below is displayed when the - Canon MF7280 | imageCLASS MF7280 Reference Guide - Page 43
. Copying or printing begins automatically, as soon as the machine finishes warming up. (See Chapter 1, "Introduction to Copying," in the Copying Guide.) • In the case above, the default settings are selected. • The default copy settings are: 1 - Copy Ratio: Direct (100%) - Paper Selection - Canon MF7280 | imageCLASS MF7280 Reference Guide - Page 44
This Machine The Basic Features screen is displayed. NOTE • If Department ID Management has not been enabled, this message will not appear. • For instructions on entering the Department ID and password, see "Entering the Department ID and Password," on p. 2-21. 1-18 Main Power and Control Panel - Canon MF7280 | imageCLASS MF7280 Reference Guide - Page 45
User ID ➞ press [OK]. ❑ Press [Password] ➞ enter the password ➞ press [OK]. ❑ Press (Log In/Out). 1 The Basic Features screen is displayed. NOTE For instructions on entering the User ID and password on the User ID Management screen, see "Using the User ID Management," p. 2-24. Main Power and Control - Canon MF7280 | imageCLASS MF7280 Reference Guide - Page 46
Control Panel Power Switch You can set the machine to enter the Sleep mode whenever you desire, by pressing the control panel power switch, or specify to have the machine enter the Sleep mode at a preset time. (See "Auto Sleep Time,"on p. 3-53.) 1 Press the control panel power switch to cancel - Canon MF7280 | imageCLASS MF7280 Reference Guide - Page 47
for instructions: ■ Connecting the Machine to the Network See the Network Quick Start Guide. ■ Setting Up the Network See the Network Guide. ■ Setting Up the Printer See the PCL/UFR II Printer Guide. ■ Installing the Printer Driver See the PCL Driver Guide or UFR II Driver Guide. ■ Using - Canon MF7280 | imageCLASS MF7280 Reference Guide - Page 48
describes the main features and basic operations of the machine. 2 CHAPTER What This Machine Can Do 2-2 Overview of the imageCLASS MF7280 2-5 Switching the Functions Indicated on the Touch Panel Display 2-5 Specifying Settings 2-7 Functions That Conserve Power 2-8 Checking, Changing, and - Canon MF7280 | imageCLASS MF7280 Reference Guide - Page 49
needs of document work in a digitized office, the imageCLASS MF7280 represents the ultimate in digital multitasking machines. Remote UI Copying sizes together in one copy operation, are provided to increase your productivity. LTR Original Original Feeding Direction See the Copying Guide 11" x 17 - Canon MF7280 | imageCLASS MF7280 Reference Guide - Page 50
for the printers and copiers connected to canon.com). Device Information Manage Using the Remote UI See the Remote UI Guide You can control functions, such as confirming the status of the machine, job operations, and printing instructions, all from your PC's Web browser. The imageCLASS MF7280 - Canon MF7280 | imageCLASS MF7280 Reference Guide - Page 51
Sending See the Sending Guide The Send function enables you to send scanned image or document data to file servers, or send it by e-mail or I-fax. A Original variety of file formats are supported (TIFF and PDF (for sending black-and-white scanned images or document data); and JPEG and PDF ( - Canon MF7280 | imageCLASS MF7280 Reference Guide - Page 52
Overview of the imageCLASS MF7280 Basic Operations Most operations on this machine are executed from the touch panel display. By pressing the keys according to the instructions on the touch panel display, you can utilize the functions of this machine efficiently. 2 CAUTION Press the touch - Canon MF7280 | imageCLASS MF7280 Reference Guide - Page 53
Status.") ■ User Management and Restriction A login service manages data relating to users using the machine. The following two login services are available: • Department ID Management If Department such as IDs and passwords. (See the Remote UI Guide.) 2-6 Overview of the imageCLASS MF7280 - Canon MF7280 | imageCLASS MF7280 Reference Guide - Page 54
, Communications Settings, The Sending Guide/Facsimile Guide Address Book Settings: • Printer Settings: The PCL/UFR II Printer Guide • Network Settings: The Network Guide Basic Operations The Additional Functions Screen The System Settings Screen Overview of the imageCLASS MF7280 2-7 - Canon MF7280 | imageCLASS MF7280 Reference Guide - Page 55
Manager Settings." • For instructions on specifying Printer Settings, see the PCL/UFR II Printer Guide. • For instructions on specifying Network Settings, see the Network Guide. 2 Functions That Conserve displayed after pressing the control panel power switch. 2-8 Overview of the imageCLASS MF7280 - Canon MF7280 | imageCLASS MF7280 Reference Guide - Page 56
Checking, Changing, and Canceling Print Jobs The System Monitor screen enables you to check the status of the machine or cancel print jobs. 2 Basic Operations Overview of the imageCLASS MF7280 2-9 - Canon MF7280 | imageCLASS MF7280 Reference Guide - Page 57
The meanings of the icons are described as shown below: 2 Icon (Type of Job) Description Copy Job Basic Operations Send Job Fax Job Printer Job Report Job Additional Functions Job Icon (Machine Status) Description Error Paper Jam Replace Cartridge 2-10 Overview of the imageCLASS MF7280 - Canon MF7280 | imageCLASS MF7280 Reference Guide - Page 58
the standard settings. NOTE • You can set the Auto Clear Time from 0 to 9 minutes in one minute increments. The default setting is '2' minutes. (See "Auto Clear Time," on p. 3-54.) • The Auto Clear mode does not activate if Auto Clear Time is set to '0'. Overview of the imageCLASS MF7280 2-11 - Canon MF7280 | imageCLASS MF7280 Reference Guide - Page 59
machine will not rotate the image, and will print it as is, with part of the image cut off. Even if Auto Orientation is set to 'On', the image is not rotated if the Different Size Originals mode is set. (See Chapter 4, "Custom Settings," in the Copying Guide.) 2-12 Overview of the imageCLASS MF7280 - Canon MF7280 | imageCLASS MF7280 Reference Guide - Page 60
Using the Touch Panel Display Basic Operations This section describes the keys that are frequently used on the touch panel display. Information on how to adjust the brightness of the touch panel display is also provided. 2 CAUTION Press the touch panel display keys gently with your fingers. Do - Canon MF7280 | imageCLASS MF7280 Reference Guide - Page 61
Touch Panel Key Display When you press a key on the touch panel display, that key is highlighted, and the corresponding mode is set. When you set certain modes, the characters on some keys may become grayed out. You cannot press keys that are grayed out. This means that you cannot set these modes in - Canon MF7280 | imageCLASS MF7280 Reference Guide - Page 62
■ Keys That Display a Drop-Down List Pressing a key that has a right triangle ( ) to the right of the name of the selection, displays a drop-down list containing other setting options. Before Selection Drop-Down List After Selection Basic Operations 2 ■ Numeric Keys Anytime the numeric keys - Canon MF7280 | imageCLASS MF7280 Reference Guide - Page 63
require alphanumeric entries, enter characters using the keys displayed on the touch panel display, as shown below. 2 Alphanumeric Characters Example: Enter . 1 To enter alphanumeric characters, make sure that is displayed above [Entry Mode]. Each press of [Entry Mode] switches the - Canon MF7280 | imageCLASS MF7280 Reference Guide - Page 64
2 Enter . To enter uppercase letters, press [Shift]. To enter a space, press [Space]. To move the cursor, press [ ] or [ ]. To enter symbols, press [Entry Mode] to select [ - Canon MF7280 | imageCLASS MF7280 Reference Guide - Page 65
Basic Operations Symbols Example: Enter . 1 Press [Entry Mode] to select [Other]. 2 Each press of [Entry Mode] switches the entry mode between and . 2 Press [▼] or [▲] to display the desired symbol that you want to enter. 2-18 Entering Characters from the Touch Panel Display - Canon MF7280 | imageCLASS MF7280 Reference Guide - Page 66
Basic Operations 3 Press [é]. To enter a space, press [Space]. To move the cursor, press [ ] or [ ]. To enter alphanumeric characters, press [Entry Mode] to select [Alphabet] ➞ enter the desired characters. The characters you entered are displayed, as shown below. 2 NOTE • If you make a mistake - Canon MF7280 | imageCLASS MF7280 Reference Guide - Page 67
Basic Operations Values in Inches If you want to enter values in inches in all modes which require a numeric entry, set Inch Entry to 'On' in Common Settings (from the Additional Functions screen). (See "Inch Entry," on p. 3-24.) This enables you to enter values in inches when you press [Inch] on a - Canon MF7280 | imageCLASS MF7280 Reference Guide - Page 68
functions may be restricted, and a screen asking you to enter your Department ID and password may appear while you are using the machine. Follow the instructions on the touch panel display to continue using the selected function. • If User ID Management is set to 'On', see "Using the User ID - Canon MF7280 | imageCLASS MF7280 Reference Guide - Page 69
2 Press (Log In/Out). PQRS 7 TUV 8 WXYZ 9 Additional Functions Display Contrast 0 Log In/Out Clear Stop Start 2 Processing/ Data Error Power The Basic Features screen of the selected function appears on the touch panel display. Basic Operations NOTE If the Department ID or password that - Canon MF7280 | imageCLASS MF7280 Reference Guide - Page 70
3 When your operations are complete, press (Log In/Out) on the control panel. PQRS 7 TUV 8 WXYZ 9 Additional Functions 0 Stop Log In/Out Clear Start Display Contrast 2 Processing/ Data Error Power Basic Operations The screen for entering the Department ID and password appears. NOTE • To - Canon MF7280 | imageCLASS MF7280 Reference Guide - Page 71
. 2 IMPORTANT Register User IDs and passwords before setting the User ID Management to 'On'. NOTE For instructions on how to register a User ID and password, see the Remote UI Guide. Basic Operations 1 Press [User ID]. NOTE You can use only alphanumeric characters for User IDs and passwords - Canon MF7280 | imageCLASS MF7280 Reference Guide - Page 72
Basic Operations 2 Enter the User ID ➞ press [OK]. 2 You can also enter values using - (numeric keys). 3 Press [Password]. Using the User ID Management 2-25 - Canon MF7280 | imageCLASS MF7280 Reference Guide - Page 73
Basic Operations 4 Enter the password ➞ press [OK]. 2 You can also enter the password using - (numeric keys). 5 Press (Log In/Out). The Basic Features screen of the selected function appears on the touch panel display. If the User ID or password that you entered is incorrect, a message appears - Canon MF7280 | imageCLASS MF7280 Reference Guide - Page 74
6 When your operations are complete, press (Log In/Out) on the control panel. PQRS 7 TUV 8 WXYZ 9 Additional Functions 0 Stop Log In/Out Clear Start Display Contrast 2 Processing/ Data Error Power Basic Operations The screen for entering the User ID and password appears. NOTE • To - Canon MF7280 | imageCLASS MF7280 Reference Guide - Page 75
may occur. In this case, load only one sheet of heavyweight paper at a time. • image. Moreover, the fixing unit may become dirty and require a service repair, or the paper Guide.) NOTE • Envelopes may be creased in the printing process. • For high-quality printouts, use paper recommended by Canon - Canon MF7280 | imageCLASS MF7280 Reference Guide - Page 76
■ Standard Size You can select standard inch paper, or A or B series paper. ■ Irregular Size You can load nonstandard paper sizes (3 3/4" x 5 7/8" to 11 3/4" x 17" (95 mm x 148 mm to 297 mm x 432 mm)). ■ Envelope The following envelopes can be loaded into the stack bypass: 2 • COM10: 4 1/8" x 9 - Canon MF7280 | imageCLASS MF7280 Reference Guide - Page 77
2 Adjust the slide guides to match the size of the paper. 2 Slide Guides If you are feeding large size paper, pull out the auxiliary tray, and extend the tray extension. Basic Operations Tray Auxiliary Tray Extension 2-30 Making Prints Using the Stack Bypass - Canon MF7280 | imageCLASS MF7280 Reference Guide - Page 78
Basic Operations 3 Load the paper into the stack bypass. ❑ Make sure that the height of the paper stack does not exceed the loading limit mark ( ). 2 When you use the stack bypass to make copies, straighten out curled paper prior to use, as shown below. Feeding Direction IMPORTANT Curled paper may - Canon MF7280 | imageCLASS MF7280 Reference Guide - Page 79
The screen for selecting the paper size appears. IMPORTANT • When loading paper into the stack bypass, align the paper stack neatly between the slide guides. If the paper is not loaded correctly, a paper jam may occur. • If you are printing on heavyweight paper or envelopes using the stack bypass - Canon MF7280 | imageCLASS MF7280 Reference Guide - Page 80
on the paper package about which side of the paper to load, follow those instructions. • When the paper is loaded into the stack bypass, the side facing down is the one printed on. • If problems, such as poor print quality or paper jams occur, try turning the paper stack over and reload - Canon MF7280 | imageCLASS MF7280 Reference Guide - Page 81
Basic Operations ❑ Hold down the four corners of the envelopes firmly, so that they and the sealed or glued portion stay flat. 2 Flap IMPORTANT • Do not print on the back side of the envelopes (the side with the flap). • If the envelopes become filled with air, flatten them by hand before loading - Canon MF7280 | imageCLASS MF7280 Reference Guide - Page 82
❑ Load the envelopes, as shown below. Basic Operations Feeding 2 Direction The screen for selecting the paper size appears. IMPORTANT • The stack bypass can hold 10 envelopes at a time. • Envelopes may be creased in the printing process. 4 Select the desired paper size. NOTE The paper size/ - Canon MF7280 | imageCLASS MF7280 Reference Guide - Page 83
paper. If the type of paper is not set correctly, it could adversely affect the quality of the image. Moreover, the fixing unit may become dirty and require a service repair, or the paper could jam. NOTE • If you select [Transparency] or [Labels], make sure that you do not specify any finishing - Canon MF7280 | imageCLASS MF7280 Reference Guide - Page 84
Basic Operations ❑ Press [X] to specify the horizontal axis of the paper ➞ enter a value. ❑ Press [Y] to specify the vertical axis of the paper size ➞ enter a value. ❑ Press [OK]. 2 The display returns to the paper size selection screen. NOTE • If you make a mistake when entering values, press [C] - Canon MF7280 | imageCLASS MF7280 Reference Guide - Page 85
If the type of paper is not set correctly, it could adversely affect the quality of the image. Moreover, the fixing unit may become dirty and require a service repair, or the paper could jam. • If you select a nonstandard paper size, the Auto Zoom, finishing modes, 1 2-Sided, 2 2-Sided, Book 2-Sided - Canon MF7280 | imageCLASS MF7280 Reference Guide - Page 86
Basic Operations ❑ Select the envelope type ➞ press [OK]. 2 IMPORTANT • If the envelope type is not selected correctly, a paper jam may occur. • If an envelope size is selected, 1 2-Sided, 2 2-Sided, Book 2-Sided, Two-page Separation, or Image Combination mode cannot be specified. ❑ Press [OK]. 5 - Canon MF7280 | imageCLASS MF7280 Reference Guide - Page 87
Basic Operations The display returns to the Copy Basic Features screen, and the selected paper size and type are displayed. 2 6 If the Copy function is selected, place your originals ➞ select the desired copy settings. 7 Press (Start). Copying starts. NOTE To cancel all settings and return the - Canon MF7280 | imageCLASS MF7280 Reference Guide - Page 88
Multi-functional Operations The imageCLASS MF7280 offers the user many functions, such as printing, scanning, copying, Manual TX* Send Memory TX Memory RX Printing of Auto RX Documents Printer Receiving Data Printing * Manual TX includes the direct sending. Copy Scanning Printing Printer - Canon MF7280 | imageCLASS MF7280 Reference Guide - Page 89
TX* Basic Operations Send Memory TX Memory RX Printing of Auto RX Documents Printer Receiving Data Printing * Manual TX includes the direct sending. NOTE The machine's performance may be affected if several network send and receive jobs are being carried out at the - Canon MF7280 | imageCLASS MF7280 Reference Guide - Page 90
Available Paper Stock The paper types that can be used with this machine are shown in the following table. Icons indicating the type of paper loaded in each paper drawer can be displayed on the paper selection screen if you store that information in the machine 2 beforehand. (See "Identifying - Canon MF7280 | imageCLASS MF7280 Reference Guide - Page 91
(176 mm x 250 mm) 6 3/8" x 9" (162 mm x 229 mm) 3 3/4" x 5 7/8" to 11 3/4" x 17" (95 mm x 148 mm to 297 mm x 432 mm) NOTE For instructions on loading paper, see the following sections: - Paper Drawers: "Loading Paper," on p. 6-2 - Stack Bypass: "Making Prints Using the Stack Bypass," on p. 2-28 - Canon MF7280 | imageCLASS MF7280 Reference Guide - Page 92
3-5 Specifying Common Settings 3-15 Initial Function at Power ON 3-15 Default Display after Auto Clear 3-18 Tone Settings 3-20 Setting the Toner Save Mode 3-22 Printer Density 3-23 Inch Entry 3-24 Auto Paper Selection/Auto Drawer Switching 3-26 Identifying the Type of Paper in a Paper Source - Canon MF7280 | imageCLASS MF7280 Reference Guide - Page 93
Customizing Settings 3. Customizing Settings Cutting Down Waiting Time for a Next Job (Special Mode S 3-65 Feeder Smudge Adjustment 3-67 3 3-2 - Canon MF7280 | imageCLASS MF7280 Reference Guide - Page 94
What Are Additional Functions? Additional Functions enable you to customize the machine's various settings. IMPORTANT • When User ID Management is set to 'On', users whose user type is registered as "User" (end user) cannot change the System Manager Settings even if there are no System Manager - Canon MF7280 | imageCLASS MF7280 Reference Guide - Page 95
3 Press a mode key to specify its settings. 3 For an overview of all the settings you can change from the Additional Functions screen, see "Additional Functions Settings Table," on p. 3-5. NOTE The Common Settings, Adjustment/Cleaning, and System Settings screens consist of a list of individual - Canon MF7280 | imageCLASS MF7280 Reference Guide - Page 96
• Communications Settings, Address Book The Facsimile Guide, 3 Settings, and Report Settings: The Sending Guide • Printer Settings and Report Settings: The PCL/UFR II Printer Guide • Network Settings and Report Settings: The Network Guide Customizing Settings The Additional Functions Screen - Canon MF7280 | imageCLASS MF7280 Reference Guide - Page 97
to 3 levels), Off*1 p. 3-20 Print Done Tone: On*1 (1*1 to 3 levels), Off Scan Done Tone: On*1 (1*1 to 3 levels), Off Toner Save Mode High, Low, Off*1 p. 3-22 Printer Density 1 to 9 levels; 5*1 p. 3-23 Inch Entry On*1, Off p. 3-24 Drawer Eligibility For APS/ ADS Copy: (Stack Bypass: On - Canon MF7280 | imageCLASS MF7280 Reference Guide - Page 98
Auto Sleep Time Auto Clear Time *1 Indicates the default setting. Daylight Saving Time Settings: On, Off*1 On*1 3 to 30 minutes; 5*1 Off 0 (Off) to 9 minutes, in one minute increments; 2 min.*1 p. 3-53 p. 3-54 Additional Functions Settings Table 3-7 - Canon MF7280 | imageCLASS MF7280 Reference Guide - Page 99
Press [Start] p. 6-30 Fixing Unit Cleaning Press [Cleaning Sheet Print] p. Guide. Settings TX Report: On, For Error Only*1, Off Report With TX Image: On*1, Off Activity Report Auto Print: On*1, Off Send/Receive Separate: On, Off*1 RX Report: On, For Error Only, Off*1 Address Book List One - Canon MF7280 | imageCLASS MF7280 Reference Guide - Page 100
Edit, Erase, Set page limits Page Totals Clear, Clear All Totals, Print List Allow ID Unknown Printer Jobs On*1, Off Network Settings *1 Indicates the default setting. *4 See the Network Guide. Applicable Page p. 5-2 3 p. 5-6 *4 Customizing Settings Additional Functions Settings Table 3-9 - Canon MF7280 | imageCLASS MF7280 Reference Guide - Page 101
addresses. Erase Print List Device Info Settings Device Name Location User ID Management *1 Indicates the default setting. *2 See the Facsimile Guide. *3 See the Sending Guide. File Format: TIFF*1, PDF, Divide into Pages Yes, No Yes, No 32 characters maximum 32 characters maximum On, Off - Canon MF7280 | imageCLASS MF7280 Reference Guide - Page 102
Data Size: 0 to 99 MB, in one MB increments, 3 MB*1 Divided TX over Destinations Restrict New Addresses: On, Off*1 Allow Fax Driver TX: On*1, Off p. 5-34 License Registration This setting. *2 See the Facsimile Guide. *3 See the Sending Guide. *5 See the Remote UI Guide. IMPORTANT • When User ID - Canon MF7280 | imageCLASS MF7280 Reference Guide - Page 103
the Copying Guide. 3 ■ Communications Settings Customizing Settings Item Common Settings TX Settings Settings Applicable Page Unit Name (24 : Speed Priority*1, Image Priority Default Screen for Send: Favorite Buttons, One-touch Buttons, Initial Function*1 Initialize TX Settings: Yes, No *2, - Canon MF7280 | imageCLASS MF7280 Reference Guide - Page 104
75% Reduce Direction: Ver. Hor., Vertical Only*1 Off Continue Printing When Toner Is Out: Yes*1, No Unit Telephone # (20 characters maximum) Tel Line Type: Pulse, Tone*1 Monitor the default setting. *2 See the Facsimile Guide. *3 See the Sending Guide. Additional Functions Settings Table 3-13 - Canon MF7280 | imageCLASS MF7280 Reference Guide - Page 105
the PCL/UFR II Printer Guide. ■ Address Book Name: 16 characters maximum File Protocol: FTP*1, Windows (SMB) Host Name: 120 characters maximum File Path characters maximum Erase Edit *2, *3 One-touch Buttons Register/Edit You can register or edit the items of One-touch Buttons for Fax, E- - Canon MF7280 | imageCLASS MF7280 Reference Guide - Page 106
Specifying Common Settings You can specify the settings that are common to the Copy and Send/Fax functions. Initial Function at Power ON You can specify the screen that is displayed when you turn ON the main power, or after the Auto Clear mode initiates. The System Monitor screen can also be 3 - Canon MF7280 | imageCLASS MF7280 Reference Guide - Page 107
Customizing Settings 2 Press [Initial Function]. 3 NOTE If the desired setting is not displayed, press [▼] or [▲] to scroll to the desired setting. 3 Select [Copy] or [Send] ➞ press [OK]. When the main power is turned ON or after the Auto Clear mode initiates: If you select [Copy]: The Copy Basic - Canon MF7280 | imageCLASS MF7280 Reference Guide - Page 108
Customizing Settings ● If you want to set the System Monitor screen as the initial function screen: ❑ Press [On] for ➞ press [OK]. 3 The System Monitor screen is displayed when the main power is turned ON, or after the Auto Clear mode initiates. The - Canon MF7280 | imageCLASS MF7280 Reference Guide - Page 109
Default Display after Auto Clear You can specify either the Initial Function or the Selected Function to be displayed on the screen after the Auto Clear mode initiates. NOTE • The time necessary for Auto Clear to initiate can be set. (See "Auto Clear Time," on p. 3-54.) • The default setting is ' - Canon MF7280 | imageCLASS MF7280 Reference Guide - Page 110
2 Select [Initial Function] or [Selected Function] ➞ press [OK]. 3 Customizing Settings Details of each item are shown below. [Initial Function]: The screen specified as the initial function is displayed after the Auto Clear mode initiates. For example, if you set the System Monitor screen as - Canon MF7280 | imageCLASS MF7280 Reference Guide - Page 111
Tone Settings You can set whether to sound audible tones. The following tones sound at the following times: • Entry Tone: When pressing keys on the control panel or keys on the touch panel display • Error Tone: When a malfunction occurs (e.g., paper jam or operational error) 3 • Send Done - Canon MF7280 | imageCLASS MF7280 Reference Guide - Page 112
2 Select the desired tones. 3 3 Select [On] ➞ press or press [OK]. to set the desired volume ➞ Customizing Settings If you select [Off], the selected tone is not sounded. The selected mode is set. 4 Press [Done] repeatedly until the Basic Features screen appears. Specifying Common Settings 3-21 - Canon MF7280 | imageCLASS MF7280 Reference Guide - Page 113
notice degradation in print quality, set this mode to 'Off'. • The default setting is 'Off'. 3 1 Press (Additional Functions) ➞ [Common Settings] ➞ [Toner Save Mode]. Customizing Settings NOTE If the desired setting is not displayed, press [▼] or [▲] to scroll to the desired setting. 2 Select - Canon MF7280 | imageCLASS MF7280 Reference Guide - Page 114
Customizing Settings 3 Press [Done] repeatedly until the Basic Features screen appears. Printer Density You can set the density for printing. NOTE The default setting is '5'. 3 1 Press (Additional Functions) ➞ [Common Settings]. If necessary, see the screen shots in - Canon MF7280 | imageCLASS MF7280 Reference Guide - Page 115
Customizing Settings 3 Press [Light] or [Dark] to set the desired Density ➞ press [OK]. 3 4 Press [Done] repeatedly until the Basic Features screen appears. Inch Entry Specifying this setting ensures that the key for entering values in inches is displayed on the various numeric entry screens. The - Canon MF7280 | imageCLASS MF7280 Reference Guide - Page 116
Customizing Settings 2 Press [▼] or [▲] until [Inch Entry] appears ➞ press [Inch Entry]. 3 3 Select [On] or [Off] ➞ press [OK]. The selected mode is set. 4 Press [Done] repeatedly until the Basic Features screen appears. Specifying Common Settings 3-25 - Canon MF7280 | imageCLASS MF7280 Reference Guide - Page 117
are "On" for all paper sources except for the stack bypass. You cannot set the stack bypass for Printer. Customizing Settings 1 Press (Additional Functions) ➞ [Common Settings]. If necessary, see the screen shot in step 1 of "Initial Function at Power ON," on p. 3-15. 2 Press [▼] or [▲] - Canon MF7280 | imageCLASS MF7280 Reference Guide - Page 118
Customizing Settings 3 Select [Copy], [Printer], [Receive], or [Other]. 3 4 Select [On] or [Off] for the stack bypass and the other paper sources ➞ press [OK]. Details of each item are shown below. [ - Canon MF7280 | imageCLASS MF7280 Reference Guide - Page 119
setting, you cannot select 'Off' for all of the paper sources at the same time. At least one of the paper sources, besides the stack bypass must be set to 'On'. • If you selected [Printer] in step 3, the Stack Bypass icon ( ) will not be displayed on the paper selection screen in step - Canon MF7280 | imageCLASS MF7280 Reference Guide - Page 120
type. If the type of paper is not set correctly, it could adversely affect the quality of the image. Moreover, the fixing unit may become dirty and require a service repair, or the paper could jam. 3 1 Press (Additional Functions) ➞ [Common Settings]. If necessary, see the screen shot in step 1 of - Canon MF7280 | imageCLASS MF7280 Reference Guide - Page 121
Customizing Settings 3 Select the paper source in which you want to register the paper type. 3 The numbers on the screen represent the following paper sources: Paper Drawer 1 Paper Drawer 2 3-30 Specifying Common Settings - Canon MF7280 | imageCLASS MF7280 Reference Guide - Page 122
Customizing Settings 4 Select the desired paper type loaded in the paper source ➞ press [OK]. 3 Make sure that the registered paper type setting is the same paper type that is loaded in the paper source. The selected mode is set. NOTE For more information on paper types, see "Available Paper Stock - Canon MF7280 | imageCLASS MF7280 Reference Guide - Page 123
setting is set to 'Off'. (See Chapter 3, "Using a TCP/IP Network," in the Network Guide.) The SMB setting is set to 'Off'. (See Chapter 4, "Using a NetBIOS Network," in the Network Guide.) • The default setting is 'Low'. Customizing Settings 1 Press (Additional Functions) ➞ [Common Settings]. If - Canon MF7280 | imageCLASS MF7280 Reference Guide - Page 124
Customizing Settings 3 Select [Low] or [High] ➞ press [OK]. 3 Details of each item are shown below. [Low]: Energy consumption in the Sleep mode is low, but it takes longer to recover from the Sleep mode. [High]: Energy consumption in the Sleep mode is high, but it takes shorter to recover from the - Canon MF7280 | imageCLASS MF7280 Reference Guide - Page 125
paper. If the type of paper is not set correctly, it could adversely affect the quality of the image. Moreover, the fixing unit may become dirty and require a service repair, or the paper 3 could jam. NOTE • If you are using the stack bypass as a paper source for the Copy function, you - Canon MF7280 | imageCLASS MF7280 Reference Guide - Page 126
Customizing Settings 3 Press [On] ➞ [Store]. 3 If you press [Off], proceed to step 6. 4 Select the desired paper size. ● If you want to select a standard paper size: ❑ Select the desired paper size ➞ press [Next]. NOTE To select an A or B series paper size, press [A/B-size]. Specifying Common - Canon MF7280 | imageCLASS MF7280 Reference Guide - Page 127
paper. If the type of paper is not set correctly, it could adversely affect the quality of the image. Moreover, the fixing unit may become dirty and require a service repair, or the paper could jam. NOTE • If you select [Transparency] or [Labels], make sure that you do not specify any finishing - Canon MF7280 | imageCLASS MF7280 Reference Guide - Page 128
Customizing Settings ❑ Press [X] to specify the horizontal axis of the paper ➞ enter a value using the numeric keys on the touch panel display. ❑ Press [Y] to specify the vertical axis of the paper ➞ enter a value using the numeric keys on the touch panel display. ❑ Press [OK]. 3 The display - Canon MF7280 | imageCLASS MF7280 Reference Guide - Page 129
If the type of paper is not set correctly, it could adversely affect the quality of the image. Moreover, the fixing unit may become dirty and require a service repair, or the paper could jam. • If you select a nonstandard paper size, the Auto Zoom, finishing modes, 1 2-Sided, 2 2-Sided, Book 2-Sided - Canon MF7280 | imageCLASS MF7280 Reference Guide - Page 130
Customizing Settings ❑ Select the envelope type ➞ press [OK]. 3 The display returns to the paper size selection screen. IMPORTANT • If the envelope type is not selected correctly, a paper jam may occur. • If an envelope size is selected, 1 2-Sided, 2 2-Sided, Book 2-Sided, Two-page Separation, or - Canon MF7280 | imageCLASS MF7280 Reference Guide - Page 131
Customizing Settings 6 Press [Done] repeatedly until the Basic Features screen appears. Paper Feed Method You can set the priority of copy speed or copy quality for each cassette. NOTE The default setting is set to copy speed for each cassette. 3 1 Press (Additional Functions) ➞ [Common Settings]. - Canon MF7280 | imageCLASS MF7280 Reference Guide - Page 132
Customizing Settings 3 Set the priority of copy speed or copy quality for each cassette ➞ press [OK]. 3 4 Press [Done] repeatedly until the Basic Features screen appears. Changing the Language Shown on the Touch Panel Display You can select the language displayed on the touch panel display. NOTE • - Canon MF7280 | imageCLASS MF7280 Reference Guide - Page 133
Customizing Settings 2 Press [▼] or [▲] until [Language Switch] appears ➞ press [Language Switch]. 3 3 Press [On] ➞ select the desired language ➞ press [OK]. If the desired language is not displayed, press [▼] or [▲]. If you do not want to change the display language, press [Off]. The touch panel - Canon MF7280 | imageCLASS MF7280 Reference Guide - Page 134
Reversing the Contrast of the Touch Panel Display You can reverse the contrast on the touch panel display for better viewing. The Reversed Display mode reverses the light and dark areas on the touch panel display. If you find it hard to read what is being shown on the touch panel display, try using - Canon MF7280 | imageCLASS MF7280 Reference Guide - Page 135
3 Select [On] or [Off] ➞ press [OK]. 3 Customizing Settings Details of each item are shown below. [On]: The colors of the touch panel display screen are reversed (i.e., the areas that are normally light become dark, and the dark areas become light). [Off]: The touch panel display screen - Canon MF7280 | imageCLASS MF7280 Reference Guide - Page 136
Customizing Settings 2 Press [▼] or [▲] until [Error Display for Dirty Feeder] appears ➞ press [Error Display for Dirty Feeder]. 3 3 Select [On] or [Off] ➞ press [OK]. 4 Press [Done] repeatedly until the Basic Features screen appears. Specifying Common Settings 3-45 - Canon MF7280 | imageCLASS MF7280 Reference Guide - Page 137
Returning the Common Settings to Their Defaults You can restore all of the Common Settings to their defaults (initial settings). NOTE If you set Language Switch to 'On', and then return the Common Settings to their default settings, Language Switch is turned 'Off', but the language shown on the - Canon MF7280 | imageCLASS MF7280 Reference Guide - Page 138
Customizing Settings 3 Press [Yes]. 3 To cancel initializing the Common Settings, press [No]. The message appears for approximately two seconds on the touch panel display. The Common Settings are returned to their defaults. 4 Press [Done] repeatedly until the Basic Features screen - Canon MF7280 | imageCLASS MF7280 Reference Guide - Page 139
Timer Settings You can make various timer related settings for the machine, such as adjusting the current time and date, and specifying the time it takes for the machine to enter into the Sleep mode. 3 Current Date and Time You can set the current date and time. The current date and time settings - Canon MF7280 | imageCLASS MF7280 Reference Guide - Page 140
2 Press [Date & Time Settings]. 3 3 Enter the current date (month, day, year) and time using - (numeric keys). Customizing Settings Enter the month and the day using four digits (including zeros). Enter all four digits of the year, and the time in 24-hour notation, as four digits (including zeros) - Canon MF7280 | imageCLASS MF7280 Reference Guide - Page 141
● If you are setting the Time Zone: ❑ Press [Time Zone Settings] ➞ select the time zone in which the machine is located ➞ press [OK]. 3 Customizing Settings NOTE • The default setting is 'GMT-3:00'. - Eastern time (US/Canada): - Central time (US/Canada): - Mountain time (US/Canada): - Pacific - Canon MF7280 | imageCLASS MF7280 Reference Guide - Page 142
Daylight Saving Time ends ➞ press [OK]. ❑ Press [OK]. NOTE • If you set Daylight Saving Time, the machine automatically sets the standard time of the machine one hour forward at the specified date and time. • The default setting is 'Off'. Timer Settings 3-51 - Canon MF7280 | imageCLASS MF7280 Reference Guide - Page 143
Customizing Settings 4 Press [OK]. 3 The selected mode is set. 5 Press [Done] repeatedly until the Basic Features screen appears. 3-52 Timer Settings - Canon MF7280 | imageCLASS MF7280 Reference Guide - Page 144
Auto Sleep Time If the machine is idle for a certain period of time (after the last print job or key operation is performed), the control panel power switch automatically switches OFF to save power. The machine has entered the Sleep mode. NOTE The default setting is '3' minutes. 1 Press (Additional - Canon MF7280 | imageCLASS MF7280 Reference Guide - Page 145
the selected function. This period of time is called the "Auto Clear Time." 3 The Auto Clear Time mode can be set from 0 to 9 minutes in one minute increments, and can also be set to 'Off'. NOTE • If '0' is selected, the Auto Clear Time mode is not set. • The default setting is - Canon MF7280 | imageCLASS MF7280 Reference Guide - Page 146
Settings 2 Press [-] or [+] to specify the desired Auto Clear Time ➞ press [OK]. 3 The Auto Clear Time can be set from 0 to 9 minutes (in one minute increments). You can also enter values using - (numeric keys). The selected mode is set. 3 Press [Done] repeatedly until the Basic Features screen - Canon MF7280 | imageCLASS MF7280 Reference Guide - Page 147
help you to clean the machine or to prevent a number of 3 problems before they occur. Cleaning Routine cleaning is needed for the long use Fixing Unit Cleaning Clean the fixing unit in the main unit when black streaks appear with printing or you replace the cartridges. See "Fixing Unit Cleaning - Canon MF7280 | imageCLASS MF7280 Reference Guide - Page 148
Improving Print Quality and Density (Special Mode M) If print quality deteriorates or an irregularity of the print density appears, the transcription output may not work adequately. Use Special Mode M to improve the print quality or irregular print density. NOTE The default setting is 'Normal'. 1 - Canon MF7280 | imageCLASS MF7280 Reference Guide - Page 149
printing on the paper that was stored for a long period of time at high temperature and high humidity. Also effective when the machine's fixing unit does not properly feed the paper that contains a lot of moisture. [High]: Compensate for poor quality that occurs when printing on the heavyweight - Canon MF7280 | imageCLASS MF7280 Reference Guide - Page 150
Preventing Paper Curls or Jams (Special Mode N) When the two-sided printing function is used, paper may curl severely or become jammed. Use Special Mode N to prevent paper curling or jamming. IMPORTANT Do not use paper that has been exposed to high temperature or humidity for an extended period of - Canon MF7280 | imageCLASS MF7280 Reference Guide - Page 151
Customizing Settings 3 Select [On] or [Off] ➞ press [OK]. 3 The selected mode is set. 4 Press [Done] repeatedly until the Basic Features screen appears. Preventing Paper Jams in the Two-Sided Mode (Special Mode O) A paper jam may occur when printing the backside of paper using the two-sided paper - Canon MF7280 | imageCLASS MF7280 Reference Guide - Page 152
Customizing Settings 2 Press [▼] or [▲] until [Special Mode O] appears ➞ press [Special Mode O]. 3 3 Select [On] or [Off] for the desired paper source ➞ press [OK]. The selected mode is set. 4 Press [Done] repeatedly until the Basic Features screen appears. Cleaning and Adjusting the Machine 3-61 - Canon MF7280 | imageCLASS MF7280 Reference Guide - Page 153
Using Lightweight Paper (Special Mode P) When you use the lightweight paper for printing, set this function to 'On'. NOTE • The Special Mode P helps limit a drop in the copy speed when printing on multiple sheets of narrow-width paper in succession. • The default setting is 'Off'. 3 1 Press ( - Canon MF7280 | imageCLASS MF7280 Reference Guide - Page 154
3 Select [On] or [Off] ➞ press [OK]. 3 Customizing Settings Details of each item are shown below: [On]: Help the machine keep the copy speed when printing on multiple sheets of the lightweight paper (18 lb bond (64 g/m2)). [Off]: This mode is for printing on multiple sheets of the paper (18 lb - Canon MF7280 | imageCLASS MF7280 Reference Guide - Page 155
Setting the Bond Special Fixing Mode You can specify to perform special fixing for bond paper. NOTE The default setting is 'Off'. 1 Press (Additional Functions) ➞ [Adjustment/Cleaning]. If necessary, see the screen shot in step 1 of "Improving Print Quality and Density 3 (Special Mode M)," on p. - Canon MF7280 | imageCLASS MF7280 Reference Guide - Page 156
Customizing Settings 3 Select [On] or [Off] ➞ press [OK]. 3 The selected mode is set. 4 Press [Done] repeatedly until the Basic Features screen appears. Cutting Down Waiting Time for a Next Job (Special Mode S) If size of paper required is different for a job that follows an extended amount of - Canon MF7280 | imageCLASS MF7280 Reference Guide - Page 157
2 Press [▼] or [▲] until [Special Mode S] appears ➞ press [Special Mode S]. 3 3 Select [Speed Priority 1], [Speed Priority 2], or [Off] ➞ press [OK]. Customizing Settings Details of each item are shown below. [Speed Priority 1]: Reduces the waiting time. Printing resumes quickly. [Speed Priority - Canon MF7280 | imageCLASS MF7280 Reference Guide - Page 158
Feeder Smudge Adjustment If the feeder is dirty, copies may include unwarranted dots or lines. When this function is set to 'On', dust, dirt or foreign objects in the feeder will not be printed. IMPORTANT If either [JPEG] or [PDF (Compact)] is selected for [File Format] when the Send function is - Canon MF7280 | imageCLASS MF7280 Reference Guide - Page 159
Customizing Settings 3 Select [On] or [Off] ➞ press [OK]. 3 The selected mode is set. 4 Press [Done] repeatedly until the Basic Features screen appears. 3-68 Cleaning and Adjusting the Machine - Canon MF7280 | imageCLASS MF7280 Reference Guide - Page 160
Checking Job and Device Status 4 CHAPTER This chapter explains how to check the counter, and how to use the System Monitor screen to change or check the status of print and copy jobs. Checking the Serial Number 4-2 Checking Job Status 4-3 Copy/Print Job Details 4-8 Canceling Copy/Print Jobs - Canon MF7280 | imageCLASS MF7280 Reference Guide - Page 161
Checking the Serial Number You can check the machine's serial number. 1 Press (Serial No.) on the control panel. ON/OFF 4 1 GHI 4 PQRS 7 ABC 2 JKJLKL 5 TUV 8 DEF 3 MNMONO 6 WXYZ 9 Serial No. The serial number of the machine is shown on the touch panel display. Checking Job and Device Status - Canon MF7280 | imageCLASS MF7280 Reference Guide - Page 162
the Remote UI. (See Chapter 1, "Using the Remote UI," in the Remote UI Guide.) • The indicator on the keys located on the bottom right of the System Monitor indicator indicates errors. For instructions on resolving errors, see Chapter 7, "Troubleshooting." 1 Press [System Monitor]. Checking Job - Canon MF7280 | imageCLASS MF7280 Reference Guide - Page 163
TX Job Status] or [RX Job Status] instead. NOTE For instructions on checking the status of Fax, or RX/TX jobs, see Chapter 6, "Checking/Changing the Send/Receive Status" in the Sending Guide, and Chapter 3, "Checking/Changing the Fax Status," in the Facsimile Guide. ❑ Press [Log] to check the jobs - Canon MF7280 | imageCLASS MF7280 Reference Guide - Page 164
NOTE • The table below describes the icons that are displayed on the status and log screens. Icon (Job Status) Description Executing Waiting Canceling Icon (Job Type) Description Copy Job 4 Fax Job IFax Job E-mail Job Print Job Report Print Job • The most recent 100 copy, fax, or print - Canon MF7280 | imageCLASS MF7280 Reference Guide - Page 165
status of the device and the current job are displayed here. This area displays recovery procedures for problems, such as clearing a paper jam or replacing the cartridge. The status of toner is displayed. The remaining amount of available system memory is displayed in percentage. The paper supply - Canon MF7280 | imageCLASS MF7280 Reference Guide - Page 166
❑ When you are finished checking the status of toner, press [Done]. 4 3 Press [Done]. The display returns to the Basic Features screen. Checking Job and Device Status Checking Job Status 4-7 - Canon MF7280 | imageCLASS MF7280 Reference Guide - Page 167
Copy/Print Job Details You can check the details of copy and print jobs, such as the date and time the machine received and processed the jobs, and the number of pages. NOTE If Job Log Display in System Settings (from the Additional Functions screen) is set to 'Off', the following items are not - Canon MF7280 | imageCLASS MF7280 Reference Guide - Page 168
2 Press [Status] or [Log] ➞ select the job whose details you want to check ➞ press [Details]. 4 3 Check the detailed information ➞ press [Done] repeatedly until the Basic Features screen appears. Checking Job and Device Status Copy/Print Job Details 4-9 - Canon MF7280 | imageCLASS MF7280 Reference Guide - Page 169
Checking Job and Device Status Canceling Copy/Print Jobs You can cancel the current copy/print jobs. 1 Press [System Monitor] ➞ select the job type [Copy] or [Print]. 4 2 Press [Status] ➞ select the job you want to cancel ➞ press [Cancel]. 4-10 Canceling Copy/Print Jobs - Canon MF7280 | imageCLASS MF7280 Reference Guide - Page 170
Checking Job and Device Status 3 Press [Yes], if you want to cancel the job. 4 4 Press [Done]. Canceling Copy/Print Jobs 4-11 - Canon MF7280 | imageCLASS MF7280 Reference Guide - Page 171
System Manager Settings 5 CHAPTER This chapter describes the settings that can be made by the person in charge of the machine's operation, such as the System Manager. Specifying the System Manager Settings 5-2 Department ID Management 5-6 Registering the Department ID, Password, and Page Limit - Canon MF7280 | imageCLASS MF7280 Reference Guide - Page 172
Password, or registering the System Manager ID and System Password as their user information in advance. System Manager Settings NOTE • For instructions on entering characters, see "Entering Characters from the Touch Panel Display," on p. 2-16. • You can enter a maximum of 32 characters for - Canon MF7280 | imageCLASS MF7280 Reference Guide - Page 173
1 Press (Additional Functions) ➞ [System Settings]. If the System Manager ID and System Password have been set, enter the System Manager ID and System Password using - (numeric keys) ➞ press 5 (Log In/Out). 2 Press [System Manager Settings]. System Manager Settings NOTE If the desired setting - Canon MF7280 | imageCLASS MF7280 Reference Guide - Page 174
3 Press [System Manager] ➞ enter the System Manager's name ➞ press [OK]. 5 4 Press [System Manager ID] ➞ enter a number (up to seven digits) using - (numeric keys). System Manager Settings You must set a System Manager ID to manage the operations of the machine. You cannot store a System - Canon MF7280 | imageCLASS MF7280 Reference Guide - Page 175
5 Press [System Password] ➞ enter a number (up to seven digits) using - (numeric keys) ➞ press [OK]. You cannot store a System Password with only zeros as the number, such as . If you enter a number that begins with zeros, the leading zeros are 5 ignored. Example: If or is - Canon MF7280 | imageCLASS MF7280 Reference Guide - Page 176
changes made in "Device Information Settings," on p. 5-28, make sure that you change the user information accordingly. For instructions on how to set user ID and password, see the Remote UI Guide. NOTE • The maximum number of digits that you can store for the Department ID and password is seven. If - Canon MF7280 | imageCLASS MF7280 Reference Guide - Page 177
Registering the Department ID, Password, and Page Limit 1 Press (Additional Functions) ➞ [System Settings] ➞ [Department ID Management]. 5 If the System Manager ID and System Password have been set, enter the System Manager ID and System Password using - (numeric keys) ➞ press (Log In/Out). NOTE If - Canon MF7280 | imageCLASS MF7280 Reference Guide - Page 178
3 Press [Register ID/Password]. 5 4 Press [Register]. System Manager Settings 5-8 Department ID Management - Canon MF7280 | imageCLASS MF7280 Reference Guide - Page 179
5 Use - (numeric keys) to enter the Department ID and password. ❑ Press [Department ID] ➞ enter the Department ID. ❑ Press [Password] ➞ enter the password. 5 You cannot register a Department ID or password with only zeros as the number, such as . If you enter a number that begins with zeros - Canon MF7280 | imageCLASS MF7280 Reference Guide - Page 180
7 Press [On] under the desired function(s). Press [Off], if you do not want to set a page limit restriction for the function. 5 NOTE is the sum of and . 8 Press [ ] (Page Limit) next to [On]/[Off] of the desired function(s) ➞ enter the page limit - Canon MF7280 | imageCLASS MF7280 Reference Guide - Page 181
System Manager Settings NOTE • If you make a mistake when entering a number, press (Clear) to clear the number. • You can set the page limit from 0 to 999,999 pages. Once the page limit is reached, copying, scanning, or printing is not possible. • The page limit refers to the number of printed - Canon MF7280 | imageCLASS MF7280 Reference Guide - Page 182
step 2, pressing [OK] activates Department ID Management. 12 Press [Done] repeatedly until the screen below appears. System Manager Settings NOTE For instructions on entering the Department ID and password, see "Entering the Department ID and Password," on p. 2-21. 5-12 Department ID Management - Canon MF7280 | imageCLASS MF7280 Reference Guide - Page 183
Changing the Password and Page Limit You can change the password and page limit settings that you have registered. 1 Press (Additional Functions) ➞ [System Settings] ➞ [Department ID Management]. If necessary, see the screen shot in step 1 of "Registering the Department ID, Password, and Page Limit - Canon MF7280 | imageCLASS MF7280 Reference Guide - Page 184
System Manager Settings 3 Press [▼] or [▲] to display the Department ID whose password you want to change ➞ select the Department ID ➞ press [Edit]. 5 NOTE Press and hold down [▼] or [▲] to quickly and continuously scroll through the available Department ID pages. Continuous scrolling is useful - Canon MF7280 | imageCLASS MF7280 Reference Guide - Page 185
NOTE • If you make a mistake when entering the password, press password. • You cannot change the Department ID. (Clear) to clear the 5 If you want to change or set a page limit restriction, press [Turn Limits On/Off and Set Page Limits]. System Manager Settings 5 6 Change the page limit - Canon MF7280 | imageCLASS MF7280 Reference Guide - Page 186
System Manager Settings NOTE • If you make a mistake when entering a number, press (Clear) to clear the number. • You can set the page limit from 0 to 999,999 pages. Once the page limit is reached, copying, scanning, or printing is not possible. • The page limit refers to the number of printed - Canon MF7280 | imageCLASS MF7280 Reference Guide - Page 187
Erasing the Department ID and Password You can erase the Department ID and password that you have registered. 1 Press (Additional Functions) ➞ [System Settings] ➞ [Department ID Management]. If necessary, see the screen shot in step 1 of "Registering the Department ID, Password, and Page Limit," on - Canon MF7280 | imageCLASS MF7280 Reference Guide - Page 188
4 Press [Yes]. If you do not want to erase the selected Department ID and all of its settings, press [No]. 5 The selected Department ID and all of its settings are erased. 5 Press [Done]. System Manager Settings 5-18 Department ID Management - Canon MF7280 | imageCLASS MF7280 Reference Guide - Page 189
can display and print a list of how much paper was used by each department. NOTE For instructions on registering user information on User ID Management, see the Remote UI Guide. 1 Press (Additional Functions) ➞ [System Settings] ➞ [Department ID Management]. If necessary, see the screen shot in - Canon MF7280 | imageCLASS MF7280 Reference Guide - Page 190
2 Press [On] ➞ [Page Totals]. System Manager Settings 5 3 Check or print the page total count. The page totals that belong to print jobs without a Department ID (left blank) are the number of prints from computers that do not correspond with a registered Department ID. These prints are - Canon MF7280 | imageCLASS MF7280 Reference Guide - Page 191
System Manager Settings ● If you want to print the displayed list: ❑ Press [Print List]. ❑ Press [Yes]. 5 If you do not want to print the displayed list, press [No]. Department ID Management 5-21 - Canon MF7280 | imageCLASS MF7280 Reference Guide - Page 192
Printing starts. The screen below is displayed while the machine is printing the counter information. System Manager Settings 5 NOTE • To cancel printing, press [Cancel]. • To close the screen that is displayed while the machine is printing the Page Count List, press [Done]. • The counter - Canon MF7280 | imageCLASS MF7280 Reference Guide - Page 193
5 Press [OK]. System Manager Settings NOTE If you selected [On] in step 2, pressing [OK] activates Department ID Management. 5 Clearing Page Totals You can clear the page totals made for all departments or for specific departments. 1 Press (Additional Functions) ➞ [System Settings] ➞ [ - Canon MF7280 | imageCLASS MF7280 Reference Guide - Page 194
System Manager Settings 3 Press [Clear All Totals]. To clear one page total at a time by Department ID, press [▼] or [▲] to display the desired Department ID ➞ select the Department ID ➞ press [Clear]. 5 4 Press [Yes]. If you - Canon MF7280 | imageCLASS MF7280 Reference Guide - Page 195
The message appears for approximately two seconds on the touch panel display. The page totals are cleared. 5 Press [Done]. 5 System Manager Settings Department ID Management 5-25 - Canon MF7280 | imageCLASS MF7280 Reference Guide - Page 196
6 Press [OK]. System Manager Settings NOTE 5 If you selected [On] in step 2, pressing [OK] activates Department ID Management. Accepting Print Jobs with Unknown IDs You can specify whether to accept or reject print jobs from computers that do not correspond to any registered Department ID. - Canon MF7280 | imageCLASS MF7280 Reference Guide - Page 197
2 Press [On]. 3 Select [On] or [Off] ➞ press [OK]. 5 System Manager Settings Details of each item are shown below. [On]: The machine accepts print jobs from computers that do not correspond with a registered Department ID. [Off]: The machine does not accept print jobs from computers that do - Canon MF7280 | imageCLASS MF7280 Reference Guide - Page 198
System Manager Settings Device Information Settings Device Information Settings enables you to set a name for the machine, and enter information regarding its location. 1 Press (Additional Functions) ➞ [System Settings] ➞ [Device Info Settings]. 5 If the System Manager ID and System Password have - Canon MF7280 | imageCLASS MF7280 Reference Guide - Page 199
to store the name and location of the machine, press [Cancel]. The device name and the location of the machine are set. NOTE For instructions on entering characters, see "Entering Characters from the Touch Panel Display," on p. 2-16. 3 Press [Done] repeatedly until the Basic Features screen appears - Canon MF7280 | imageCLASS MF7280 Reference Guide - Page 200
only from the Remote UI. For more information on the User ID Management, see the Remote UI Guide. • You need to register the User ID and password before you set this mode to 'On'. • One Department ID can be registered for each User ID. 5 1 Press (Additional Functions) ➞ [System Settings] ➞ [User ID - Canon MF7280 | imageCLASS MF7280 Reference Guide - Page 201
2 Select [On] or [Off] ➞ press [OK]. The selected mode is set. 3 Press [Done] repeatedly until the Basic Features screen 5 appears. System Manager Settings Managing User IDs 5-31 - Canon MF7280 | imageCLASS MF7280 Reference Guide - Page 202
interface. Once the Ethernet interface port is configured properly, the imageCLASS MF7280 can be controlled and set up through the Remote UI and network. NOTE • For more information on the Remote UI, see the Remote UI Guide. • For instructions on configuring the Ethernet port, see the Network - Canon MF7280 | imageCLASS MF7280 Reference Guide - Page 203
2 Select [On] or [Off] ➞ press [OK]. System Manager Settings Details of each item are shown below. [On]: Settings can be specified and the machine can be operated through the Remote UI. 5 [Off]: Settings cannot be specified and the machine cannot be operated through the Remote UI. The selected - Canon MF7280 | imageCLASS MF7280 Reference Guide - Page 204
settings to restrict the transmission, including the restriction on specifying destinations using - (numeric keys), and restrictions on transmissions from the fax driver. Restricting the New Addresses This mode enables you to restrict the entering of new destinations. When you set New Addresses to - Canon MF7280 | imageCLASS MF7280 Reference Guide - Page 205
2 Press [▼] or [▲] until [Restrict Access to Destinations] appears ➞ press [Restrict Access to Destinations]. 3 Select [Restrict New Addresses] 5 System Manager Settings Restricting Access to Destinations 5-35 - Canon MF7280 | imageCLASS MF7280 Reference Guide - Page 206
4 Select [On] or [Off] ➞ press [OK] Details of each item are shown below. 5 [On]: Specifying a destination using - (numeric keys) or the new address tab is restricted. [Off]: Specifying a destination using - (numeric keys) or the new address tab is enabled. The selected mode is set. 5 Press [ - Canon MF7280 | imageCLASS MF7280 Reference Guide - Page 207
TX is set to 'On', you can send faxes from computers using the fax driver. NOTE The default setting is 'On'. 1 Press (Additional Functions) ➞ [System Settings]. If necessary, see the screen shot in step 1 of "Specifying the System Manager Settings," - Canon MF7280 | imageCLASS MF7280 Reference Guide - Page 208
Manager Settings Details of each item are shown below. [On]: Sending fax from the computers using the fax driver is enabled. [Off]: Sending fax from the computers using the fax driver is restricted. The selected mode is set. 5 Press [Done] repeatedly until the Basic Features screen appears. 5-38 - Canon MF7280 | imageCLASS MF7280 Reference Guide - Page 209
System Manager Settings Checking the Job Log You can specify whether or not to check the job log. When you set [Job Log Display] to 'On', you can check the job log using the System Monitor screen. When you set [Job Log Display] to 'Off', the job log does not appear on the System Monitor screen. - Canon MF7280 | imageCLASS MF7280 Reference Guide - Page 210
3 Select [On] or [Off] ➞ press [OK] System Manager Settings Details of each item are shown below. 5 [On]: The job log is displayed on the System Monitor screen. [Off]: The job log is not displayed on the System Monitor screen. The selected mode is set. IMPORTANT When you set [Job Log Display] - Canon MF7280 | imageCLASS MF7280 Reference Guide - Page 211
Restricting the USB Interface Port Follow the procedure below to restrict jobs through the USB interface. NOTE The default setting is 'On'. 1 Press (Additional Functions) ➞ [System Settings]. If necessary, see the screen shot in step 1 of "Specifying the System Manager Settings," on p. 5-2. If - Canon MF7280 | imageCLASS MF7280 Reference Guide - Page 212
3 Select [On] or [Off] ➞ press [OK] Details of each item are shown below. 5 [On]: The machine can receive the job through the USB interface. [Off]: The machine cannot receive the job through the USB interface. The selected mode is set. 4 Press [Done] repeatedly until the Basic Features screen - Canon MF7280 | imageCLASS MF7280 Reference Guide - Page 213
Displaying Department ID/User Name You can set whether or not to display the Department ID on the Job/Print Status Display Area of the touch panel display. NOTE • For more information on the Department ID Management, see "Department ID Management," on p. 5-6. • The default setting is 'On'. 1 Press - Canon MF7280 | imageCLASS MF7280 Reference Guide - Page 214
3 Select [On] or [Off] ➞ press [OK] Details of each item are shown below. 5 [On]: The Department ID is displayed on the Job/Print Status Display Area. [Off]: The Department ID is not displayed on the Job/Print Status Display Area. The selected mode is set. 4 Press [Done] repeatedly until the - Canon MF7280 | imageCLASS MF7280 Reference Guide - Page 215
operations, and replace consumables, such as toner and staple cartridges. Paper Drawers 6-2 Loading Paper 6-2 Cartridge 6-12 Replacing the Cartridge 6-14 Routine Cleaning 6-23 Platen Glass and Underside of the Feeder 6-24 Manual Feeder Cleaning 6-25 Transfer Roller Cleaning 6-30 Fixing Unit - Canon MF7280 | imageCLASS MF7280 Reference Guide - Page 216
Paper Drawers This section describes how to load paper into the paper drawers. NOTE • The following paper sizes can be loaded into the paper drawers 1 and 2. - LGL - LTR - LTRR - 11" x 17" - STMT • For more information on available paper stock that can be loaded into the paper drawers, see " - Canon MF7280 | imageCLASS MF7280 Reference Guide - Page 217
reverse side either.) - Paper which has been printed on using a thermal transfer printer (Do not print on the reverse side either.) - Reverse side of the flat surface. • Never place paper or any other items in the empty part of the drawer next to the paper stack. Doing so may cause paper jams - Canon MF7280 | imageCLASS MF7280 Reference Guide - Page 218
paper in its original package, and store it in a dry place, away from direct sunlight. NOTE • For high-quality printouts, use paper recommended by Canon. • Before loading paper, always fan the sheets several times, and align the edges to facilitate feeding. Routine Maintenance 6-4 Paper Drawers - Canon MF7280 | imageCLASS MF7280 Reference Guide - Page 219
3 Push down the metal plate to lock. 4 Load the paper stack into the paper drawer. Even out the edges of the paper stack. Load the paper stack against the right wall of the paper drawer. When loading paper in the paper drawer for the first time, set the size plate and the paper-size detecting - Canon MF7280 | imageCLASS MF7280 Reference Guide - Page 220
the back of the paper drawer and the corners are below the paper size guide clips. • Be sure to set the paper-size detecting lever correctly. If load, follow those instructions. • When the paper is loaded into the paper drawer, the side facing up is the one printed on. • If problems occur, such as - Canon MF7280 | imageCLASS MF7280 Reference Guide - Page 221
or printing, load a new paper stack, and follow the instructions on the touch panel display. The machine automatically restarts, and in a paper drawer, follow the procedure described below to adjust the paper drawer guides. 1 Pull out the paper drawer, and remove all of the loaded paper. 6 - Canon MF7280 | imageCLASS MF7280 Reference Guide - Page 222
reattach it to the slots with the mark indicating the desired paper size. Detach the end guide by pressing down and forward. Align the end guide with the mark indicating the desired paper size. Reattach the end guide by tilting it forward and inserting the tabs at both ends into the slots. The - Canon MF7280 | imageCLASS MF7280 Reference Guide - Page 223
5 Lower the lock lever to the left to lock the side guide. IMPORTANT Be sure to set the lock lever correctly. If the lock lever is positioned incorrectly to the type of paper loaded in the paper - Canon MF7280 | imageCLASS MF7280 Reference Guide - Page 224
7 Set the paper-size detecting lever, located on the left side of the paper drawer, to match the size of the paper being loaded. A4 A5 B5 LGL LTR STMT U2 A3 A4 B4 B5 11X17 LTR U1 U3 IMPORTANT Be sure to set the paper-size detecting lever correctly. If the lever is positioned 6 incorrectly to the - Canon MF7280 | imageCLASS MF7280 Reference Guide - Page 225
Routine Maintenance 9 Change the paper size plate to match the new paper size. 10 Gently push the paper drawer back into the machine until it clicks into place in the closed position. 6 CAUTION When returning the paper drawer to its original position, be careful not to get your fingers caught, as - Canon MF7280 | imageCLASS MF7280 Reference Guide - Page 226
Feeder Originals can be stamped to indicate that they have been sent. Replace the stamp cartridge when this mark is faint or no longer visible. IMPORTANT When replacing the stamp cartridge, take care not to allow ink to come in contact with your hands or clothing. If ink gets onto your hands or - Canon MF7280 | imageCLASS MF7280 Reference Guide - Page 227
are aligned with 6 the hollows on the feeder. • Be careful that the stamping surface of the stamp cartridge does not protrude. • Insert the stamp cartridge properly, or it may cause paper jams. 4 Gently close the inner cover and the feeder cover until it clicks. CAUTION When closing the - Canon MF7280 | imageCLASS MF7280 Reference Guide - Page 228
When prints can no longer be made as toner runs out completely, a screen showing how to replace the cartridge, like the one shown below, appears on the touch panel display. Follow the instructions shown on the screen. 6 If you press [Recover Later], you can continue operations, such as setting - Canon MF7280 | imageCLASS MF7280 Reference Guide - Page 229
you to do so appears. • Do not attempt to replace the cartridge while the machine is printing. NOTE • Complete instructions on how to replace the cartridge can be accessed by pressing [Previous] or [Next] on the touch panel display. • If the toner runs out during a print job, the machine will start - Canon MF7280 | imageCLASS MF7280 Reference Guide - Page 230
the ▼ (down arrow) on the lever is aligned with the ▲ (up arrow) of the (Unlock) icon position before proceeding. 4 While grasping the handle of the cartridge holder, pull the 6 cartridge holder out of the machine until it stops. Routine Maintenance 6-16 Replacing the - Canon MF7280 | imageCLASS MF7280 Reference Guide - Page 231
Routine Maintenance 5 While grasping the handle of the cartridge, remove the cartridge from the cartridge holder. Lift the cartridge straight up. 6 Take the new cartridge out of the protective bag. 6 IMPORTANT Keep the protective bag in which the cartridge came in. It may be required when removing - Canon MF7280 | imageCLASS MF7280 Reference Guide - Page 232
7 Place the cartridge on a flat surface, and remove only the short shipping tape affixed on both other sides of the cartridge. 8 Remove the packing materials. 6 9 Hold the cartridge, shake it gently five or six times from side to side, then back and forth to evenly distribute the toner inside. 6-18 - Canon MF7280 | imageCLASS MF7280 Reference Guide - Page 233
in the direction of the arrow in the illustration below while supporting the cartridge. Pull the sealing tape straight out. Routine Maintenance CAUTION • If the sealing tape is pulled out forcefully or stopped at midpoint, toner may leak. If toner gets into your eyes or mouth, rinse it out - Canon MF7280 | imageCLASS MF7280 Reference Guide - Page 234
its tab. 13 While grasping the handle of the new cartridge, insert the cartridge into the cartridge holder. 6 NOTE Use only the cartridge recommended for use in this machine. 14 While grasping the handle of the cartridge holder, push the cartridge holder in the machine as far as it will go. 6-20 - Canon MF7280 | imageCLASS MF7280 Reference Guide - Page 235
. 6 Routine Maintenance CAUTION When closing the front cover, be careful not to get your fingers caught, as this may result in personal injury. Replacing the Cartridge 6-21 - Canon MF7280 | imageCLASS MF7280 Reference Guide - Page 236
Routine Maintenance 17 Gently close the left cover of the main unit until it clicks by placing your hand on the hand symbol located on the left cover. CAUTION When closing the left cover, be careful not - Canon MF7280 | imageCLASS MF7280 Reference Guide - Page 237
Feeding Roller WARNING • Do not use alcohol, benzene, paint thinner, or other solvents for cleaning. Doing so may result in damage to the plastic parts. • Disconnect the power cord from the power outlet regularly, and clean the area around the base of the power plug's metal pins and the power - Canon MF7280 | imageCLASS MF7280 Reference Guide - Page 238
Platen Glass and Underside of the Feeder Clean the platen glass and the underside of the feeder following the procedure below. WARNING When cleaning the machine, first turn OFF the main power switch, and disconnect the power cord. Failure to observe these steps may result in a fire or electrical - Canon MF7280 | imageCLASS MF7280 Reference Guide - Page 239
Manual Feeder Cleaning If your originals have black streaks or appear dirty after scanning them through the feeder, this may be caused by pencil writing rubbing - Canon MF7280 | imageCLASS MF7280 Reference Guide - Page 240
Routine Maintenance 2 Clean the rollers (a total of three places) inside the feeder cover with a cloth dampened with water. Then wipe the area with a soft, dry cloth. 3 Open the inner cover, holding it by its front tab. 6 Inner Cover 6-26 Routine Cleaning - Canon MF7280 | imageCLASS MF7280 Reference Guide - Page 241
of three places) inside the inner cover with a cloth dampened with water. Then wipe the area with a soft, dry cloth. Rollers 5 Clean the transparent plastic part of the inner cover with a cloth dampened with water. Then wipe the area with a soft, dry 6 cloth. Routine Cleaning 6-27 - Canon MF7280 | imageCLASS MF7280 Reference Guide - Page 242
Routine Maintenance 6 Close the inner cover. CAUTION When closing the inner cover, be careful not to get your fingers caught, as this may result in personal injury. 7 Close the feeder cover. 6 CAUTION When closing the feeder cover, be careful not to get your fingers caught, as this may result in - Canon MF7280 | imageCLASS MF7280 Reference Guide - Page 243
8 Open the feeder. 9 Clean the feeder scanning area (the left side of the platen glass) and the document feeding roller, with a cloth dampened with water. Then wipe the area with a soft, dry cloth. 6 Routine Maintenance Feeder Scanning Area Document Feeding Roller Routine Cleaning 6-29 - Canon MF7280 | imageCLASS MF7280 Reference Guide - Page 244
in personal injury. Transfer Roller Cleaning 6 If the backside of paper is smudged with printing, the transcription roller in the main unit may be dirty. Should this occur, use the Transfer Roller Cleaning function to clean the transcription roller. 1 Press (Additional Functions) ➞ [Adjustment - Canon MF7280 | imageCLASS MF7280 Reference Guide - Page 245
Routine Maintenance 2 Press [Start]. To cancel the transcription roller cleaning, press [Cancel]. While the transfer roller is being cleaned, the screen below appears. 6 The display returns to the Adjustment/Cleaning screen. 3 Press [Done] repeatedly until the Basic Features screen appears. Routine - Canon MF7280 | imageCLASS MF7280 Reference Guide - Page 246
Cleaning If black streaks appear with printing, the fixing unit in the main unit may be dirty. Should this occur, use the Fixing Unit Cleaning function to clean the fixing unit. The fixing unit should also be cleaned each time the cartridge is replaced. Print the cleaning pattern on LTR paper for - Canon MF7280 | imageCLASS MF7280 Reference Guide - Page 247
Routine Maintenance 2 Press [Cleaning Sheet Print]. To cancel printing the cleaning paper, press [Cancel]. The cleaning paper is printed. You will use this paper as the cleaning paper. 6 3 Open the stack bypass. Routine Cleaning 6-33 - Canon MF7280 | imageCLASS MF7280 Reference Guide - Page 248
Routine Maintenance 4 Load the cleaning paper with the side on which the letter "V" is printed facing up. 5 Select the paper size ➞ press [Next]. 6 Select [LTR]. 6-34 Routine Cleaning - Canon MF7280 | imageCLASS MF7280 Reference Guide - Page 249
Routine Maintenance 6 Select the paper type ➞ press [OK]. Select [Plain]. 7 Press [Start]. 6 If a cleaning paper jam occurs, the error indicator blinks in red. Press [Cancel] and remove the jammed cleaning paper. To cancel the fixing unit cleaning, press [Cancel]. Routine Cleaning 6-35 - Canon MF7280 | imageCLASS MF7280 Reference Guide - Page 250
While the fixing unit is being cleaned, the screen below appears. The display returns to the Adjustment/Cleaning screen. Throw away the cleaning paper after use. 8 Press [Done] repeatedly until the Basic Features screen 6 appears. Routine Maintenance 6-36 Routine Cleaning - Canon MF7280 | imageCLASS MF7280 Reference Guide - Page 251
Routine Maintenance Automatic Feeder Cleaning If your originals have black streaks or appear dirty after scanning them through the feeder, clean the rollers of the feeder by repeatedly feeding blank sheets of paper through it. NOTE It takes approximately 20 seconds to clean the feeder. 1 Press ( - Canon MF7280 | imageCLASS MF7280 Reference Guide - Page 252
2 Place 10 sheets of blank paper into the feeder ➞ press [Start]. Make sure that you fan the sheets of paper well. Use LTR paper. To cancel feeder cleaning, press [Cancel]. 6 While the feeder is being cleaned, the screen below appears. Routine Maintenance The display returns to the Adjustment - Canon MF7280 | imageCLASS MF7280 Reference Guide - Page 253
paper, transparencies (recommended for this machine), labels, and other types of paper stock are available. For more information, contact Canon Authorized Service Facilities or the Canon Customer Care Center. 6 CAUTION Do not store paper in places exposed to open flames, as this may cause the paper - Canon MF7280 | imageCLASS MF7280 Reference Guide - Page 254
the used cartridge with a new one. Use only cartridges recommended for use on this machine. WARNING • Never dispose cartridges in a fire or incinerator, as this may result in an explosion. 6 • Do not store cartridges in places exposed to open flames, as this may cause the toner to ignite - Canon MF7280 | imageCLASS MF7280 Reference Guide - Page 255
Duplex Unit 7-10 Feeder 7-13 Stack Bypass 7-17 Paper Drawer 1 7-19 Paper Drawer 2 7-23 List of Error Messages 7-26 Self-Diagnostic Display 7-26 List of Error Codes without Messages 7-28 If Memory Becomes Full during Scanning 7-30 Service Call Message 7-31 If You Cannot Solve the Problem - Canon MF7280 | imageCLASS MF7280 Reference Guide - Page 256
frequently, when there is no apparent problem with the machine, either one of the following two reasons may be the cause. Follow the instructions described below to reduce the frequency Drawer to Hold a Different Paper Size," on p. 6-7.) 7 Troubleshooting 7-2 Reducing the Frequency of Paper Jams - Canon MF7280 | imageCLASS MF7280 Reference Guide - Page 257
black circle that appears on the screen indicates the location of the paper jam. Follow the instructions on how to clear the paper jam appear along the topside of the screen. 7 Troubleshooting When you press [Recover Later], you can continue operations, such as setting modes and scanning originals - Canon MF7280 | imageCLASS MF7280 Reference Guide - Page 258
parts on the inside of the machine. If you cannot remove the paper, please contact Canon Authorized Service Facilities or the Canon Troubleshooting 1 Inspect all paper jam locations indicated on the touch panel display, and remove any jammed paper. See the appropriate pages below for instructions - Canon MF7280 | imageCLASS MF7280 Reference Guide - Page 259
Stack Bypass," on p. 7-17.)/Fixing Unit (See "Fixing Unit (Inside the Main Unit)," on p. 7-6.) c Duplex Unit (See "Duplex Unit," on p. 7-10.) d Paper Drawer 1 (See "Paper Drawer 1," on p. 7-19.) 7 e Paper Drawer 2 (See "Paper Drawer 2," on p. 7-23.) Troubleshooting 2 After you have removed all - Canon MF7280 | imageCLASS MF7280 Reference Guide - Page 260
fixing unit area, a screen similar to the one shown below result in burns or electrical shock. Troubleshooting CAUTION • The fixing unit and its surroundings inside the machine may become jammed inside the machine, take care not to allow toner on the jammed paper to come into contact with your - Canon MF7280 | imageCLASS MF7280 Reference Guide - Page 261
main unit, and open the left cover. 2 Push down the green fixing lever. 7 CAUTION The parts located around the exit slot guide and the fixing unit are subject to high temperatures. When removing jammed paper, take care not to touch anything in this area except the lever. Troubleshooting Clearing - Canon MF7280 | imageCLASS MF7280 Reference Guide - Page 262
3 Hold the green knob, lift the upper cover of the fixing unit. 4 Remove any jammed paper. 7 5 Push up the green fixing lever. Troubleshooting 7-8 Clearing Paper Jams - Canon MF7280 | imageCLASS MF7280 Reference Guide - Page 263
the instructions on the touch panel display. 7 NOTE The screen indicating the location of the paper jam repeatedly appears on the touch panel display until the paper jam is entirely cleared. For more information, see "Screens Indicating the Locations of Paper Jams," on p. 7-3. Troubleshooting - Canon MF7280 | imageCLASS MF7280 Reference Guide - Page 264
the duplex unit, a screen similar to the one shown may result in burns or electrical shock. Troubleshooting CAUTION • The fixing unit and its surroundings inside the machine may become jammed inside the machine, take care not to allow toner on the jammed paper to come into contact with your hands - Canon MF7280 | imageCLASS MF7280 Reference Guide - Page 265
Troubleshooting 1 Press the button on the left cover of the main unit, and open the left cover. 2 Remove any jammed paper. 7 CAUTION Some parts of the duplex unit are subject to high temperature. When removing jammed paper, take care not to touch anything in this unit. NOTE When removing the jammed - Canon MF7280 | imageCLASS MF7280 Reference Guide - Page 266
the left cover of the main unit, and then gently close the left cover until it clicks into place in the closed position. CAUTION When closing the left cover, be careful not to get your fingers caught, as this may result in personal injury. 4 Follow the instructions on the touch panel display - Canon MF7280 | imageCLASS MF7280 Reference Guide - Page 267
jam occurs in the feeder, a screen similar to the one shown below appears on the touch panel display. Check the touch the inside of the machine, as this may result in burns or electrical shock. Troubleshooting CAUTION When removing jammed originals or paper, take care not to cut your hands on the - Canon MF7280 | imageCLASS MF7280 Reference Guide - Page 268
Troubleshooting 2 Remove any jammed originals. IMPORTANT Do not pull the jammed original forcefully. Doing so may tear the original. 3 Open the inner cover, holding it by its front tab. 7 Inner Cover 4 Turn the feed dial and remove any jammed originals. 7-14 Clearing Paper Jams - Canon MF7280 | imageCLASS MF7280 Reference Guide - Page 269
When closing the inner cover, be careful not to get your fingers caught, as this may result in personal injury. 6 Close the feeder cover. 7 Troubleshooting CAUTION When closing the feeder cover, be careful not to get your fingers caught, as this may result in personal injury. Clearing Paper Jams - Canon MF7280 | imageCLASS MF7280 Reference Guide - Page 270
Troubleshooting 7 Open the feeder and remove any jammed originals. 8 Close the feeder. 7 CAUTION When closing the feeder, be careful not to get your fingers caught, as this may result in personal injury. 9 Follow the instructions on the touch panel display. NOTE The screen indicating the location - Canon MF7280 | imageCLASS MF7280 Reference Guide - Page 271
a screen similar to the one shown below appears on the result in burns or electrical shock. Troubleshooting CAUTION • The fixing unit and its surroundings inside the machine may become jammed inside the machine, take care not to allow toner on the jammed paper to come into contact with your hands - Canon MF7280 | imageCLASS MF7280 Reference Guide - Page 272
. 2 Remove any jammed paper. NOTE If you cannot remove the jammed paper, follow the procedures described in "Fixing Unit (Inside the Main Unit)," on p. 7-6. 7 3 Follow the instructions on the touch panel display. NOTE The screen indicating the location of the paper jam repeatedly appears on the - Canon MF7280 | imageCLASS MF7280 Reference Guide - Page 273
1, a screen similar to the one shown below appears on the touch result in burns or electrical shock. Troubleshooting CAUTION • The fixing unit and its surroundings inside the machine may become jammed inside the machine, take care not to allow toner on the jammed paper to come into contact with your - Canon MF7280 | imageCLASS MF7280 Reference Guide - Page 274
Troubleshooting 1 Press the button on the left cover of the main unit, and open the left cover. 2 Open the paper drawer's left cover. 7 3 Remove any jammed paper. 7-20 Clearing Paper Jams - Canon MF7280 | imageCLASS MF7280 Reference Guide - Page 275
Troubleshooting 4 Pull out the paper drawer and remove any jammed paper. 5 Gently push the paper drawer back into the machine until it clicks into place in - Canon MF7280 | imageCLASS MF7280 Reference Guide - Page 276
cover of the main unit, and then gently close the left cover 7 until it clicks into place in the closed position. Troubleshooting CAUTION When closing the left cover, be careful not to get your fingers caught, as this may result in personal injury. 8 Follow the instructions on the touch panel - Canon MF7280 | imageCLASS MF7280 Reference Guide - Page 277
2, a screen similar to the one shown below appears on the touch result in burns or electrical shock. Troubleshooting CAUTION • The fixing unit and its surroundings inside the machine may become jammed inside the machine, take care not to allow toner on the jammed paper to come into contact with your - Canon MF7280 | imageCLASS MF7280 Reference Guide - Page 278
Troubleshooting 1 Open the paper drawer's left cover. 2 Remove any jammed paper. 7 3 Pull out the paper drawer and remove any jammed paper. 7-24 Clearing Paper Jams - Canon MF7280 | imageCLASS MF7280 Reference Guide - Page 279
Troubleshooting 4 Gently push the paper drawer back into the machine until it , be careful not to get your fingers caught, as this may result in personal injury. 6 Follow the instructions on the touch panel display. NOTE The screen indicating the location of the paper jam repeatedly appears on the - Canon MF7280 | imageCLASS MF7280 Reference Guide - Page 280
Guide and the Network Guide. Self-Diagnostic Display If the machine displays a self-diagnostic error message, follow the instructions list of self-diagnostic error messages, along with their possible causes and remedies. Troubleshooting Load Paper. Cause 1 The machine has run out of paper. No - Canon MF7280 | imageCLASS MF7280 Reference Guide - Page 281
then press the Start key. Cause Scanning was stopped due to a problem with the feeder. Remedy Arrange the originals in page order with the Troubleshooting Replace the toner. Cause Printing is not possible because the toner has run out. Remedy Replace the cartridge. (See "Replacing the Cartridge - Canon MF7280 | imageCLASS MF7280 Reference Guide - Page 282
scanning area is dirty. Remedy Clean the feeder's scanning area. (See "Manual Feeder Cleaning," on p. 6-25.) List of Error Codes without Messages If Reports," in the Facsimile Guide.) Perform the necessary procedures according to the error code. Troubleshooting # 001 Cause Remedy Paper - Canon MF7280 | imageCLASS MF7280 Reference Guide - Page 283
(See Chapter 3, "Checking/Changing the Fax Jobs," in the Facsimile Guide.) # 701 Cause The specified Department ID does not exist, or the , disconnect the machine, and contact Canon Authorized Service Facilities or the Canon Customer Care Center. Troubleshooting # 816 Cause You cannot print - Canon MF7280 | imageCLASS MF7280 Reference Guide - Page 284
Troubleshooting If Memory Becomes Full during Scanning If memory becomes full during the scanning of originals, the following screens appear on the touch panel display. NOTE - Canon MF7280 | imageCLASS MF7280 Reference Guide - Page 285
Troubleshooting Service Call Message If a malfunction occurs and the machine cannot operate normally, a screen like the one shown below is displayed. Follow the instructions that appear on the touch panel display. If a message like the one shown below appears, follow the procedure described below. - Canon MF7280 | imageCLASS MF7280 Reference Guide - Page 286
Care Center. ❑ Turn OFF the main power. 7 ❑ Disconnect the power cord from the wall outlet. NOTE When contacting Canon Authorized Service Facilities or the Canon Customer Care Center, check the following: - Model name - Problems and status of the machine - Error code on the touch panel display 7-32 - Canon MF7280 | imageCLASS MF7280 Reference Guide - Page 287
, contact Canon Authorized Service Facilities or the Canon Customer Care Center at 1-800-828-4040 between the hours of 8:00 A.M. to 8:00 P.M. EST Monday through Friday and 10:00 A.M. to 8:00 P.M. on Saturday. For interactive troubleshooting, e-mail technical support, the latest driver downloads and - Canon MF7280 | imageCLASS MF7280 Reference Guide - Page 288
Appendix 8 CHAPTER This chapter provides the specifications of the main unit and other useful information. Report Samples 8-2 User's Data List 8-2 Department ID List 8-2 Specifications 8-3 Main Unit 8-3 Relationship between Original Orientation and Preprinted Paper Output Chart 8-7 Index - Canon MF7280 | imageCLASS MF7280 Reference Guide - Page 289
Report Samples You can print the contents of the machine settings. The following lists can be printed: User's Data List 8 Department ID List Appendix 8-2 Report Samples - Canon MF7280 | imageCLASS MF7280 Reference Guide - Page 290
Main Unit Item Specification Name Canon imageCLASS MF7280 Type Desktop Platen Type Stationary Photoconductive Material OPC (Organic Photo Conductor) Copying System Indirect electrostatic copying Appendix Developing System Single component dry toner - Canon MF7280 | imageCLASS MF7280 Reference Guide - Page 291
Item Paper Sizes Margin Areas Specification Paper Drawer: 11" x 17", LGL, LTR, LTRR, and STMT Stack Bypass: 11" x 17", LGL, LTR, LTRR, STMT, STMTR, EXEC, Irregular Size (3 3/4" x 5 7/8" to 11 3/4" x 17" (95 mm x 148 mm to 297 mm x 432 mm)), and Envelopes (ISO-B5, ISO-C5, COM10, DL, and Monarch) - Canon MF7280 | imageCLASS MF7280 Reference Guide - Page 292
sheet (Labels) Output Orientation Face Down Density Control Automatic or manual (9 levels) Multiple Copies 1 to 99 sheets Power Source 1,249 mm) Installation Space (W x D) (Left cover of the main unit is opened and paper drawer is pulled out) Weight Approximately 128 lb (58 kg - Canon MF7280 | imageCLASS MF7280 Reference Guide - Page 293
Paper Weight 16 lb to 28 lb bond (52 g/m2to 105 g/m2) (One-page scanning for 10 lb to 16 lb bond (37 g/m2to 52 g/m2) bond (80 g/m2)) Original Scanning Speed 20 sheets/minute (LTR) Power Source From main unit Power Consumption Approximately 26 W max. Dimensions (W x D x H) 22 1/4" x 19 - Canon MF7280 | imageCLASS MF7280 Reference Guide - Page 294
Relationship between Original Orientation and Preprinted Paper Output Chart Use this chart when printing on preprinted paper (i.e., paper with logos). NOTE If you want to copy on the back side of preprinted paper, place the side you want to copy on: - face up when using a paper drawer - face down - Canon MF7280 | imageCLASS MF7280 Reference Guide - Page 295
settings, 3-12 Appendix Copy settings, 3-12 Printer settings, 3-14 Report settings, 3-8 8 System cartridge, 1-13 Replacing, 6-14 Checking Job Status, 4-3 Checking the Job Log, 5-39 Checking the Serial Number, 4-2 Cleaning Automatic feeder cleaning, 6-37 Cleaning the machine, 6-23 Manual - Canon MF7280 | imageCLASS MF7280 Reference Guide - Page 296
ID, password, and Setting the toner save mode, 3-22 page instructions, xxv Stamp cartridge, 6-40 Displaying an error message of the feeder, 3-44 Displays Used in This Manual, x Duplex Unit, 1-13, 7-10 8 Control Panel About the control panel, 1-11 E Control panel power switch, 1-14 Parts - Canon MF7280 | imageCLASS MF7280 Reference Guide - Page 297
instructions, xix Internal View, 1-13 Irregular Size, 2-29 J Job Status, checking, 4-3 Job/Print Status Display Area, 2-6 8-10 Index K Keys Used in This Manual, x L Labels, 2-43 Language Switch, 3-41 Laser drawers), 6-2 Replacing the cartridge, 6-14 Replacing the stamp cartridge, 6-12 Managing User - Canon MF7280 | imageCLASS MF7280 Reference Guide - Page 298
Supply Indicator, 2-12 Parts and Functions of the Main Unit Control panel, 1-14 instructions, xix Installation, xix Maintenance and inspections, xxiii Other warnings, xxv Power supply, xx Scanning Area, 1-13 Scanning, definition, xi SEND Key, 1-14 Sending Function, 2-4 Serial No. Key, 1-14 Service - Canon MF7280 | imageCLASS MF7280 Reference Guide - Page 299
Main unit, 8-3 Stack Bypass About the stack bypass, 1-11 Auxiliary tray, 2-30 Clearing paper jams, 7-17 Paper, 3-34 Printing, 2-28 Slide guides, 2-30 Tray extension, 2-30 Stamp Cartridge, 6-12 Standard Size, 2-29 Start Key, 1-14 Appendix Stop Key, 1-14 Symbols Used in This Manual, ix - Canon MF7280 | imageCLASS MF7280 Reference Guide - Page 300
Appendix U Unknown ID, 5-26 USB Device, 5-41 User ID Management, 2-6, 2-24, 5-30 Using Lightweight Paper, 3-62 Using the USB interface, 5-41 8 Index 8-13 - Canon MF7280 | imageCLASS MF7280 Reference Guide - Page 301
3-chome, Ohta-ku, Tokyo 146-8501, Japan CANON U.S.A., INC. One Canon Plaza, Lake Success, NY 11042, U.S.A. CANON CANADA INC. 6390 Dixie Road Mississauga, Ontario L5T 1P7, Canada CANON EUROPA N.V. Bovenkerkerweg 59-61 1185 XB Amstelveen, The Netherlands CANON FRANCE S.A.S. 17, quai du Président Paul
-
 1
1 -
 2
2 -
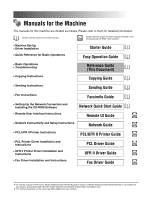 3
3 -
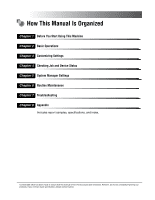 4
4 -
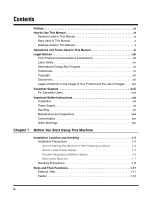 5
5 -
 6
6 -
 7
7 -
8
-
9
-
10
-
11
-
12
-
13
-
14
-
15
-
16
-
17
-
18
-
19
-
20
-
21
-
22
-
23
-
24
-
25
-
26
-
27
-
28
-
29
-
30
-
31
-
32
-
33
-
34
-
35
-
36
-
37
-
38
-
39
-
40
-
41
-
42
-
43
-
44
-
45
-
46
-
47
-
48
-
49
-
50
-
51
-
52
-
53
-
54
-
55
-
56
-
57
-
58
-
59
-
60
-
61
-
62
-
63
-
64
-
65
-
66
-
67
-
68
-
69
-
70
-
71
-
72
-
73
-
74
-
75
-
76
-
77
-
78
-
79
-
80
-
81
-
82
-
83
-
84
-
85
-
86
-
87
-
88
-
89
-
90
-
91
-
92
-
93
-
94
-
95
-
96
-
97
-
98
-
99
-
100
-
101
-
102
-
103
-
104
-
105
-
106
-
107
-
108
-
109
-
110
-
111
-
112
-
113
-
114
-
115
-
116
-
117
-
118
-
119
-
120
-
121
-
122
-
123
-
124
-
125
-
126
-
127
-
128
-
129
-
130
-
131
-
132
-
133
-
134
-
135
-
136
-
137
-
138
-
139
-
140
-
141
-
142
-
143
-
144
-
145
-
146
-
147
-
148
-
149
-
150
-
151
-
152
-
153
-
154
-
155
-
156
-
157
-
158
-
159
-
160
-
161
-
162
-
163
-
164
-
165
-
166
-
167
-
168
-
169
-
170
-
171
-
172
-
173
-
174
-
175
-
176
-
177
-
178
-
179
-
180
-
181
-
182
-
183
-
184
-
185
-
186
-
187
-
188
-
189
-
190
-
191
-
192
-
193
-
194
-
195
-
196
-
197
-
198
-
199
-
200
-
201
-
202
-
203
-
204
-
205
-
206
-
207
-
208
-
209
-
210
-
211
-
212
-
213
-
214
-
215
-
216
-
217
-
218
-
219
-
220
-
221
-
222
-
223
-
224
-
225
-
226
-
227
-
228
-
229
-
230
-
231
-
232
-
233
-
234
-
235
-
236
-
237
-
238
-
239
-
240
-
241
-
242
-
243
-
244
-
245
-
246
-
247
-
248
-
249
-
250
-
251
-
252
-
253
-
254
-
255
-
256
-
257
-
258
-
259
-
260
-
261
-
262
-
263
-
264
-
265
-
266
-
267
-
268
-
269
-
270
-
271
-
272
-
273
-
274
-
275
-
276
-
277
-
278
-
279
-
280
-
281
-
282
-
283
-
284
-
285
-
286
-
287
-
288
-
289
-
290
-
291
-
292
-
293
-
294
-
295
-
296
-
297
-
298
-
299
-
300
-
301
 |
 |

Read this guide first.
Please read this guide before operating this equipment.
After you finish reading this guide, store it in a safe place for future reference.
ENG
R
e
f
e
r
e
n
ce
G
u
i
de
R
e
f
e
r
e
n
ce
G
u
i
de