Canon PIXMA i860 Quick Start Guide - Page 20
Advanced Printing, Install the Photo Paper Tray., Load the paper.
 |
View all Canon PIXMA i860 manuals
Add to My Manuals
Save this manual to your list of manuals |
Page 20 highlights
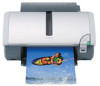
Advanced Printing 2 Install the Photo Paper Tray. Put the Photo Paper Tray along the paper rest and insert it until it clicks into place. Put the protrusions of the Photo Paper Tray all the way into the slots of the printer. 3 Load the paper. (1) Open the cover on the Photo Paper Tray. (2) Load the paper with its printing side facing up. (3) Set the edge of the paper to the right end of the Photo Paper Tray. Up to 20 sheets of paper can be loaded at once. (4) Pinch the paper guide on the Photo Paper Tray and set it to the left edge of the paper. 18
-
 1
1 -
2
-
3
-
4
-
5
-
6
-
7
-
8
-
9
-
10
-
11
-
12
-
13
-
14
-
 15
15 -
 16
16 -
 17
17 -
 18
18 -
 19
19 -
 20
20 -
 21
21 -
 22
22 -
 23
23 -
 24
24 -
 25
25 -
26
-
27
-
28
-
29
-
30
-
31
-
32
-
33
-
34
-
35
-
36
-
37
-
38
-
39
-
40
-
41
-
42
-
43
-
44
-
45
-
46
-
47
-
48
-
49
-
50
-
51
-
52
-
53
-
54
-
55
-
56
-
57
-
58
-
59
-
60
-
61
-
62
-
63
-
64
-
65
-
66
-
67
-
68
-
69
-
70
-
71
-
72
-
73
-
74
-
75
-
76
-
77
-
78
-
79
-
80
-
81
-
82
-
83
-
84
-
85
-
86
-
87
-
88
-
89
-
90
-
91
-
92
 |
 |

Advanced Printing
18
2
Install the Photo Paper Tray.
Put the Photo Paper Tray along the paper rest and insert it until it clicks into place.
3
Load the paper.
(1)
Open the cover on the Photo Paper Tray.
(2)
Load the paper with its printing side facing up.
(3)
Set the edge of the paper to the right end of the Photo Paper Tray.
Up to 20 sheets of paper can be loaded at once.
(4)
Pinch the paper guide on the Photo Paper Tray and set it to the left edge of the
paper.
Put the protrusions of the Photo
Paper Tray all the way into the
slots of the printer.