Canon PowerShot S100 Digital ELPH Software Starter Guide DC SD - Page 63
Starting ImageBrowser - powershot ixus / digital elph
 |
View all Canon PowerShot S100 Digital ELPH manuals
Add to My Manuals
Save this manual to your list of manuals |
Page 63 highlights
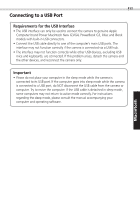
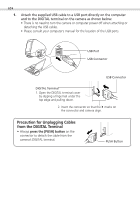
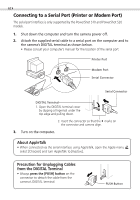
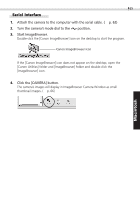
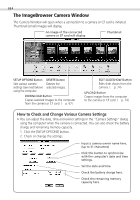
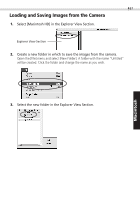
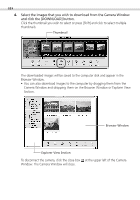
Windows 63 From Loading to Printing This section provides a simple explanation of the procedures for using ImageBrowser to load and print images. Please refer to the ImageBrowser Help file for more details. What to Do if a Warning Dialog Displays • If approximately five minutes pass without a camera function being accessed when the camera is connected via the USB interface, a message on the computer display will ask if you wish to remain connected. If you do not access a function, the camera will close the connection after an additional minute passes. Use the procedure below to reconnect. • PowerShot S100 DIGITAL ELPH/DIGITAL IXUS Press the camera's main switch. • PowerShot S10/S20 Press the camera's shutter button. (The dialog will not appear and the camera will not close the connection if the camera is being powered by the AC adapter.) Starting ImageBrowser USB Interface 1. Attach the camera to the computer with the USB cable. (§ p. 60) 2. Set the camera to the mode for communicating with a computer. • PowerShot S100 DIGITAL ELPH/DIGITAL IXUS Slide the mode switch to the position and press the main switch to turn on the power. • PowerShot S10/S20 Turn the mode dial to the position. ImageBrowser will automatically start and display the "communication settings" dialog. 3. Confirm that [USB Port] and your camera model are selected and click the [Set] button. The images from the camera will display as small thumbnail images in the ImageBrowser Camera Window. (§ p. 66) Macintosh
-
 1
1 -
2
-
3
-
4
-
5
-
6
-
7
-
8
-
9
-
10
-
11
-
12
-
13
-
14
-
15
-
16
-
17
-
18
-
19
-
20
-
21
-
22
-
23
-
24
-
25
-
26
-
27
-
28
-
29
-
30
-
31
-
32
-
33
-
34
-
35
-
36
-
37
-
38
-
39
-
40
-
41
-
42
-
43
-
44
-
45
-
46
-
47
-
48
-
49
-
50
-
51
-
52
-
53
-
54
-
55
-
56
-
57
-
 58
58 -
 59
59 -
 60
60 -
 61
61 -
 62
62 -
 63
63 -
 64
64 -
 65
65 -
 66
66 -
 67
67 -
 68
68 -
69
-
70
-
71
-
72
-
73
-
74
-
75
-
76
-
77
-
78
-
79
-
80
-
81
-
82
-
83
-
84
 |
 |
