Canon i900D i900D Direct Printing Guide - Page 11
Printing Photograph
 |
View all Canon i900D manuals
Add to My Manuals
Save this manual to your list of manuals |
Page 11 highlights
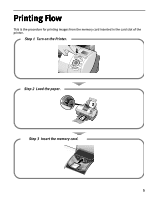
Printing Photograph Let's select an image from the images stored on the memory card of the digital camera and print it. Printing an Image Displayed on the LCD 1 Turn on the printer and Load the Paper. See "Loading Paper" on page 12. 2 Insert the memory card in the card slot. See "Inserting a Memory Card" on page 7. The stored image is displayed on the LCD. Note You can set the area to print using the Trimming function. See "Printing a specified area Trimming" on page 16. 3 Select the image to print. 4 Confirm the settings. 10 (1) Using the print. buttons, select the image to (2) Press the OK button. The print confirmation screen is displayed. (1) Confirm the printer settings. On the first screen, the Paper Size, Paper Type, Bordered/Borderless printing status, and whether or not to print the date are displayed. (2) Press the button. On the second screen, the settings for Print Quality, Photo Optimizer, and Noise Reduction are displayed.
-
 1
1 -
2
-
3
-
4
-
5
-
 6
6 -
 7
7 -
 8
8 -
 9
9 -
 10
10 -
 11
11 -
 12
12 -
 13
13 -
 14
14 -
 15
15 -
 16
16 -
17
-
18
-
19
-
20
-
21
-
22
-
23
-
24
-
25
-
26
-
27
-
28
-
29
-
30
-
31
-
32
-
33
-
34
-
35
-
36
-
37
-
38
-
39
-
40
-
41
-
42
-
43
-
44
-
45
-
46
-
47
-
48
-
49
-
50
 |
 |
