Canon i900D i900D Direct Printing Guide - Page 3
Operation Panel and Menu Display - problems
 |
View all Canon i900D manuals
Add to My Manuals
Save this manual to your list of manuals |
Page 3 highlights
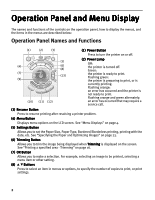
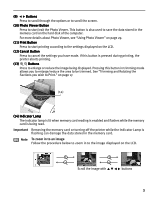
Operation Panel and Menu Display The names and functions of the controls on the operation panel, how to display the menus, and the items in the menus are described below: Operation Panel Names and Functions (1) (2) (3) (1) Power Button Press to turn the printer on or off. (5) (4) (6) (8) (7) (13) (9) (10) (11) (12) (2) Power Lamp Off: the printer is turned off. Green: the printer is ready to print. Flashing green: the printer is preparing to print, or is currently printing. Flashing orange: an error has occurred and the printer is not ready to print. Flashing orange and green alternately: an error has occurred that may require a service call. (3) Resume Button Press to resume printing after resolving a printer problem. (4) Menu Button Displays menu options on the LCD screen. See "Menu Displays" on page 4. (5) Settings Button Allows you to set the Paper Size, Paper Type, Bordered/Borderless printing, printing with the date, etc. See "Specifying the Paper and Optimizing Images" on page 23. (6) Trimming Button Allows you to trim the image being displayed when Trimming is displayed on the screen. See "Printing a specified area - Trimming" on page 16. (7) OK Button Allows you to make a selection. For example, selecting an image to be printed, selecting a menu item or other setting. (8) Buttons Press to select an item in menus or options, to specify the number of copies to print, or print settings. 2
-
 1
1 -
 2
2 -
 3
3 -
 4
4 -
 5
5 -
 6
6 -
 7
7 -
 8
8 -
 9
9 -
10
-
11
-
12
-
13
-
14
-
15
-
16
-
17
-
18
-
19
-
20
-
21
-
22
-
23
-
24
-
25
-
26
-
27
-
28
-
29
-
30
-
31
-
32
-
33
-
34
-
35
-
36
-
37
-
38
-
39
-
40
-
41
-
42
-
43
-
44
-
45
-
46
-
47
-
48
-
49
-
50
 |
 |
