Canon i900D i900D Direct Printing Guide - Page 46
Ink does not come out/ Printing is Blurred/ Colors are Wrong/ White, Streaks, Printed Surface is - ink well cleaning instructions
 |
View all Canon i900D manuals
Add to My Manuals
Save this manual to your list of manuals |
Page 46 highlights
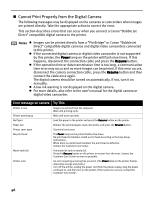
„ Ink does not come out/ Printing is Blurred/ Colors are Wrong/ White Streaks Possible Cause Try This Ink tank is not seated properly/Ink tank is empty Check that the ink tanks are firmly seated in the print head and reseat them if necessary. • Check to see if all the orange tape has been removed as shown in (1). If a part of the orange tape remains as shown in (2), remove it. Incorrect paper type Print head nozzles clogged or misaligned Media not loaded print-side up If an ink tank is empty: See "Replacing an Ink Tank" on page 35. On the operation panel, confirm that the Media Type selected matches the paper loaded. Print the nozzle check pattern to check for uneven ink output. When a specific color is missing from the nozzle check pattern, clean the print head. • If the ink supply is uneven: See "Print Head Cleaning" on page 40. • If straight lines are misalign: See "Aligning Print Head - Auto head align" on page 42. Check that your paper is loaded with the correct print side facing up. Note Follow the instructions packaged with your specialty media for loading and handling. „ Printed Surface is Scratched Possible Cause Try This Inappropriate Paper Type is used. • Check to see if the paper you are printing on is too thick or curled. See "Print Media to Avoid" on page 12. • Note that smudging may occur at the top and bottom edges of the paper when using Borderless Printing. Ensure that the paper you are using is compatible with Borderless Printing. Note If the printed surface is still scratched: Follow the procedure below and set the Thick paper to Thick paper. This procedure also applies to direct printing from your camera. 1. Press the Menu button. 2. Use the button. buttons to select Maintenance and then press the OK 3. Use the buttons to select Thick paper from the Maintenance menu and then press the OK button. 4. Use the buttons to select Thick paper and then press the OK button. * After printing is completed, return the Thick paper to Auto. 45
-
 1
1 -
2
-
3
-
4
-
5
-
6
-
7
-
8
-
9
-
10
-
11
-
12
-
13
-
14
-
15
-
16
-
17
-
18
-
19
-
20
-
21
-
22
-
23
-
24
-
25
-
26
-
27
-
28
-
29
-
30
-
31
-
32
-
33
-
34
-
35
-
36
-
37
-
38
-
39
-
40
-
 41
41 -
 42
42 -
 43
43 -
 44
44 -
 45
45 -
 46
46 -
 47
47 -
 48
48 -
 49
49 -
 50
50
 |
 |
