Canon imageCLASS MF6530 imageCLASS MF6500 Series Advanced Guide - Page 60
Settings Using a Web Browser (Remote UI), Startup Time Settings
 |
View all Canon imageCLASS MF6530 manuals
Add to My Manuals
Save this manual to your list of manuals |
Page 60 highlights
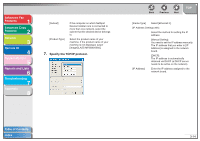
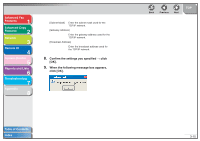
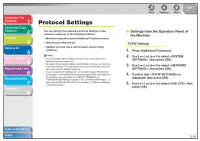
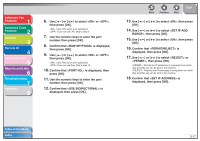
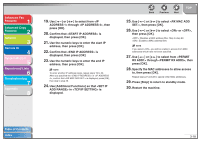
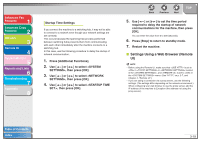
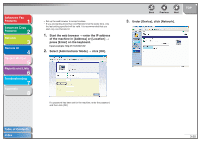
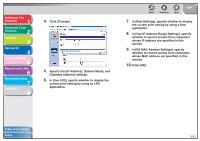
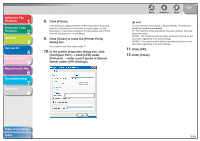
Advanced Fax Features 1 Advanced Copy Features 2 Network 3 Remote UI 4 System Monitor 5 Reports and Lists 6 Troubleshooting 7 Appendix 8 Startup Time Settings If you connect the machine to a switching hub, it may not be able to connect to a network even though your network settings are set correctly. This occurs because the spanning tree process performed between switching hubs prevents them from communicating with each other immediately after the machine connects to a switching hub. In this case, use the following procedure to delay the startup of network communication. 1. Press [Additional Functions]. 2. Use [ ] or [ ] to select , then press [OK]. 3. Use [ ] or [ ] to select , then press [OK]. 4. Use [ ] or [ ] to select , then press [OK]. Back Previous Next TOP 5. Use [ ] or [ ] to set the time period required to delay the startup of network communications for the machine, then press [OK]. You can enter the value from 0 to 300 (seconds). 6. Press [Stop] to return to standby mode. 7. Restart the machine. ■ Settings Using a Web Browser (Remote UI) NOTE - Before using the Remote UI, make sure that is set to in in located in the , and is set to in the menu. (See "HTTP," on p. 3-7, and Chapter 4, "Remote UI".) - If you are using a connection via a proxy server, use the following settings. (The settings differ depending on the network environment.) When configuring your web browser to use the proxy server, add the IP address of the machine to Exception (the address not using the proxy server). Table of Contents Index 3-19
-
 1
1 -
2
-
3
-
4
-
5
-
6
-
7
-
8
-
9
-
10
-
11
-
12
-
13
-
14
-
15
-
16
-
17
-
18
-
19
-
20
-
21
-
22
-
23
-
24
-
25
-
26
-
27
-
28
-
29
-
30
-
31
-
32
-
33
-
34
-
35
-
36
-
37
-
38
-
39
-
40
-
41
-
42
-
43
-
44
-
45
-
46
-
47
-
48
-
49
-
50
-
51
-
52
-
53
-
54
-
 55
55 -
 56
56 -
 57
57 -
 58
58 -
 59
59 -
 60
60 -
 61
61 -
 62
62 -
 63
63 -
 64
64 -
 65
65 -
66
-
67
-
68
-
69
-
70
-
71
-
72
-
73
-
74
-
75
-
76
-
77
-
78
-
79
-
80
-
81
-
82
-
83
-
84
-
85
-
86
-
87
-
88
-
89
-
90
-
91
-
92
-
93
-
94
-
95
-
96
-
97
-
98
-
99
-
100
-
101
-
102
-
103
-
104
-
105
-
106
-
107
-
108
-
109
-
110
-
111
-
112
-
113
-
114
-
115
-
116
-
117
-
118
-
119
-
120
-
121
-
122
-
123
-
124
-
125
-
126
-
127
-
128
-
129
-
130
-
131
-
132
 |
 |