Canon imageCLASS MF6550 imageCLASS MF6500 Series Advanced Guide - Page 65
Click [Close] to close the [Printer Ports], Name] under [LPR Settings].
 |
View all Canon imageCLASS MF6550 manuals
Add to My Manuals
Save this manual to your list of manuals |
Page 65 highlights
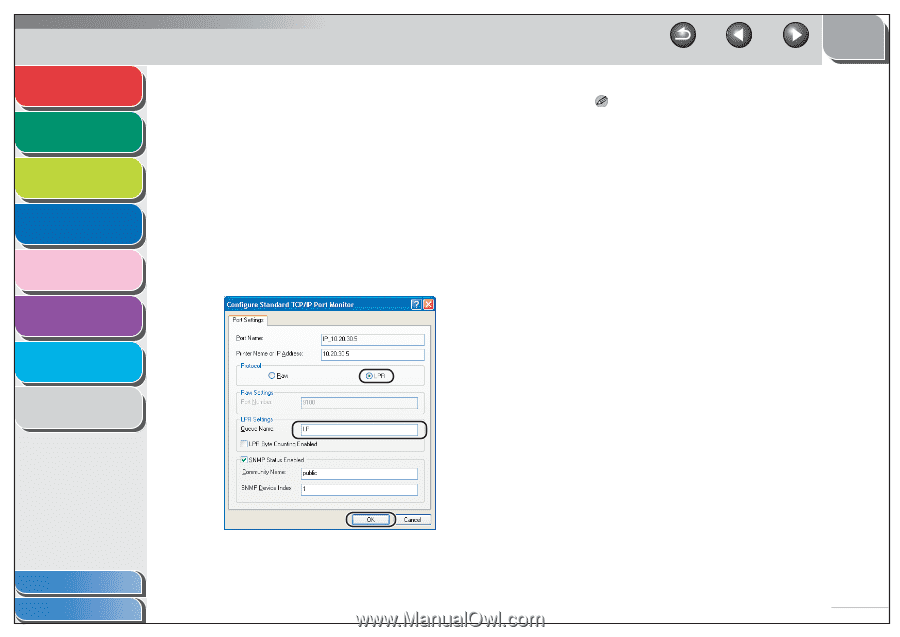
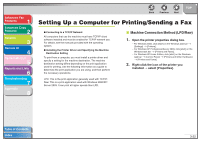
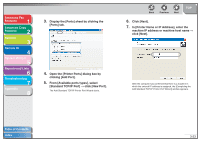
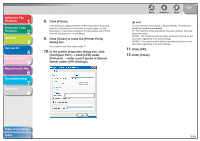
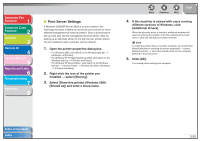
Advanced Fax Features 1 Advanced Copy Features 2 Network 3 Remote UI 4 System Monitor 5 Reports and Lists 6 Troubleshooting 7 Appendix 8 8. Click [Finish]. If the dialog box displays [Additional Port Information Required], follow the instructions on the screen to search again, or click [Standard] → click [Canon Network Printing Device with P9100] from the pull-down list → click [Next]. 9. Click [Close] to close the [Printer Ports] dialog box. If you want to use Raw, skip to step 11. 10. In the printer properties dialog box, click [Configure Port] → Click [LPR] under [Protocol] → enter a print queue in [Queue Name] under [LPR Settings]. Back Previous Next TOP NOTE You can specify a print queue in [Queue Name]. The following three print queues are available: LP: The machine prints according to its spool settings. Normally select this option. SPOOL: The machine prints only after spooling a print job on the hard disk, regardless of its spool settings. DIRECT: The machine prints without spooling a print job on the hard disk, regardless of its spool settings. 11. Click [OK]. 12. Click [Close]. Table of Contents Index 3-24
-
 1
1 -
2
-
3
-
4
-
5
-
6
-
7
-
8
-
9
-
10
-
11
-
12
-
13
-
14
-
15
-
16
-
17
-
18
-
19
-
20
-
21
-
22
-
23
-
24
-
25
-
26
-
27
-
28
-
29
-
30
-
31
-
32
-
33
-
34
-
35
-
36
-
37
-
38
-
39
-
40
-
41
-
42
-
43
-
44
-
45
-
46
-
47
-
48
-
49
-
50
-
51
-
52
-
53
-
54
-
55
-
56
-
57
-
58
-
59
-
 60
60 -
 61
61 -
 62
62 -
 63
63 -
 64
64 -
 65
65 -
 66
66 -
 67
67 -
 68
68 -
 69
69 -
 70
70 -
71
-
72
-
73
-
74
-
75
-
76
-
77
-
78
-
79
-
80
-
81
-
82
-
83
-
84
-
85
-
86
-
87
-
88
-
89
-
90
-
91
-
92
-
93
-
94
-
95
-
96
-
97
-
98
-
99
-
100
-
101
-
102
-
103
-
104
-
105
-
106
-
107
-
108
-
109
-
110
-
111
-
112
-
113
-
114
-
115
-
116
-
117
-
118
-
119
-
120
-
121
-
122
-
123
-
124
-
125
-
126
-
127
-
128
-
129
-
130
-
131
-
132
 |
 |