Canon imagePROGRAF TM-200 Guide for Media Configuration Tool - Page 58
Importing Media Information
 |
View all Canon imagePROGRAF TM-200 manuals
Add to My Manuals
Save this manual to your list of manuals |
Page 58 highlights
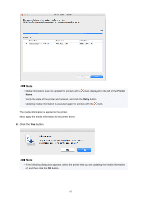
Importing Media Information Media information files downloaded from the Canon website and media information files exported from the Media Configuration Tool can be imported and applied to printers. Important • You cannot add or edit media information if a printer is not connected. Browse "Changing the Base Printer" and reselect the base printer to add and edit media information. • Do not attempt to print or turn the printer off while the program is communicating with the printer. Do not add or edit media information on a printer from another computer while it is being added or edited. • We recommend backing up the media information in advance before adding or editing media information. For how to back up media information, see "Back Up Base Printer Media Information" in "Copying Media Information from the Base Printer to Another Printer". Note • You can load media information for each paper. • You can also import the media information of custom paper. • If the imported media information file of the custom paper contains calibration target information, the calibration target will also be registered in the printer. The following explains how to read media information. • Adding and Updating Media Information from the Main Screen • Adding Media Information by Double-Clicking the Media Information File Adding and Updating Media Information from the Main Screen 1. Click (Add/Update Media Information) in the Add/Save Media Information button group (or select Add/Update Media Information from the Add/Save Media Information menu). 58
-
 1
1 -
2
-
3
-
4
-
5
-
6
-
7
-
8
-
9
-
10
-
11
-
12
-
13
-
14
-
15
-
16
-
17
-
18
-
19
-
20
-
21
-
22
-
23
-
24
-
25
-
26
-
27
-
28
-
29
-
30
-
31
-
32
-
33
-
34
-
35
-
36
-
37
-
38
-
39
-
40
-
41
-
42
-
43
-
44
-
45
-
46
-
47
-
48
-
49
-
50
-
51
-
52
-
 53
53 -
 54
54 -
 55
55 -
 56
56 -
 57
57 -
 58
58 -
 59
59 -
 60
60 -
 61
61 -
 62
62 -
 63
63 -
64
-
65
-
66
-
67
-
68
-
69
-
70
-
71
-
72
-
73
-
74
-
75
-
76
-
77
-
78
-
79
-
80
-
81
-
82
-
83
-
84
-
85
-
86
-
87
-
88
-
89
-
90
-
91
-
92
-
93
-
94
-
95
-
96
-
97
-
98
-
99
-
100
-
101
-
102
-
103
-
104
-
105
-
106
-
107
-
108
-
109
-
110
-
111
-
112
-
113
-
114
-
115
-
116
-
117
-
118
-
119
-
120
-
121
-
122
-
123
-
124
-
125
-
126
-
127
-
128
-
129
-
130
 |
 |
