Compaq Mini 110c-1000 HP Mini User Guide - Windows XP - Page 14
Knowing the parts, Start, Control Panel, Performance and, Maintenance, Power Options
 |
View all Compaq Mini 110c-1000 manuals
Add to My Manuals
Save this manual to your list of manuals |
Page 14 highlights
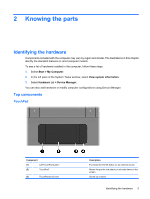
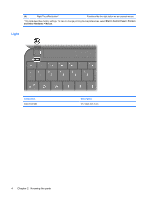
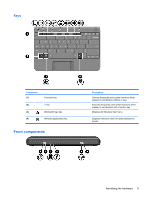
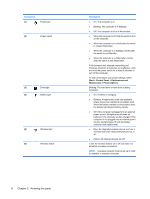
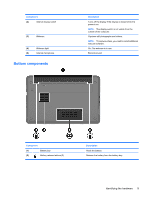
Component (1) Power light (2) Power switch (3) Drive light (4) Battery light (5) Wireless light (6) Wireless switch 6 Chapter 2 Knowing the parts Description ● On: The computer is on. ● Blinking: The computer is in Standby. ● Off: The computer is off or in Hibernation. ● When the computer is off, slide the switch to turn on the computer. ● When the computer is on, briefly slide the switch to initiate Hibernation. ● When the computer is in Standby, briefly slide the switch to exit Standby. ● When the computer is in Hibernation, briefly slide the switch to exit Hibernation. If the computer has stopped responding and Windows shutdown procedures are ineffective, slide and hold the power switch for at least 5 seconds to turn off the computer. To learn more about your power settings, select Start > Control Panel > Performance and Maintenance > Power Options. Blinking: The hard drive or flash drive is being accessed. ● On: A battery is charging. ● Blinking: A battery that is the only available power source has reached a low battery level. When the battery reaches a critical battery level, the battery light begins blinking rapidly. ● Off: If the computer is plugged into an external power source, the light turns off when all batteries in the computer are fully charged. If the computer is not plugged into an external power source, the light stays off until the battery reaches a low battery level. ● Blue: An integrated wireless device, such as a wireless local area network (WLAN) device, is on. ● Amber: All wireless devices are off. Turns the wireless feature on or off, but does not establish a wireless connection. NOTE: A wireless network must be set up in order to establish a wireless connection.
-
 1
1 -
2
-
3
-
4
-
5
-
6
-
7
-
8
-
 9
9 -
 10
10 -
 11
11 -
 12
12 -
 13
13 -
 14
14 -
 15
15 -
 16
16 -
 17
17 -
 18
18 -
 19
19 -
20
-
21
-
22
-
23
-
24
-
25
-
26
-
27
-
28
-
29
-
30
-
31
-
32
-
33
-
34
-
35
-
36
-
37
-
38
-
39
-
40
-
41
-
42
-
43
-
44
-
45
-
46
-
47
-
48
-
49
-
50
-
51
-
52
-
53
-
54
-
55
-
56
-
57
-
58
-
59
-
60
-
61
-
62
-
63
-
64
-
65
-
66
-
67
-
68
-
69
-
70
-
71
-
72
-
73
-
74
-
75
-
76
-
77
-
78
-
79
-
80
-
81
-
82
-
83
-
84
-
85
-
86
-
87
 |
 |