Craftsman 79194 Operation Manual - Page 10
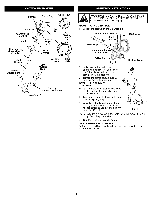
CHECKING, THE OIL LEVEL, Fig. 18, Max Oil Fill, Fig. 19, Oil Fil, Fig. 20, CHANGING, THE OIL, ARNING
 |
View all Craftsman 79194 manuals
Add to My Manuals
Save this manual to your list of manuals |
Page 10 highlights
CHECKING THE OIL LEVEL The importance of checking and maintaining the proper oil level in the crankcase cannot be overemphasized. Check oil before each use: 1. Stop the engine and allow oil to drain into the crankcase. 2. Place the engine on an elevated, level surface with the cutting head shield hanging off the surface to get a proper oil level reading (Fig. 18). ( Fig. 18 3. Keep dirt, grass clippings and other debris out of the engine. Clean the area around the dipstick before removing it. 4. Remove the oil fill plug. 5. Look into the oil fill hole, use a flashlight if needed. The oil should be just touching the innermost thread (Fig. 19). 6. If the oil level is not touching the innermost thread on the oil fill hole, add a small amount of oil to the oil fill hole and recheck (Fig. 19). Repeat this procedure until the oil level reaches the innermost thread on the oil fill hole. NOTE: Do not overfill the unit. NOTE: Make sure the O-ring is in place on the oil fill plug when checking and changing the oil (Fig. 20). Oil Fil__ CHANGING THE OIL _ hanAdRliNngINGu:nit. Wear gloves to prevent injury when For a new engine, change the oil after the first 10 hours of operation. Change the oil while the engine is still warm. The oil will flow freely and carry away more impurities. 1. Unplug spark plug boot to prevent accidental starting. 2. Remove the oil fill plug. 3. Pour the oil out of the oil fill hole and into a container by tipping the unit to a vertical position (Fig. 21). Allow ample time for complete drainage. 4. Wipe up any oil residue on the unit and clean up any oil that may have spilled. Dispose of the oil according regulations. 5. tRoefFilel dtheeralc, raSntkacteasaendwiltohcal 3.04 fluid ounce (90 ml) of SAE 30 SF, SG, SH oil. / Fig. 21 NOTE: Use the bottle and spout saved from initial use to measure the correct amount of oil. The top of the label on the bottle measures approximately 3.04 ounces (90 ml) (Fig. 22). Check the level; see Checking the Oil Level. If the level is low, add a small amount of oil and recheck. Do not overfill (Fig. 22). Max Oil Fill Line / Fig. 19 Fig. 20 \\ Fill Level L 4-Cycle Motor Oil Fig. 22 6. Replace the oil fill plug. 7. Reconnect the spark plug boot. 10
-
 1
1 -
2
-
3
-
4
-
 5
5 -
 6
6 -
 7
7 -
 8
8 -
 9
9 -
 10
10 -
 11
11 -
 12
12 -
 13
13 -
 14
14 -
 15
15 -
16
-
17
-
18
-
19
-
20
-
21
-
22
-
23
-
24
-
25
-
26
-
27
-
28
-
29
-
30
-
31
-
32
-
33
-
34
-
35
-
36
 |
 |
