D-Link DGS-3630-28TC Hardware Installation Guide - Page 24
Installing the Switch in a Standard 19\, Installing Transceivers into the Transceiver Ports
 |
View all D-Link DGS-3630-28TC manuals
Add to My Manuals
Save this manual to your list of manuals |
Page 24 highlights
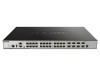
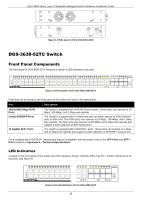
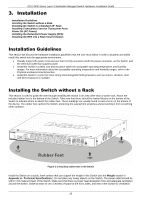
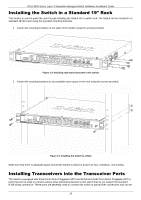
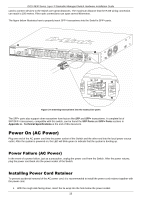
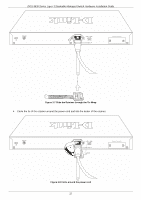
DGS-3630 Series Layer 3 Stackable Managed Switch Hardware Installation Guide Installing the Switch in a Standard 19" Rack This section is used to guide the user through installing the Switch into a switch rack. The Switch can be mounted in a standard 19"(1U) rack using the provided mounting brackets. 1. Fasten the mounting brackets to the sides of the Switch using the screws provided. Figure 3-2 Attaching rack-mount brackets to the Switch 2. Fasten the mounting brackets in any available open space in the rack using the screws provided. Figure 3-3 Installing the Switch in a Rack Make sure that there is adequate space around the Switch to allow for proper air flow, ventilation, and cooling. Installing Transceivers into the Transceiver Ports The Switch is equipped with Small Form-factor Pluggable (SFP) and Enhanced Small Form-factor Pluggable (SFP+) ports that can be used to connect various other networking devices to this switch that do not support the standard RJ45 wiring connection. These ports are generally used to connect this switch to optical fiber connections and can be 24
-
 1
1 -
2
-
3
-
4
-
5
-
6
-
7
-
8
-
9
-
10
-
11
-
12
-
13
-
14
-
15
-
16
-
17
-
18
-
 19
19 -
 20
20 -
 21
21 -
 22
22 -
 23
23 -
 24
24 -
 25
25 -
 26
26 -
 27
27 -
 28
28 -
 29
29 -
30
-
31
-
32
-
33
-
34
-
35
-
36
-
37
-
38
-
39
-
40
-
41
-
42
-
43
-
44
-
45
-
46
-
47
-
48
-
49
-
50
-
51
-
52
-
53
-
54
-
55
-
56
-
57
-
58
-
59
-
60
-
61
-
62
-
63
-
64
-
65
-
66
-
67
-
68
-
69
-
70
-
71
-
72
 |
 |
