DIRECTV D11 System Manual - Page 111
Satellite In, Out To Tv, Off-air In, 4 Channel Switch, S-video, Video Yellow, Audio R-red And L- - usb
 |
View all DIRECTV D11 manuals
Add to My Manuals
Save this manual to your list of manuals |
Page 111 highlights
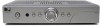
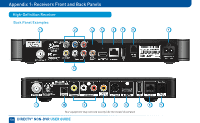
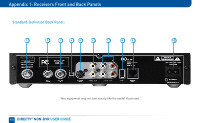
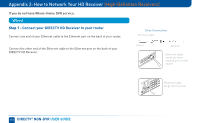
Appendix 1: Receivers Front and Back Panels 1. SATELLITE IN - Use to connect the DIRECTV Receiver to the satellite dish antenna. 2. OUT TO TV - Connects the DIRECTV Receiver to your TV or VCR using RF coaxial cable. This jack provides the most basic connection, carrying good sound and video quality. 3. OFF-AIR IN - Connect a standard TV antenna or cable feed to the DIRECTV Receiver using this jack. 4. 3/4 CHANNEL SWITCH - Allows users to choose the channel that is not used in your area (3 or 4) when the receiver is connected to TV using RF coaxial cable from the DIRECTV Receiver's OUT TO TV. 5. S-VIDEO - Provides the best picture quality, better than VIDEO RCA-type or RF coaxial cable jacks. If your TV has an S-Video jack, use an S-Video jack, use it along with the audio jacks (S-Video only carries picture information, not sound) to connect to your TV. 6. VIDEO (YELLOW) - Provides better picture quality than the OUT TO TV jack. Connect the second RCA-type composite VIDEO jack to another device, such as a VCR. Your must also connect the AUDIO cables when using the VIDEO connection. 7. AUDIO (R-Red and L-White) - Audio cables offer better sound quality than RF coaxial cables. You can connect a second set of audio cables to another component, such as a VCR or stereo. 8. USB PORT - For future use. 9. PHONE - Connects the DIRECTV Receiver to a telephone wall jack to enable DIRECTV CINEMA and Pay Per View purchasing and Caller ID (if your phone service package includes it). 10. POWER - Connects the DIRECTV Receiver to an electrical outlet. We recommend you use a surge protector to safeguard your DIRECTV Receiver from power spikes. 111
-
 1
1 -
2
-
3
-
4
-
5
-
6
-
7
-
8
-
9
-
10
-
11
-
12
-
13
-
14
-
15
-
16
-
17
-
18
-
19
-
20
-
21
-
22
-
23
-
24
-
25
-
26
-
27
-
28
-
29
-
30
-
31
-
32
-
33
-
34
-
35
-
36
-
37
-
38
-
39
-
40
-
41
-
42
-
43
-
44
-
45
-
46
-
47
-
48
-
49
-
50
-
51
-
52
-
53
-
54
-
55
-
56
-
57
-
58
-
59
-
60
-
61
-
62
-
63
-
64
-
65
-
66
-
67
-
68
-
69
-
70
-
71
-
72
-
73
-
74
-
75
-
76
-
77
-
78
-
79
-
80
-
81
-
82
-
83
-
84
-
85
-
86
-
87
-
88
-
89
-
90
-
91
-
92
-
93
-
94
-
95
-
96
-
97
-
98
-
99
-
100
-
101
-
102
-
103
-
104
-
105
-
 106
106 -
 107
107 -
 108
108 -
 109
109 -
 110
110 -
 111
111 -
 112
112 -
 113
113 -
 114
114 -
 115
115 -
 116
116 -
117
-
118
-
119
-
120
-
121
-
122
-
123
-
124
-
125
-
126
-
127
-
128
-
129
-
130
-
131
-
132
 |
 |