Dell 2230 User's Guide
Dell 2230 Manual
 |
View all Dell 2230 manuals
Add to My Manuals
Save this manual to your list of manuals |
Dell 2230 manual content summary:
- Dell 2230 | User's Guide - Page 1
Dell 2230d Laser Printer User's Guide November 2008 www.dell.com | support.dell.com - Dell 2230 | User's Guide - Page 2
in any manner whatsoever without the written permission of Dell Inc. is strictly forbidden. Trademarks used in this text: Dell, the DELL logo, and Dell Toner Management System are trademarks of Dell Inc.; Microsoft and Windows are registered trademarks of Microsoft Corporation. Other trademarks and - Dell 2230 | User's Guide - Page 3
to install internal options...33 Installing a memory card ...34 Installing hardware options...36 Installing a 250- or 550-sheet drawer...36 Printing the printer settings configuration sheet...38 Interpreting the printer control panel lights 39 Understanding the printer control panel light sequences - Dell 2230 | User's Guide - Page 4
by the printer ...67 Paper sizes supported by the printer ...68 Setting up for local printing 70 Windows®...70 Installing the Printer Drivers ...70 Installing Additional Printer Drivers...70 Installing Additional Printer Software ...71 Macintosh®...72 Mac OS X: Adding the Printer in Print Center or - Dell 2230 | User's Guide - Page 5
Profiler...75 Dell Printer Alert Utility...76 Installing the Optional XPS Driver...76 Dell Toner Management System...77 Printing Status Window...77 Dell Printer Supplies Reorder Application ...77 Printing 79 Printing a document...79 Printing on both sides of the paper...80 Setting Jam Recovery...80 - Dell 2230 | User's Guide - Page 6
the photoconductor kit and toner cartridge 102 Clearing jams from the standard exit bin...104 Clearing jams from Tray 1...104 Clearing jams from Tray 2...106 Clearing jams in the manual feeder...107 Clearing jams behind the rear door...108 Troubleshooting 110 Solving basic printer problems...110 - Dell 2230 | User's Guide - Page 7
appears on the page 119 Toner rubs off...120 Toner specks...120 Transparency print quality is poor...120 Streaked horizontal lines...121 Streaked vertical lines ...121 Solid black or white streaks appear on transparencies or paper 122 Appendix 124 Dell Technical Support Policy...124 Contacting - Dell 2230 | User's Guide - Page 8
8 - Dell 2230 | User's Guide - Page 9
the media to release emissions. You must understand the section in your operating instructions that discusses the guidelines for selecting print media to avoid the possibility of harmful emissions. CAUTION-HOT SURFACE: The inside of the printer might be hot. To reduce the risk of injury from a hot - Dell 2230 | User's Guide - Page 10
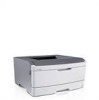
or parts: 1 Front door release button 2 Paper stop 3 Standard exit bin 4 Printer control panel 5 System board door 6 Standard 250-sheet tray (Tray 1) 7 Manual feeder door 8 Front door The following illustration shows the printer back with its basic features or parts: Learning about the printer 10 - Dell 2230 | User's Guide - Page 11
1 Rear door 2 USB port 3 Parallel port 4 Printer power cord socket 5 Power button (On/Off switch) 6 Locking device Configured models The following illustration shows the printer configured with an optional 250-sheet drawer: Learning about the printer 11 - Dell 2230 | User's Guide - Page 12
1 Front door release button 2 Paper stop 3 Standard exit bin 4 Printer control panel 5 System board door 6 Standard 250-sheet tray (Tray 1) 7 Optional 250-sheet drawer (Tray 2) 8 Manual feeder door 9 Front door The following illustration shows the printer configured with an optional 550-sheet drawer - Dell 2230 | User's Guide - Page 13
release button 2 Paper stop 3 Standard exit bin 4 Printer control panel 5 System board door 6 Standard 250-sheet tray (Tray 1) 7 Optional 550-sheet drawer (Tray 2) 8 Manual feeder door 9 Front door Understanding the printer control panel The printer control panel features six lights and two buttons - Dell 2230 | User's Guide - Page 14
Item 1 Error light 2 Jam light 3 Load paper light 4 Toner light 5 Ready light 6 Continue button 7 Stop button Attaching cables 1 Connect the printer to a computer using USB or parallel cable. 2 Connect the power cord to the printer first and then to a wall outlet. Learning about the printer 14 - Dell 2230 | User's Guide - Page 15
1 USB port 2 Parallel port 3 Printer power cord socket Learning about the printer 15 - Dell 2230 | User's Guide - Page 16
® Windows® or Printer Settings for Macintosh®. Paper menu Default Source menu Menu item Default Source Tray Manual Paper Manual Env Description Sets a default paper source for all print jobs Notes: • Tray 1 (standard tray) is the factory default setting. • Only an installed paper source - Dell 2230 | User's Guide - Page 17
DL Envelope is the international factory default setting. 10 Envelope C5 Envelope B5 Envelope DL Envelope Other Envelope Set Type menu for Tray 1 Plain Paper Card Stock Transparency Recycled Bond Letterhead Preprinted Colored Paper Light Paper Heavy Paper Rough/Cotton Custom Type Lets you - Dell 2230 | User's Guide - Page 18
for Manual Paper Plain Paper Card Stock Transparency Bond Letterhead Preprinted Colored Paper Light Paper Heavy Paper Rough/Cotton Custom Type Set Type menu for Manual Envelope Envelope Custom Type Description Lets you specify the type of paper being manually loaded Note: Plain Paper is - Dell 2230 | User's Guide - Page 19
Light Weight is the setting selected for Select Type, Light is the only Select Weight setting available. • When Heavy Weight is the setting selected for Select Type, Heavy is the only Select Weight setting available. • Settings appear only if the paper is supported. Understanding the printer menus - Dell 2230 | User's Guide - Page 20
type for the Recycled paper type loaded, and it will also be the Recycled paper type in other menus. Notes: • Paper is the factory default setting. • The Recycled type must be supported by the selected tray or feeder in order for you to print from that source. Understanding the printer menus 20 - Dell 2230 | User's Guide - Page 21
Paper Size. The Universal Paper Size is a user-defined paper size. It is listed with the other paper size settings and includes similar options, such as support for duplex printing and printing : • If the height exceeds the maximum, then the printer uses the maximum height allowed. • 14 inches is the - Dell 2230 | User's Guide - Page 22
for the USB Buffer, disable or reduce the size of the parallel buffer. • Changing this setting automatically resets the printer. Mac Binary PS On Off Auto Sets the printer to process Macintosh binary PostScript print jobs Notes: • Auto is the factory default setting. • The Off setting filters - Dell 2230 | User's Guide - Page 23
printer uses PostScript emulation if PS SmartSwitch is set to On. It uses the default printer language specified in the Setup menu if PS SmartSwitch is set to Off. Sets the printer to automatically switch to PostScript emulation when a print setting automatically resets the printer. Enables - Dell 2230 | User's Guide - Page 24
compatibility with most existing parallel ports and is the recommended setting. • The Standard setting tries to resolve parallel port communication problems. Determines whether the printer honors printer print jobs. Settings menu General Settings menu Menu item Eco-Mode Off Energy Paper Energy/Paper - Dell 2230 | User's Guide - Page 25
: • Off is the factory default setting. The Toner is low message will appear as a warning. • Single means the Toner is low message will appear and the indicator light will blink red. Sets the amount of time in minutes the printer waits after a job is printed before it goes into a reduced power state - Dell 2230 | User's Guide - Page 26
emulation uses a PS interpreter for processing print jobs. PCL emulation uses a PCL interpreter for processing print jobs. • The factory default printer language is PCL Emulation. • Setting a printer language as the default does not prevent a software program from sending print jobs that use - Dell 2230 | User's Guide - Page 27
factory default setting. • To set 2-sided printing from the software program, for Windows users, click File Œ Print, and then click Properties, Preferences, Options, or Setup. For Macintosh users, choose File > Print, and then adjust the settings from the print dialog and pop-up menus. Defines the - Dell 2230 | User's Guide - Page 28
default setting. • Multi-Purpose Feeder appears as a value only if it is a supported option on the printer and if Configure MP is set to Cassette. Specifies that multiple-page images be printed on one side of a sheet of paper. Notes: • Off is the factory default setting. • The number selected is the - Dell 2230 | User's Guide - Page 29
• To set Enhance Fine Lines, with a document open, click File Œ Print, and then click Properties, Preferences, Options, or Setup for Windows users. For Macintosh users, choose File> Print, and then adjust the settings from the print dialog and pop-up menus. Choose whether to apply Gray Correction on - Dell 2230 | User's Guide - Page 30
1.00-1008.00 Description Prints a page containing the PostScript error Note: Off is the factory default setting. Establishes the font search order Notes: • Resident is the factory default setting. • A formatted flash memory option card must be installed in the printer and operating properly for - Dell 2230 | User's Guide - Page 31
setting Lines per Page. Sets the printer to print on A4-size paper Notes: • 198 mm is the factory default setting. • The 203-mm setting sets the width of the page to allow the printing of eighty 10-pitch characters. Specifies whether the printer automatically performs a carriage return (CR) after - Dell 2230 | User's Guide - Page 32
, and to print up to 16 images on a single page. If the printer is connected to a computer by a USB or parallel cable, open the Local Printer Settings Utility for Windows or Printer Settings for Macintosh. One of these utilities installs with the printer software. Understanding the printer menus 32 - Dell 2230 | User's Guide - Page 33
internal options Accessing the system board to install internal options CAUTION-SHOCK HAZARD: When accessing the system board, turn the printer off, and then unplug the power cord from the wall outlet before continuing. If you have other devices attached to the printer, then turn them off as well - Dell 2230 | User's Guide - Page 34
devices attached to the printer, then turn them off as well, and unplug any cables going into the printer. Warning-Potential Damage: System board be purchased separately and attached to the system board. To install the memory card: 1 Turn the printer off. 2 Access the system board. 3 Unpack the - Dell 2230 | User's Guide - Page 35
fully seat the card. 7 Ensure that each latch fits over the notch on each end of the card. 8 Close the system board door. 9 Turn the printer back on. 10 In Windows Vista®: a Click Œ Control Panel. b Click Hardware and Sound. c Click - Dell 2230 | User's Guide - Page 36
In Windows® XP and 2000: a Click StartŒ Control Panel. b Double-click Printers and Other Hardware. c Double-click Printers and Faxes. 11 Right-click the Dell 2230d Laser Printer icon. 12 Click Properties. 13 Click Install Options. Note: Memory cards designed for other printers may not work with your - Dell 2230 | User's Guide - Page 37
and Sound. c Click Printers. In Windows® XP and 2000: a Click StartŒ Control Panel. b Double-click Printers and Other Hardware. c Double-click Printers and Faxes. 10 Right-click the Dell 2230d Laser Printer icon. 11 Click Properties. 12 Click Install Options. 13 Click Ask Printer. 14 Click OK. 15 - Dell 2230 | User's Guide - Page 38
. It also provides instructions on how to navigate through the configuration menus to select and save new settings. To print the printer settings configuration sheet: 1 Turn the printer off. 2 Open the front door. 3 Press and hold as you turn the printer on. All the lights cycle. 4 Release . 5 Close - Dell 2230 | User's Guide - Page 39
Error 2 Jam 3 Load paper 4 Toner 5 Ready 6 Continue 7 Stop The printer control panel features six lights and two buttons. The lights can be on, off, blinking, or blinking slowly. Light sequence What you can do Turn the printer off and then on again. If the lights are still blinking, contact Dell - Dell 2230 | User's Guide - Page 40
Light sequence Replace PC Kit - Blinking - Blinking - On Ready - On (green) What you can do Replace the photoconductor kit. For more information, see "Replacing the photoconductor kit" on page 91. Send a job to print. Send a job to print. Power Saver - On (yellow) Interpreting the printer control - Dell 2230 | User's Guide - Page 41
Light sequence Hex Trace Ready - Slowly Blinking Busy - Blinking Flushing Buffer - Blinking - Blinking What you can do Use Hex Trace to troubleshoot printing problems. Wait or press . Wait until the printer returns to the Ready state. Interpreting the printer control panel lights 41 - Dell 2230 | User's Guide - Page 42
sequence to clear. Waiting - On - On Wait for the light sequence to clear. Canceling job - On - On - On - On - On - On Press and release . To avoid this light sequence in the future, ensure that you use a valid code when programming the printer. Invalid Engine Code - On - On Interpreting the - Dell 2230 | User's Guide - Page 43
door is open - On What you can do Press and release either or l to return to the Ready state. Replace the toner cartridge with one suitable for your region. For more information, see "Replacing the toner cartridge" on page 89. Close the front door. Interpreting the printer control panel lights 43 - Dell 2230 | User's Guide - Page 44
paper from the standard exit bin - Blinking What you can do Load paper in Tray 1 or Tray 2. Load paper in the manual feeder. Remove printed pages from the standard exit bin, and then press and release to clear the light sequence and continue printing. Interpreting the printer control panel lights - Dell 2230 | User's Guide - Page 45
the printer on. For more information, see "Replacing the toner cartridge" on page 89. • Press and release to clear the light sequence and continue processing the print job. • Replace the photoconductor kit. For more information, see "Replacing the photoconductor kit" on page 91. PC Kit life warning - Dell 2230 | User's Guide - Page 46
the secondary paper jam light sequences" on page 50. Paper jam - On - On Understanding the secondary error light sequences When the and lights are on simultaneously, press twice quickly to see the secondary error code. Printer control panel Lights and buttons 1 Error 2 Jam 3 Load paper 4 Toner - Dell 2230 | User's Guide - Page 47
printer memory. For more information, see "Installing a memory card" on page 34. Install additional printer memory. For more information, see "Installing a memory card" on page 34 Insufficient memory to support Resource Save feature - On - Blinking - On Interpreting the printer control panel lights - Dell 2230 | User's Guide - Page 48
printer memory. For more information, see "Installing a memory card" on page 34. • Ensure that the paper you loaded is large enough. • Clear any paper jam. • Press to clear the code and continue the print job. Paper size is small - On - On - On - On Interpreting the printer control panel lights - Dell 2230 | User's Guide - Page 49
Light sequences What you can do Download valid engine code to the internal print server. Invalid engine code - On - On - On Cartridge region mismatch - On - Blinking - On Replace the toner cartridge with one that is suitable for your region. For more information, see "Replacing the toner - Dell 2230 | User's Guide - Page 50
the toner cartridge and replace it with a supported toner cartridge. For more information, see "Replacing the toner cartridge" on page 89. Cartridge part number not supported by device - On - On - On Understanding the secondary paper jam light sequences When the and lights are on, a paper jam has - Dell 2230 | User's Guide - Page 51
photoconductor kit and toner cartridge unit. 200.yy Paper jam - On - On - On Remove the photoconductor kit and toner cartridge unit. 201.yy Paper jam - On - On - On Open the front door, and then open the rear door. 202.yy Paper jam - On - On - On Interpreting the printer control panel lights - Dell 2230 | User's Guide - Page 52
Light sequence 231.yy Paper jam - On - Blinking - On 233.yy Paper jam - On - Blinking - Blinking - On 234.yy Paper jam - On - Blinking - On What you can do to access the jam Open the front door, and then open the door, and then open the rear door. Interpreting the printer control panel lights 52 - Dell 2230 | User's Guide - Page 53
following: • Clear the jam at the standard exit bin. • Load paper supported by the duplex function. For more information, see "Paper sizes supported by the printer" on page 68. Try one or more of the following: • Remove Tray 1. • Remove the photoconductor kit and toner cartridge unit. • Remove Tray - Dell 2230 | User's Guide - Page 54
Light sequence What you can do to access the jam Clear the paper jam from the manual feeder. 251.yy Paper jam - On - On - On - On Note: For more information, see "Clearing jams" on page 97. Interpreting the printer control panel lights 54 - Dell 2230 | User's Guide - Page 55
Universal paper settings The Universal Paper Size is a user-defined setting that lets you print on paper sizes that are not preset in the printer menus. Defining a specific height and width measurement for the Universal paper size, in the portrait orientation, allows the printer to support the - Dell 2230 | User's Guide - Page 56
Proper paper loading prevents jams and facilitates trouble-free printing. 1 Pull the tray completely out. Do not remove trays while a job prints or when the Busy light sequence appears on the printer control panel. Doing so may cause a jam. Busy - Blinking 2 Squeeze the width guide tabs, and then - Dell 2230 | User's Guide - Page 57
and forth to loosen them, and then fan them. Do not fold or crease the paper. Straighten the edges on a level surface. 5 Load the paper stack toward the back of the tray as shown with the recommended print side facedown. Note: Notice the maximum fill line. Do not try to overload the tray - Dell 2230 | User's Guide - Page 58
letterhead, place the top edge of the sheet toward the front of the tray. Load the letterhead with the design placed facedown. 6 Squeeze the width guide tabs on the right guide, and slide the width guides to lightly touch the side of the stack. Loading paper and specialty media 58 - Dell 2230 | User's Guide - Page 59
accommodates up to 150 sheets of A6-size paper, so the width guides slide farther to the center of the tray. Loading the optional 250- or 550-sheet tray Only one optional drawer, which includes either a 250- or 550-sheet tray, may be attached to the printer - Dell 2230 | User's Guide - Page 60
. Using the manual feeder The manual feeder is located inside the manual feeder door of the printer and can feed only one sheet of paper at a time. You can use the manual feeder to quickly print on paper types or sizes that are not currently loaded in the tray. 1 Open the manual feeder door. Loading - Dell 2230 | User's Guide - Page 61
stamp area as shown. 3 Feed paper into the manual feeder only to the point where its leading edge can contact the paper guides. 4 Adjust the paper guides to the paper width. Warning-Potential Damage: Do not force the paper into the feeder. Forcing the paper causes jams. Using the standard exit bin - Dell 2230 | User's Guide - Page 62
menu. To initiate tray linking from a locally connected printer: • On a Windows computer, access the Paper menu through the Local Printer Settings Utility. • On a Macintosh computer, access the Paper menu through the Printer Settings. Unlinking trays Unlinked trays have settings that are not the - Dell 2230 | User's Guide - Page 63
Printer Settings. Then, change the Paper Type and Paper Size settings of the tray so that they do not match the settings of any other tray. Warning-Potential Damage: Do not assign a Paper Type name that does not accurately describe the type of paper loaded in the tray. The temperature of the fuser - Dell 2230 | User's Guide - Page 64
labels designed for laser printers are supported for occasional use. Feed paper into the manual feeder only to the point where its leading edge can contact the paper guides. Do not force the paper into the feeder. Paper characteristics The following paper characteristics affect print quality and - Dell 2230 | User's Guide - Page 65
in the printer fuser • Preprinted papers that require a registration (the precise print location on the page) greater than ±2.3 mm (±0.9 in.), such as optical character recognition (OCR) forms In some cases, registration can be adjusted with a software application to successfully print on these - Dell 2230 | User's Guide - Page 66
) printing, consult your paper supplier. Remember that these are general guidelines only and that paper meeting these guidelines may still cause paper feeding problems in any laser printer (for example, if the paper curls excessively under normal printing conditions). Paper and specialty media guide - Dell 2230 | User's Guide - Page 67
for laser printers are supported for occasional use. It is recommended to print 20 or fewer pages of paper labels a month. Vinyl, pharmacy, and dual-sided labels are not supported. 2 Use envelopes that lie flat when individually placed on a table facedown. Paper and specialty media guide 67 - Dell 2230 | User's Guide - Page 68
sizes supported by the printer Paper size Dimensions Standard Optional 250- 250-sheet tray or 550-sheet tray Manual feeder Duplex path A4 210 x 297 mm (8.3 x 11.7 in.) A5 148 x 210 mm X (5.8 x 8.3 in.) A61 105 x 148 mm X X (4.1 x 5.8 in.) Executive 184 x 267 mm X (7.3 x 10 - Dell 2230 | User's Guide - Page 69
tray Manual feeder Duplex path 10 Envelope 105 x 241 mm X X X (4.1 x 9.5 in.) Other Envelope 229 x 356 mm X X X (9 x 14 in.) 1 A6 is supported only for grain long papers. 2 This size setting formats the page for 216 x 356 mm (8.5 x 14 in.) unless the size is specified by the software - Dell 2230 | User's Guide - Page 70
a printer driver that is compatible with the printer. Note: Installing custom drivers do not replace the system driver. A separate printer object is created and appears in the Printers folder. Operating System: Microsoft® Windows Server 2008 Windows VistaTM Windows XP Windows Server 2003 Windows - Dell 2230 | User's Guide - Page 71
operating system was installed by default. Operating System Software Path Windows Server 2008 D:\Drivers\Print\Win_2kXP\, where D:\ is the letter of your CD-ROM. Windows Vista Windows XP Windows Server 2003 Windows 2000 Note: After selecting the directory containing your printer drivers, you may be - Dell 2230 | User's Guide - Page 72
then click Continue. f Click Install on the Easy Install screen. g Enter the administrator password, and then click OK. The software is installed on the computer. h Quit the installer when it is finished. 2 Open Print Center (10.2) or Printer Setup Utility (10.3+), located in /Applications/Utilities - Dell 2230 | User's Guide - Page 73
Flag Linux, and Linspire. Printer software packages and installation instructions are available on the Drivers and Utilities CD. All the printer software supports local printing using a parallel connection. To launch the installation instructions for Linux: 1 Insert the Drivers and Utilities CD. If - Dell 2230 | User's Guide - Page 74
must use the Drivers and Utilities CD to install these software applications. Note: These software applications are not available with Macintosh®. Status Monitor Center Note: For the local Status Monitor Center to work properly, bidirectional communication support must be in place so the printer and - Dell 2230 | User's Guide - Page 75
a group of saved printer driver settings and other data for such things as: • Print orientation and N-Up (document settings) • Installation status of an output tray (printer options) • User-defined paper sizes (custom papers) • Simple text and watermarks • Overlay references Software Overview 75 - Dell 2230 | User's Guide - Page 76
ΠDell PrintersΠDell 2230d Laser Printer. 2 Click Printer Alert Utility. Installing the Optional XPS Driver The XML Paper Specification (XPS) driver is an optional printer driver designed to make use of the advanced XPS color and graphics features that are only available for Windows Vista users - Dell 2230 | User's Guide - Page 77
desktop icon. You can order toner by phone or from the Web. • If ordering online, launch the Dell Printer Supplies Reorder Application: 1 In Windows Vista (default Start menu): a Click Œ Programs. b Click Dell Printers. c Click Dell 2230d Laser Printer. In Windows XP and 2000: Software Overview 77 - Dell 2230 | User's Guide - Page 78
StartŒ Programs or All ProgramsŒ Dell PrintersŒ Dell 2230d Laser Printer. 2 Click Dell Printer Supplies Reorder Application. The Order Supplies dialog box opens. 3 If Multiple Printers Found launches, select the printer you are ordering the supplies for. 4 Follow the instructions on the screen. • If - Dell 2230 | User's Guide - Page 79
For more information, see "Avoiding jams" on page 97 and "Storing paper" on page 67. Printing a document 1 Load paper into a tray or feeder. 2 From the Paper menu, set the Paper Type and Paper Size based on the paper that is loaded. 3 Do one of the following: For Windows users a With a document open - Dell 2230 | User's Guide - Page 80
Utility for Windows or Printer Settings for Macintosh. One of these utilities installs with the printer software. • For occasional two-sided printing, you can request two-sided printing in the printer software. Do one of the following, depending on your operating system: For Windows users 1 With - Dell 2230 | User's Guide - Page 81
Manual feeder (simplex printing) Preprinted letterhead design is placed faceup. The top edge of the sheet with the logo should enter the manual feeder first. Note: Check with the manufacturer or vendor to determine whether the chosen preprinted letterhead is acceptable for laser printers. Printing - Dell 2230 | User's Guide - Page 82
printing on transparencies: • Feed transparencies from the standard 250-sheet tray or the manual feeder. • Use transparencies designed specifically for laser printers settings in the Paper menu using a local utility. • To prevent print quality problems, avoid getting fingerprints on the - Dell 2230 | User's Guide - Page 83
paper label sheets. Vinyl, pharmacy, and dual-sided labels are not supported. When printing on labels: • Use labels designed specifically for laser printers. , and creasing may significantly affect the print quality and cause jams or other paper handling problems. • Check with the manufacturer or - Dell 2230 | User's Guide - Page 84
settings page to review the current menu settings and to verify that the printer options are installed correctly. To print the menu settings: 1 Ensure that the light is on. 2 Press . The menu settings page prints. On the menu settings page: • Under the Paper Menu, check what papers are listed under - Dell 2230 | User's Guide - Page 85
print job. 2 Wait for the light to appear before re-sending the print job. For Windows users In Windows Vista: 1 Click . 2 Click Control Panel. 3 Click Hardware and Sound. 4 Click Printers. 5 Double-click the printer icon. 6 Select the job to cancel. 7 From the keyboard, press Delete. In Windows XP - Dell 2230 | User's Guide - Page 86
a job to cancel. 3 From the keyboard, press Delete. For Macintosh users In Mac OS X version 10.5: 1 From the Apple menu, choose System Preferences.. 2 Click Print & Fax, and then double-click the printer you are printing to. 3 From the printer window, select the job to cancel. 4 From the icon bar at - Dell 2230 | User's Guide - Page 87
Dell Printers. c Click Dell 2230d Laser Printer. In Windows® XP and 2000: Click StartŒ Programs or All ProgramsŒ Dell PrintersŒ Dell 2230d Laser Printer. 2 Click Dell Printer Supplies Reorder Application. The Order Supplies window opens. 3 Click the link under the Order Online heading. Cleaning - Dell 2230 | User's Guide - Page 88
that will help you conserve toner and paper. If the printer is connected to the computer by a USB or parallel cable, open the Local Printer Settings Utility for Windows or Printer Settings for Macintosh. One of these utilities installs with the printer software. Supply Toner Path to menu item - Dell 2230 | User's Guide - Page 89
multiple times until the print remains faded, and then replace the cartridge. Replacing supplies Replacing the toner cartridge Light sequence Toner is low - On - On When the "Toner is low" light sequence appears or when you experience faded print, remove the toner cartridge. Firmly shake it side - Dell 2230 | User's Guide - Page 90
of time. Extended light exposure can cause print quality problems. 4 Shake the cartridge in all directions to distribute the toner. 5 Install the new toner cartridge by aligning the rollers on the toner cartridge with the arrows on the tracks of the photoconductor kit. Push the toner cartridge in as - Dell 2230 | User's Guide - Page 91
Replacing the photoconductor kit The printer notifies you when the photoconductor kit reaches a page maximum. The printer does this by displaying the "Photoconductor life warning" light sequence or the "Replace photoconductor" light sequence. Light sequences Photoconductor life warning - Blinking - - Dell 2230 | User's Guide - Page 92
button on the base of the photoconductor kit. Pull the toner cartridge up and out using the handle. 4 Unpack the new photoconductor kit. Warning-Potential Damage: Be careful not to touch the photoconductor drum. Doing so may affect the print quality of future print jobs. Maintaining the printer 92 - Dell 2230 | User's Guide - Page 93
the toner cartridge with the tracks. Push the toner cartridge in until it clicks into place. 6 Install the unit into the printer by aligning the arrows on the guides of the unit with the arrows in the printer. Push the unit as far as it will go. 7 After you replace the photoconductor kit, reset the - Dell 2230 | User's Guide - Page 94
these precautions: • Any cart used to move the printer must have a surface able to support the full footprint of the printer. Any cart used to move the options must have a surface able to support the dimensions of the options. • Keep the printer in an upright position. • Avoid severe jarring - Dell 2230 | User's Guide - Page 95
clearance around it as shown. 1 300 mm (12.0 in.) 2 300 mm (12.0 in.) 3 200 mm (8.0 in.) 4 12.7 mm (0.5 in.) 5 300 mm (12.0 in.) Shipping the printer When shipping the printer, use the original packaging or call the place of purchase for a relocation kit. Maintaining the printer 95 - Dell 2230 | User's Guide - Page 96
all printer settings to the factory default settings except the Port menu settings. All downloads stored in RAM are deleted. You can also restore factory default settings using the printer control panel. For instructions, print a printer settings configuration sheet. Administrative support 96 - Dell 2230 | User's Guide - Page 97
signals that the tray may be removed: Load paper - On • Do not load the manual feeder while the printer is printing. Wait for the light to come on. • Push all trays in firmly after loading paper. • Make sure the guides in the trays are properly positioned, and are not pressing too tightly against - Dell 2230 | User's Guide - Page 98
. Inside this door is the unit housing the toner cartridge and photoconductor kit. 2 Standard exit bin 3 Front door 4 Manual feeder door 5 Standard 250-sheet tray (Tray 1) 6 Optional tray (Tray 2) 7 Rear door Understanding jam lights and access locations The following table lists the - Dell 2230 | User's Guide - Page 99
: • Remove Tray 1. • Open the front door, and then remove the photoconductor kit and toner cartridge unit. 201.yy Paper jam - On - On - On Open the front door, and then remove the photoconductor kit and toner cartridge unit. 202.yy Paper jam - On - On - On Open the front door, and then open the - Dell 2230 | User's Guide - Page 100
- Blinking - On Open the front door, and then open the rear door. 233.yy Paper jam - On - Blinking - Blinking - On Try one of the following: • Remove Tray 1. • Open the front door, and then open the rear door. 234.yy Paper jam - On - Blinking - On Try one of the following: • Open the front door, and - Dell 2230 | User's Guide - Page 101
235.yy Paper jam - On - Blinking - Blinking - On Remove the jam from the standard exit bin. 24x.yy Paper jam - On - On - On - On Try one of the following: • Remove Tray 1. • Open the front door, and then remove the photoconductor kit and toner cartridge unit. • Remove Tray 2. Clearing jams 101 - Dell 2230 | User's Guide - Page 102
251.yy Paper jam - On - On - On - On Remove the jam from the manual feeder. Clearing jams behind the photoconductor kit and toner cartridge 1 Push the release button, and then lower the front door. Clearing jams 102 - Dell 2230 | User's Guide - Page 103
and pull the unit containing the photoconductor kit and the toner cartridge out of the printer. Set the unit aside on a flat, clean surface. Warning-Potential Damage: Do not touch the photoconductor on the underside of the photoconductor kit. Use the cartridge handle whenever you are holding the - Dell 2230 | User's Guide - Page 104
from the standard exit bin A paper size that is not supported for duplex printing can jam the standard exit bin. To remove the jam, gently pull the sheet straight out of the standard exit bin. Clearing jams from Tray 1 To see whether paper is jammed in or behind Tray 1, the standard tray: 1 Remove - Dell 2230 | User's Guide - Page 105
2 Remove the jammed paper. 3 If necessary, depress the lever to free the paper and remove the jam. 4 Insert the tray. 5 Press to continue printing. Clearing jams 105 - Dell 2230 | User's Guide - Page 106
Clearing jams from Tray 2 To see whether paper is jammed in or behind Tray 2: 1 Remove Tray 2. 2 Remove the jammed paper. Clearing jams 106 - Dell 2230 | User's Guide - Page 107
the tray. 4 Press to continue printing. Clearing jams in the manual feeder Paper jammed in the manual feeder can usually be grasped and pulled straight out. If the jam cannot be removed this way, check for jammed paper behind the photoconductor kit and toner cartridge unit. For more information, see - Dell 2230 | User's Guide - Page 108
the release button, and then lower the front door. 2 Pull open the rear door. The paper may be jammed with one end caught in the standard exit bin. CAUTION-HOT SURFACE: The inside of the printer might be hot. To reduce the risk of injury from a hot component, allow the surface to cool - Dell 2230 | User's Guide - Page 109
3 Remove the jammed paper. 4 Close both the front and rear doors. 5 Press to continue printing. Clearing jams 109 - Dell 2230 | User's Guide - Page 110
, print server, or option. • All options are properly installed. • The printer driver settings are correct. Once you have checked each of these possibilities, turn the printer off, wait for about 10 seconds, and then turn the printer back on. This often fixes the problem. Solving printing problems - Dell 2230 | User's Guide - Page 111
in a Windows operating system or the print dialog in a Macintosh operating system. Ensure that the input options settings for Paper Size, Paper Tray, and Paper Type correspond with the paper loaded in the tray. Incorrect characters print Hex Trace mode - Slowly blinking Troubleshooting 111 - Dell 2230 | User's Guide - Page 112
a memory card" on page 34. Solving option problems Option does not operate correctly or quits after it is installed These are possible solutions. Try one or more of the following: RESET THE PRINTER Turn the printer off, wait for about 10 seconds, and then turn the printer on. Troubleshooting 112 - Dell 2230 | User's Guide - Page 113
CORRECTLY 1 Pull the tray completely out. 2 Check for paper jams or misfeeds. 3 Make sure the guides are aligned against the edges of the paper. 4 Insert the tray. RESET THE PRINTER Turn the printer off, wait about 10 seconds, and then turn the printer on. Memory card Make sure the memory card is - Dell 2230 | User's Guide - Page 114
is connected to a computer by a USB or parallel cable, open the Local Printer Settings Utility for Windows or Printer Settings for Macintosh. From the Setup menu, ensure that Jam Recovery is set to Auto or On. Solving print quality problems The information in the following topics may help you solve - Dell 2230 | User's Guide - Page 115
, turn the printer off. Blank pages Try one or more of the following: • Remove and reinstall the toner cartridge. • Remove and reinstall the photoconductor kit. If the printer still prints blank pages, it may need to be serviced. For more information, contact Customer Support. Troubleshooting 115 - Dell 2230 | User's Guide - Page 116
fonts, verify that the fonts are supported by the printer, the host computer, and the software program. Clipped images Try one or more of the following: CHECK THE PAPER GUIDES Move the guides in the tray to the correct positions for the paper size loaded. CHECK THE PAPER SIZE SETTING Ensure that the - Dell 2230 | User's Guide - Page 117
Replacing the photoconductor kit" on page 91. CHECK THE PAPER SIZE AND PAPER TYPE SETTINGS If the printer is connected to a computer by a USB or parallel cable, open the Local Printer Settings Utility for Windows or Printer Settings for Macintosh. From the Paper menu, change the paper size and paper - Dell 2230 | User's Guide - Page 118
PAPER TYPE SETTING Ensure that the Paper Type setting matches the paper loaded in the tray. THE TONER CARTRIDGE MAY BE DEFECTIVE Replace the toner cartridge. For more information, see "Replacing the toner cartridge" on page 89. Print is too light Try one or more of the following: Troubleshooting - Dell 2230 | User's Guide - Page 119
. Toner fog or background shading appears on the page Try one or more of the following: THE TONER CARTRIDGE MAY BE DEFECTIVE Replace the toner cartridge. For more information, see "Replacing the toner cartridge" on page 89. THERE IS TONER IN THE PAPER PATH Contact Customer Support. Troubleshooting - Dell 2230 | User's Guide - Page 120
Try one or more of the following: THE TONER CARTRIDGE MAY BE DEFECTIVE Replace the toner cartridge. For more information, see "Replacing the toner cartridge" on page 89. THERE IS TONER IN THE PAPER PATH Contact Customer Support. Transparency print quality is poor CHECK THE TRANSPARENCIES Use only - Dell 2230 | User's Guide - Page 121
Replace the toner cartridge. For more information, see "Replacing the toner cartridge" on page 89. ENSURE THAT THE PAPER PATH IS CLEAR Paper could be caught between the photoconductor kit and the fuser. Check the paper path around the fuser area. CAUTION-HOT SURFACE: The inside of the printer - Dell 2230 | User's Guide - Page 122
THE TONER CARTRIDGE IS DEFECTIVE Replace the toner cartridge. For more information, see "Replacing the toner cartridge" on page 89. ENSURE THAT THE PAPER PATH IS CLEAR Paper could be caught between the photoconductor kit and the fuser. Check the paper path around the fuser area. Warning-Potential - Dell 2230 | User's Guide - Page 123
THE TONER CARTRIDGE MAY BE DEFECTIVE OR LOW ON TONER Replace the used toner cartridge with a new one. For more information, see "Replacing the toner cartridge" on page 89. Troubleshooting 123 - Dell 2230 | User's Guide - Page 124
in the troubleshooting process and provides for restoration of the Operating System, application software and hardware drivers to the original default configuration as shipped from Dell, as well as the verification of appropriate functionality of the printer and all Dell-installed hardware. In - Dell 2230 | User's Guide - Page 125
Warranty and Return Policy Dell Inc. ("Dell") manufactures its hardware products from parts and components that are new or equivalent to new in accordance with industry-standard practices. For information about the Dell warranty for your printer, refer to the Product Information Guide. Appendix 125 - Dell 2230 | User's Guide - Page 126
Mac OS X, for USB printing 72 installing software Local Printer Settings Utility 74 J jam light sequences 98 messages 98 jam recovery setting 80 jams accessing jam areas 98 avoiding 97 jams, clearing 200 102, 104 201 102, 104 233 106 behind photoconductor kit and toner cartridge unit 102 behind the - Dell 2230 | User's Guide - Page 127
paper jams, clearing 200 102, 104 201 102, 104 233 106 behind photoconductor kit and toner cartridge unit 102 behind the rear door 108 from manual feeder 107 from standard exit bin 104 from standard tray 104 from Tray 1 104 from Tray 2 106 Paper Loading menu 20 paper sizes supported by the printer - Dell 2230 | User's Guide - Page 128
replacing photoconductor kit 91 toner cartridge 89 reprint page after paper jam 80 S safety information 9 separator sheet setting Finishing menu 32 setting paper size 55 paper type 55 Universal Paper Size 55 Setup menu 26 shipping the printer 95 Size/Type menu 16 software Driver Profiler 75 printer
-
 1
1 -
 2
2 -
 3
3 -
 4
4 -
 5
5 -
 6
6 -
 7
7 -
8
-
9
-
10
-
11
-
12
-
13
-
14
-
15
-
16
-
17
-
18
-
19
-
20
-
21
-
22
-
23
-
24
-
25
-
26
-
27
-
28
-
29
-
30
-
31
-
32
-
33
-
34
-
35
-
36
-
37
-
38
-
39
-
40
-
41
-
42
-
43
-
44
-
45
-
46
-
47
-
48
-
49
-
50
-
51
-
52
-
53
-
54
-
55
-
56
-
57
-
58
-
59
-
60
-
61
-
62
-
63
-
64
-
65
-
66
-
67
-
68
-
69
-
70
-
71
-
72
-
73
-
74
-
75
-
76
-
77
-
78
-
79
-
80
-
81
-
82
-
83
-
84
-
85
-
86
-
87
-
88
-
89
-
90
-
91
-
92
-
93
-
94
-
95
-
96
-
97
-
98
-
99
-
100
-
101
-
102
-
103
-
104
-
105
-
106
-
107
-
108
-
109
-
110
-
111
-
112
-
113
-
114
-
115
-
116
-
117
-
118
-
119
-
120
-
121
-
122
-
123
-
124
-
125
-
126
-
127
-
128
 |
 |

Dell 2230d Laser Printer
User's Guide
November 2008
www.dell.com | support.dell.com